Ultimate Creamy Chocolate Fudge (4 Pound Batch)
Craving the best 4 pound of fudge? My classic chocolate fudge recipe is super easy to make and perfect for gifting or satisfying your sweet tooth. Try it today!

- A Delectable Journey into Chocolate Fudge
- Your Ultimate Essential Ingredients Guide to Fudge
- The Art of Professional Cooking: Mastering Classic Fudge
- Pro Tips & Secrets for Your Fudge Game
- Perfect Presentation for Your Fudgy Creation
- Storage & Make-Ahead: Keepin’ it Fresh
- Creative Variations to Spice It Up
- Complete Nutrition Guide: Keeping It Real
- Wrapping It Up
- Frequently Asked Questions
- Recipe Card
A Delectable Journey into Chocolate Fudge
Have you ever found yourself wandering into the realms of rich chocolate desserts , daydreaming about that dose of sweet nostalgia? oh my gosh, i can’t be the only one! let me take you back to my childhood where the aroma of freshly made homemade fudge filled the air during family gatherings.
That first bite of creamy goodness is one i still chase! speaking of which, i’m about to share my ultimate guide to making 4 pound of fudge: best classic chocolate fudge recipe .
Trust me, this recipe will sweep you off your feet!
A Taste of Tradition
You might be wondering: where did fudge even come from? well, my friend, it has a surprising history! fudge actually emerged in the united states in the late 19th century.
It became all the rage as people started sharing their favorite confectionery recipes . nowadays, fudge is considered a staple in many households, especially around holidays.
It’s perfect for those sweet treats that make gatherings a little more special.
Now, let's chat about the nitty-gritty. this easy fudge recipe clocks in at around 1 hour and 5 minutes total, including preparation and cooking time.
It’s quite basic, so don’t worry if you’re not a seasoned chef! the best part? you're looking at a hefty yield of about 100 small pieces ! that should easily satisfy your craving or wow your guests at any party!
Why Fudge is a Must-Try
So, what’s the big deal about this classic fudge recipe? first off, if you’re on the hunt for a rich chocolate dessert , this one checks all the boxes.
It’s loaded with flavor and oh-so-creamy—like a warm hug for your taste buds!
Health-wise, well... let's be real, it's a treat! but there’s something satisfying about knowing you’ve made buttery fudge at home.
Plus, with its rich cocoa content, you can indulge without guilt, right? let’s just say it’s not the worst thing for your sweet tooth .
When it comes to occasions, this fudge is a crowd-pleaser! perfect for holiday treats, parties, or just to keep around the house for those late-night cravings.
To top it off, it makes for awesome gifts from the kitchen . just imagine the smiles on friends’ faces when you hand them a cute box filled with luscious fudge variations !
A Few Kitchen Tips
As with most cooking techniques, a couple of handy tips can make your fudge experience smoother. first, using a candy thermometer is super helpful to reach that perfect soft-ball stage (think 234° f to 240° f ).
Or if you're feeling basic, there’s always the cold water test. just drop a spoonful of the mixture into cold water and see if it forms a nice soft ball!
Also, take care while chilling your fudge! a gradual cool down at room temperature helps maintain that velvety texture. and remember, it’s best stored in an airtight container at room temperature, but you can pop it in the fridge for a longer shelf life.
Ready to look into In?
If you're drooling at the thought of this creamy chocolate fudge , hang tight—because we’re just getting started! the ingredient list is simple and you probably have most of the essentials in your pantry already (hello, fudge with chocolate chips !).
Next, i’ll lay out what you’ll need to whip up this amazing treat; so let’s gather those ingredients and get ready to create some magic in the kitchen!
Your Ultimate Essential Ingredients Guide to Fudge
Alright, my fellow sweet treat ensoiasts! today, we’re diving deep into the essential ingredients you need to whip up one of the most delightful desserts ever: 4 pound of fudge: best classic chocolate fudge recipe .
Seriously, this creamy chocolate fudge is gonna knock your socks off.
Premium Core Components
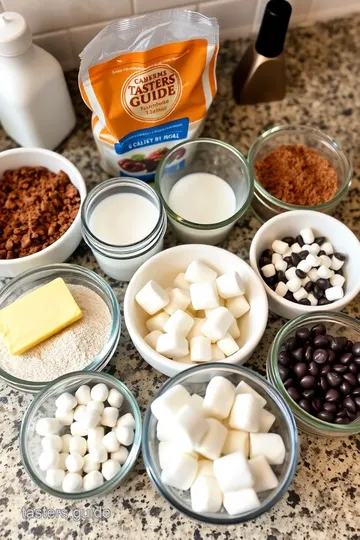
Let’s kick things off with the premium core components . It starts with knowing your measurements . You need:
- 4 cups (900g) granulated sugar
- 1 cup (240ml) heavy cream
- 1 cup (225g) unsalted butter
- 2 cups (340g) semi-sweet chocolate chips
- 1 teaspoon (5ml) vanilla extract
- 1/2 teaspoon (2.5g) salt
This recipe keeps it simple but oh-so-sweet! when you’re picking these ingredients, check for quality. look for high-fat heavy cream and real butter (not margarine, please!).
The chocolate chips should be semi-sweet. they need to make your fudge super rich and luscious.
Signature Seasoning Blend
Now, let's jazz this fudge up! when it comes to signature seasoning blends , consider adding some flair. you can toss in a teaspoon of vanilla extract —trust me, it makes a world of difference.
If you’re feeling adventurous, throw in some sea salt. it balances out that sweetness and gives your fudge an incredible depth of flavor.
Smart Substitutions
Okay, so what if you’re out of an ingredient? no worries! there are smart substitutions for every situation. if you’re short on heavy cream, evaporated milk can work in a pinch—though it changes the texture a bit.
Looking for dietary modifications ? try swapping granulated sugar for coconut sugar to keep it a tad more natural.
And hey, if you’re in a pinch for chocolate chips, feel free to use chopped chocolate bars . they melt beautifully, promise! the beauty of fudge is you can get a bit creative.
Just think of what you have on hand and how you can mix it up!
Kitchen Equipment Essentials
Moving on to the must-have tools . you don’t need much, but what you do need is essential. grab a heavy-bottomed saucepan ; this bad boy will help prevent burning your fudge.
A wooden spoon or a heat-resistant spatula is also key for stirring.
If you want to get fancy, use a candy thermometer . it can help you nail that perfect soft-ball stage (that’s about 234° f to 240° f / 112° c to 115° c for you science buffs).
With these simple tools, you’ll feel like a pro whipping up your homemade fudge !
Freshness Tips and Storage Guidelines
Now, let's chat about storage guidelines and freshness tips . it’s crucial to keep your fudge fresh. store it in an airtight container at room temperature if you plan to devour it within a couple of weeks.
For longer shelf-life, throw that fudge in the fridge. just remember, letting it come to room temperature before serving makes it perfectly soft fudge and melt-in-your-mouth heavenly!
Wrapping it Up
Alright, my sweet tooth friends, there you have it! with these essential ingredients and tips, you’re ready to tackle the best fudge recipe ever.
Whether you're whipping it up for a special occasion or just as a mid-week treat, you'll find that this classic fudge recipe is a hit every time.
Stay tuned because next, I'm gonna share step-by-step instructions on how to bring this delicious fudge to life! Let’s get cooking and make some magical holiday treats or even gifts from the kitchen ! You won't want to miss it!
The Art of Professional Cooking: Mastering Classic Fudge
You know, there's something magical about making homemade treats, especially when chocolate is involved! today, let's dive into the world of fudge, particularly the 4 pound of fudge: best classic chocolate fudge recipe.
This isn’t just any recipe; it’s creamy, rich, and the kind of thing that makes everyone smile. you can whip this up for holiday treats, gifts from the kitchen, or just because you’re craving something sweet.
Essential Preparation Steps
Before we dive into making this easy fudge recipe , let’s talk about some essential preparation steps. These will help you cook like a pro, even if you're just starting.
Mise en place: this fancy phrase just means having everything ready before you start. chop your nuts, measure your chocolate chips, and get your ingredients all lined up.
Having everything prepared saves time and keeps you from scrambling around the kitchen mid-cook!
Time management tips: try to give yourself about 15 minutes to gather and measure your ingredients. this will make the cooking process smoother, allowing you to focus on getting that perfect soft-ball stage.
Organization Strategies: Keep your work area tidy. A clutter-free space, like your mind, helps you focus. You don’t want melted chocolate flying everywhere when you’re juggling pots and pans!
Safety considerations: when working with sugar and heat, remember: things can get hot! always be careful with boiling mixtures and keep pot holders handy.
A pastry chef once told me, “respect the heat, and it’ll respect you back!”
Step-by-Step Process
Okay, let’s get into the cooking! Here’s a straightforward guide with numbered instructions to make your life easier.
-
Prepare the Baking Dish: Line a 9x13-inch dish with parchment paper. Leave an overhang for easy removal later.
-
Combine Ingredients: In a heavy-bottomed saucepan, add 4 cups of sugar, 1 cup of heavy cream, and 1 cup of unsalted butter. Stir until combined.
-
Cook the mixture: heat this mix over medium heat, stirring constantly until it boils. here’s the tricky part: let it boil without stirring until it hits 234° f to 240° f ( 112° c to 115° c).
this is the magical soft-ball stage. use a candy thermometer if you’ve got one—it’s a great tool for this!
-
Add Chocolate: Once you’ve reached the right temperature, take it off the heat. Stir in 2 cups of chocolate chips, 1 tsp vanilla extract, and ½ tsp salt until smooth.
-
Pour It Out: Quickly pour the fudge mix into your prepared dish. Smooth the top with a spatula, and watch your delicious creation form!
-
Chill Out: Let it cool for about 30 minutes at room temperature. Then, throw it in the fridge until it’s set, which takes around 2 hours.
-
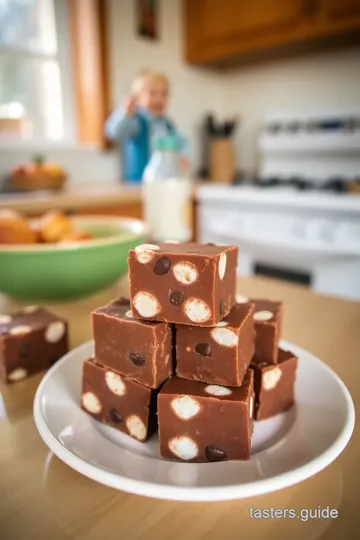
Cut and Serve: Once set, lift the fudge out using the parchment. Cut into squares, and get ready to wow your friends!
Expert Techniques
Now that you know how to whip up this classic fudge recipe, let’s sprinkle in some expert techniques to take it to the next level.
Use a Candy Thermometer: It’s your best friend when dealing with sugary concoctions. Getting the temperature right is crucial.
Be Gentle When Stirring: Once you add chocolate, stir slowly. Too much air can make the fudge grainy. Nobody wants a gritty fudge!
Quality Checkpoints: Taste a little (if you can resist!) after adding chocolate. It should be rich and creamy.
Troubleshooting: If it doesn’t set right or if it’s too soft, just remelt it briefly and try again! You can salvage that fudge, I promise.
Success Strategies
Let’s wrap this up with some success strategies to ensure you nail this recipe every time.
Common Mistakes: Don’t rush the boiling stage. Cutting corners can lead to a sad, soupy fudge!
Quality Assurance Tips: Use high-quality chocolate chips for that rich chocolate flavor. Trust me; it makes all the difference.
Perfect Results Guide: Always cool the fudge gradually. Too fast can ruin that delightful creamy texture.
Make-ahead options: you can make fudge ahead of time and store it! keep it in an airtight container at room temperature for up to two weeks.
Our cousin makes it for all her party desserts—it’s a real crowd-pleaser!
You’re well on your way to making the best classic fudge ever. Stay tuned for Additional Information where we’ll explore fudge variations, toppings, and more sweet ideas to satisfy that sweet tooth! Happy cooking, friends!
Pro Tips & Secrets for Your Fudge Game
Alright, my friends, let’s dive into some pro tips and tricks that’ll elevate your 4 pound of fudge: best classic chocolate fudge recipe to heavenly levels.
First off, when you’re working with sugar and cream, keep an eye on that candy thermometer! you want it to hit that sweet soft-ball stage between 234° f to 240° f .
This step is super crucial if you want that rich, creamy texture that makes homemade fudge a crowd-pleaser.
When i first started making fudge, i didn’t think it mattered much how you cooked it. but trust me, if you start stirring too late, or overcook it even a bit, you’re in for a grainy treat.
And nobody wants that! use a heavy-bottomed saucepan for even heat distribution, and make sure to stir gently but thoroughly when adding in your chocolate chips.
Too much air, and you might end up with something that resembles concrete instead of delicious fudge!
Perfect Presentation for Your Fudgy Creation
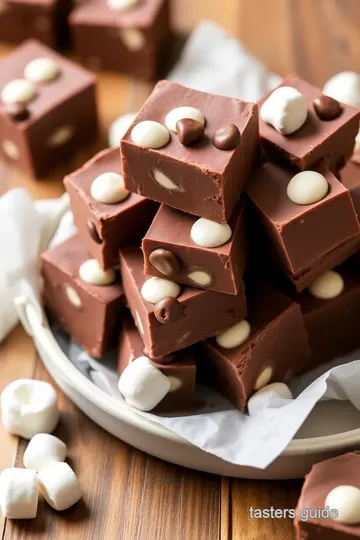
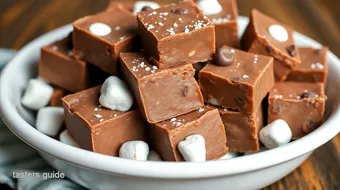
Now, let’s talk about presentation because we eat with our eyes first, right? after you cool your fudge in that 9x13-inch baking dish , remove it with the parchment paper overhang, and slice it into cute little squares or rectangles.
You can get fancy with plating by stacking a few pieces and drizzling some chocolate sauce over them.
For a fun touch, try adding some garnish ideas, like a sprinkle of sea salt on top. the salty-sweet combo will knock your socks off! you can also toss on some chopped nuts or colorful holiday-themed sprinkles if you’re making these for gifts or a party.
Trust me, little pops of color go a long way in making your classic fudge recipe look extra tempting.
Storage & Make-Ahead: Keepin’ it Fresh
Let’s be real, making easy fudge recipes is fun, but you might not eat it all in one sitting. so knowing how to store it properly is key! you can keep your fudge in an airtight container at room temperature for up to two weeks , but if you're like me and want it to last longer, just pop it in the fridge.
When you want to serve fudge later, simply let it come back to room temperature. if you find that it’s become a tad too cold, just let it sit out for a bit.
I’ve actually made this fudge days ahead for holiday treats, and it stays creamy if you store it correctly.
Creative Variations to Spice It Up
Got a flavor craving? don’t be scared to get your creativity on! you can easily adapt this fudge recipe to include different flavors.
Ever tried mint chocolate fudge ? just add a splash of peppermint extract, and you have a holiday favorite. or toss in a cup of smooth peanut butter for a buttery fudge twist that’ll have you dreaming of peanut butter cups.
You can even mix seasonal ingredients! fresh cranberries or orange zest make for a fun seasonal twist as well. honestly, it’s one of those candy recipes that’s ridiculously easy to modify; you can adjust it to fit your mood or what’s in your pantry.
Complete Nutrition Guide: Keeping It Real
Let’s chat about the nutrition side for a minute. for each piece of this rich chocolate dessert, you're looking at about 160 calories .
Not terrible for a treat, right? plus, when you use high-quality chocolate, you're adding antioxidants to your diet. just remember, moderation is key, especially with a satisfying sweet tooth in play.
Should you be worried about dietary considerations? if you have allergies, easy swaps could be made—like using dairy-free chocolate chips or even coconut cream instead of heavy cream for a unique fudge flavor.
Wrapping It Up
There you have it, folks! making the best fudge recipe is a breeze when you take the time to learn a few tips and tricks.
Whether you’re using it as gifts from the kitchen or partying it up at a celebration, this fudge is bound to impress.
Just remember to keep it fresh, get creative, and most importantly, enjoy the process of baking with chocolate. trust me, nothing beats the smell of cooking fudge filling your home.
Happy baking!
Frequently Asked Questions
What makes this 4 pound of fudge: Best Classic Chocolate Fudge Recipe unique?
This recipe stands out for its perfect ratio of ingredients, resulting in a creamy texture and rich chocolate flavor. The combination of heavy cream and semi-sweet chocolate chips creates a melt-in-your-mouth experience that is both delightful and indulgent.
Can I add toppings to my 4 pound of fudge: Best Classic Chocolate Fudge Recipe?
Absolutely! You can enhance your fudge by adding chopped nuts, such as walnuts or pecans, or a sprinkle of sea salt for that perfect contrast. These toppings not only add texture but also elevate the flavor profile.
How can I store my fudge for the best freshness?
To keep your fudge fresh, store it in an airtight container at room temperature for up to two weeks. If you want it to last longer, refrigerate it, though remember that this may change the texture slightly. Make sure to separate layers with parchment paper to prevent sticking.
Can I use different types of chocolate in this fudge recipe?
Yes! Feel free to experiment with different types of chocolate chips, such as dark or even white chocolate, to create your desired flavor. Just keep in mind that the sweetness and texture of the fudge may vary based on the type of chocolate you choose.
What happens if my fudge doesn't set properly?
If your fudge doesn't set, it may not have reached the proper soft-ball stage during cooking. You can remedy this by reheating the mixture gently, bringing it back to the correct temperature, and then allowing it to cool again before cutting. Alternatively, melting it down and pouring into a new dish can work as well.
What tips can you give for making the best fudge?
For optimal results, use a candy thermometer to ensure accurate cooking temperatures and avoid overcooking. Additionally, allow fudge to cool gradually at room temperature to maintain a creamy texture. Lastly, when adding chocolate, stir gently to avoid air pockets which can lead to a grainy texture.
Ultimate Creamy Chocolate Fudge (4 Pound Batch) Card
⚖️ Ingredients:
- 4 cups granulated sugar
- 1 cup heavy cream
- 1 cup unsalted butter
- 2 cups semi-sweet chocolate chips
- 1 teaspoon vanilla extract
- 1/2 teaspoon salt
- Chopped nuts (e.g., walnuts or pecans)
- Sea salt for sprinkling
🥄 Instructions:
- Step 1: Line a 9x13-inch baking dish with parchment paper, leaving an overhang for easy removal.
- Step 2: In a heavy-bottomed saucepan, combine granulated sugar, heavy cream, and unsalted butter.
- Step 3: Heat over medium, stirring constantly until the mixture comes to a boil. Once boiling, without stirring, cook until it reaches a soft-ball stage (234°F to 240°F / 112°C to 115°C).
- Step 4: Remove the saucepan from heat. Stir in chocolate chips, vanilla extract, and salt until smooth and fully incorporated.
- Step 5: Quickly pour the fudge mixture into the lined baking dish, smoothing the top with a spatula.
- Step 6: Allow fudge to cool at room temperature for about 30 minutes, then refrigerate until fully set (approximately 2 hours).
- Step 7: Once set, lift fudge from the dish using parchment overhang. Cut into squares or rectangles and serve.
Previous Recipe: A Dozen Assorted Traditional Cookies: Sweet Delights for Every Occasion
Next Recipe: What is Pad Nang Shrimp? Discover 7 Delicious Secrets!