Cheesy Bliss Rolls with Irresistible Honey Butter
Discover the joy of baking cheesy rolls with honey butter delicious! Warm, fluffy, and oh-so-satisfying, these rolls are perfect for any meal or snack.

- look into Into Deliciousness: Bake Cheesy Rolls with Honey Butter Delicious
- What's This Recipe All About?
- The Sweet Perks of These Rolls
- Now, Let's Gather Our Ingredients
- Your Go-To Guide for Essential Ingredients
- Mastering the Art of Professional Cooking
- Pro Tips & Secrets to Perfect Cheesy Rolls
- Perfect Presentation: Make 'Em Shine
- Storage & Make-Ahead Tips: Keep It Fresh
- Creative Variations: Spice It Up
- Complete Nutrition Guide: Feel Good About It
- Expert FAQ Solutions: Simplifying Your Questions
- Recipe Card
look into Into Deliciousness: Bake Cheesy Rolls with Honey Butter Delicious
Oh my gosh! there’s nothing quite like the smell of freshly baked bread wafting through your home. seriously, it’s like a warm hug for your senses! i remember the first time i made cheesy bread rolls with my grandma.
We spent a rainy afternoon in her cozy kitchen, laughing and sneaking bites of gooey cheese as we shaped the dough.
Baking has a special way of bringing people together, doesn’t it?
When you decide to bake cheesy rolls with honey butter delicious , you’re not just cooking—you’re creating something special. it's these little moments that remind me why i love cooking and sharing recipes with you all.
And trust me, once you sink your teeth into these soft dinner rolls, you’ll be just as hooked!
What's This Recipe All About?
Now, let’s get into the nitty-gritty of what makes these rolls so darn good! originating from traditional bread-making practices, these warm cheese rolls have become a staple in homes across america.
Today, they sit comfortably in the spotlight of comfort food recipes. they’re not just a treat for the munchies; they're perfect for any occasion—be it a family dinner or a cozy night in.
Here's the lowdown: the entire process takes about 1 hour and 45 minutes from start to finish. you’ve got 20 minutes of active prep, a 1-hour rise (grab a snack during this part!), and then around 20- 25 minutes baking.
Plus, these fluffy bread rolls yield about 12 rolls , which is just enough to share… or keep all to yourself (no judgment here!).
Cost-wise, you’re looking at a budget-friendly delight. most ingredients are pantry staples, and the overall yield makes it well worth your time.
Think of it as an investment for your stomach and your heart!
The Sweet Perks of These Rolls
Let’s talk about why you'll fall head over heels for these cheesy delights.
Health-wise , these rolls offer a nice balance thanks to the simple ingredients. you get a solid snack that’s filling without feeling like you’ve overindulged.
And hey, if you want to feel fancy, you can easily whip up a dairy-free roll option or toss in some herbs and spices to elevate the flavor profile!
They’re also perfect for special occasions. whether you're hosting a holiday gathering or just want to impress your friends at a bbq, these rolls are a crowd-pleaser .
Pair them with your favorite soups , or serve them at a party as appetizer rolls —you know they won’t last long!
With options for cheesy roll variations , you can customize to your liking. want to add some jalapeño for a kick? go for it! wanna keep it classic with a cheddar blend? absolutely.
The world is your cheesy oyster!
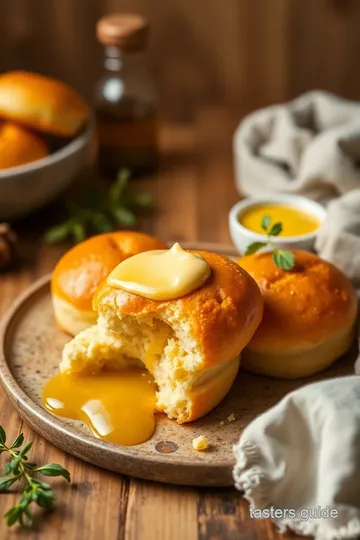
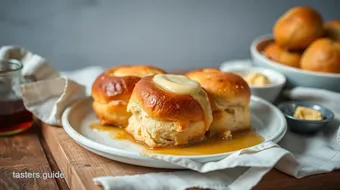
And don't get me started on that honey butter glaze . it takes these rolls over the top. the sweet and savory combo is like a match made in heaven.
Brush it on fresh from the oven, and just watch your family (or even yourself!) swoon over the buttery goodness.
Now, Let's Gather Our Ingredients
Ready to get started? You’ll need some simple ingredients for cheese rolls that you probably have on hand. Think flour, yeast, milk—easy stuff!
It’s like the perfect excuse to gather your friends or family around the kitchen for some good old-fashioned baking fun. (Seriously, it’s a fantastic way to spend quality time together!)
So, whether you’re a baking novice or a seasoned pro, or even if you’ve had a rough day and just want to treat your taste buds—these rolls are calling your name! Grab your mixing bowls and let’s dive into the deliciousness of Bake Cheesy Rolls with Honey Butter Delicious —you’ll thank me later!
Your Go-To Guide for Essential Ingredients
Alright, friends! let’s dive into the world of essential ingredients you’ll want to keep in your kitchen for your baking adventures.
Whether you’re hoping to whip up those cheesy bread rolls or just looking for quality staples for everyday cooking, i've got you covered!
Premium Core Components
First up – measurements . you’ll want to know specifics like 3 cups (360g) of flour or 1 cup (240ml) of warm milk.
And hey, speaking of milk, always check the quality! freshness is key, so make sure your items aren’t close to their expiration dates.
Store your dry ingredients in cool, dry places , and keep that opened milk in the fridge where it belongs.
Trust me, no one wants sour milk in their homemade bread recipe .
As for herbs and spices, they can lose their kick over time. So, look for vibrant colors and strong aromas. For example, if your garlic powder smells like… nothing, toss it!
Signature Seasoning Blend
You can’t forget the seasoning , folks! this is where you can let your creativity shine. think about those essential spice combos – like salt and pepper, but don’t be afraid to mix it up.
Add in herb selections like rosemary or thyme to amp up the flavors in your comfort food recipes .
Now, for those of you curious about regional flavors or vibe, southern comfort might scream for cayenne, while a mexican flair could use cumin and oregano.
The world’s your oyster, but remember, a little goes a long way!
Smart Substitutions
Oh no, you’re missing an ingredient? don’t stress. we all have those moments—it's practically a rite of passage in the kitchen! common substitutes can save your bacon.
No buttermilk? try mixing milk with a little vinegar and let it sit for 10 minutes. or, if you're out of cheese for those cheesy roll variations , grab some mashed potatoes instead! they’ll create a creamy-filled center that still brings the comfort.
Plus, for dietary needs, there are so many dairy-free options available. soy, almond, and oat milk can replace regular milk without missing a beat.
Just make sure your substitutions won’t throw off the recipe too drastically.
Kitchen Equipment Essentials
Now, let’s talk gear. if you want to get serious about your baking, you need some basic tools. a good mixing bowl and a wooden spoon are must-haves! and hey, don’t stress about fancy equipment.
You can often make do with whatever you’ve got at home.
I remember the first time i baked bread; i didn’t have a fancy bread maker, just a pot and some elbow grease! if you're looking for easy baking recipes , a good, sturdy baking sheet and parchment paper will usually do the trick.
Figuring out how to rise dough properly can elevate your baking with young children experience too.
Let’s not forget storage—these rolls can be tempting! once they cool, snatch up any leftovers and pop ‘em in an airtight container.
They’ll last about two days… but honestly, who can resist warm honey butter glaze brushed over those fluffy bread rolls for that long?
When you’re ready to have a go at it, let’s get in to the instructions for how to bake Cheesy Rolls with Honey Butter Delicious ! Trust me; your family will thank you for these delicious roll toppings !
Mastering the Art of Professional Cooking
Alright, friends! let’s dive into the wonderful world of professional cooking methods . whether you’re a kitchen newbie or looking to step up your cooking game, understanding these foundational steps is key.
Grab your apron, and let’s get rolling!
Essential Preparation Steps
First off, you’ve probably heard the fancy french term mise en place . it basically means “everything in its place.” trust me, this will save you so much stress! before you even think about heating the oven, gather all your ingredients for your cheesy bread rolls.
Pre-measure those 3 cups (360g) of flour , and have your cheese ready to go. organizing everything helps create smooth sailing through your cooking adventure.
Now, let’s talk time management tips . place a timer on specific steps, like the 20- 25 minutes bake time .
You don’t want to lose track of those gorgeous rolls turning golden brown! keep an eye on the clock and make notes about any side tasks you can do while waiting.
You could prep a fresh salad or start on that delightful honey butter glaze!
Safety is huge, too. Always have your cutting board secure, and keep your work area tidy. Clean as you go, and never forget to wash your hands! Simple, but it keeps your cooking environment healthy and safe!
Step-by-Step Process
Alright, friends, let’s break it down with some clear numbered instructions . Here’s how you can whip these cheesy rolls right in your kitchen:
- Mix the yeast : Combine your warm milk (110° F or 43° C ) with yeast and let it bubble up for about 5 minutes .
- Make the dough : Toss in melted butter, sugar, salt, and an egg. Mix it all together until it's smooth.
- Knead it up : Add flour gradually, kneading for about 8- 10 minutes until you get a soft, smooth dough.
Watch those dough balls rise to double the size during the first rise, about 1 hour . when shaping, remember to use visual cues; the rolls should feel pillowy and soft in your hands.
For baking, preheat your oven to 375° f ( 190° c) . this ensures the perfect chewy outside and soft, gooey inside!
Expert Techniques
Alright, folks, let’s get into some pro tips here! always taste as you go. you want to make sure your cheesy filling is just right.
If you're feeling adventurous, try mixing in some herbs—that’s seriously a game-changer.
Quality checkpoints are also a must. When those rolls are in the oven, peek through the oven door, but don’t open it too often! If they’re golden and fluffy, you’re golden and fluffy too!
And hey, if your dough isn’t rising properly, don’t panic! maybe the yeast is old, or the milk was too hot.
Remember, how to rise dough properly is key. it’ll take practice, but you got this!
Success Strategies
Now, let’s tackle common mistakes to avoid. overworking the dough can lead to tough rolls. mix until combined and then let it do its thing.
And don’t skip the honey butter brush at the end, folks! this honey butter glaze gives your rolls that sticky, sweet finish they crave.
For those wanting to prep ahead, these rolls freeze like a dream! shape them, freeze before the second rise, and you can pull them out later for a quick pull-apart snack.
Perfect for family-friendly meals or last-minute gatherings!
Did you know these fluffy bread rolls also make exquisite appetizer rolls ? Serve them warm with a little cinnamon honey butter for that sweet-savory contrast! Seriously, everyone will be begging for the recipe!
As we wrap this up, remember that cooking is all about enjoying the journey, not just the destination. the next time you think about making those bake cheesy rolls with honey butter delicious , keep in mind all these pro tips.
They’ll elevate your home cooking game and fill your kitchen with warmth, comfort, and maybe a bit of cheese-drenched joy!
Next up, let’s explore some Additional Information about gourmet roll variations!
Pro Tips & Secrets to Perfect Cheesy Rolls
Oh my gosh, if there's one thing that can crank up those bake cheesy rolls with honey butter delicious vibes, it’s a few solid tips from yours truly! when it comes to crafting the ultimate cheesy bread rolls , there’s magic in the details.
Here's the inside scoop:
First off, let’s chat about time-saving techniques . if you’re short on time but still want that from-scratch experience, consider using a bread machine .
Just toss in your ingredients and let it do the heavy lifting. honestly, it’s like having a little kitchen miracle worker!
Now, let's talk flavor enhancement . want to elevate those warm cheese rolls? mix in some garlic powder or dried herbs like oregano right into your dough.
You won't believe the flavor explosion! trust me; it’ll turn your homemade bread recipe into gourmet rolls at home.
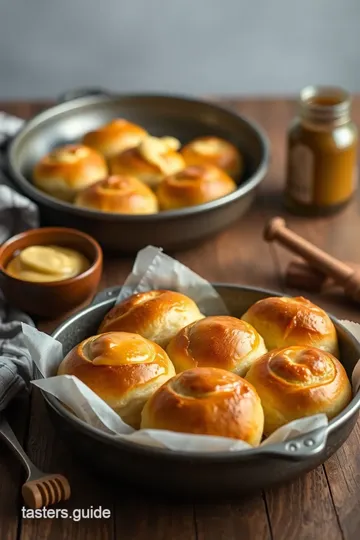
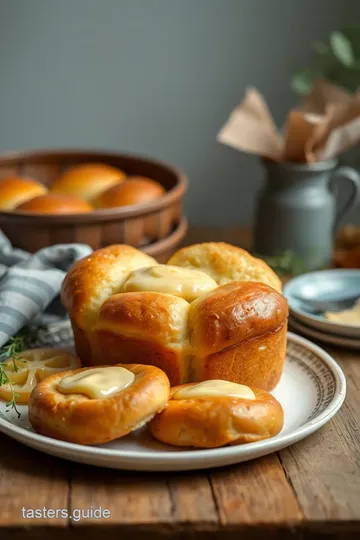
And when it comes to presentation , don’t just stop at the rolls being delish. you can jazz them up for your dinner table! use a clean white plate to really make those golden buns pop, and drizzle that honey butter glaze over the top right before serving.
It'll look like you’ve got some fancy bakery skills—your guests won't know the difference!
Perfect Presentation: Make 'Em Shine
You want these rolls to capture attention before anyone takes a bite. first thing’s first, your plating technique is key.
Arrange the rolls in a circle on a platter, maybe even sprinkle some fresh thyme leaves for that gorgeous green contrast.
Let’s not forget about garnish ideas . a light dusting of parsley or a drizzle of melted butter adds a gourmet touch.
Color combinations matter too; balance those golden brown rolls with some deep greens—think of a fresh salad beside them for that visual appeal.
Storage & Make-Ahead Tips: Keep It Fresh
So, you made a batch, and now you’ve got leftovers (if you’re lucky!). these suckers can be stored in an airtight container at room temperature for about two days—if they last that long! if you want to keep them longer, you can freeze them.
Just remember to wrap them tightly. when you're ready to eat, thaw them overnight in the fridge and reheat gently in the oven for that fresh-baked feel.
Creative Variations: Spice It Up
Now, don’t fret if you’re not a cheese lover or you’re looking for something new! you can totally switch these rolls up.
For a little kick, try spicy cheese rolls with jalapeños mixed in, or for something sweet, change it up by omitting the cheese for cinnamon honey butter rolls .
Honestly, it’s a game changer!
If you’re cooking for those with dietary restrictions, try substituting with dairy-free roll options . swap out the cheese and butter with plant-based alternatives.
With the right touches, everyone can enjoy these fluffy bread rolls.
Complete Nutrition Guide: Feel Good About It
And here’s the cherry on top: let’s break down the nutrition. each roll is about 220 calories , packing around 6g protein .
They’re not just comfort food; they can fit into your meal plans nicely. if you’re watching servings, these rolls make for the perfect side dish for soups or salads, and they’re great for light lunch ideas.
Expert FAQ Solutions: Simplifying Your Questions
Got questions? Totally understandable! If you’re wondering about dough rising, remember a warm environment helps. A sunny kitchen spot is ideal—sometimes I just set my bowl next to a warm oven.
And for those who get a little nervous trying new recipes—just know that your first attempt might not look like pinterest perfection.
But hey, as long as you followed the process, you’re golden! just keep practicing, and before you know it, you’ll be slinging out batch after batch of these easy baking recipes like a pro!
In conclusion, whether you whip up these appetizer rolls as a cozy night in with the fam or for a festive gathering, they never disappoint.
Infusing a little creativity, flavor, and comforting warmth into these rolls not only satisfies your cravings but also makes cooking fun! i promise, once you’ve tried to bake cheesy rolls with honey butter delicious , you’ll be making them again and again.
They’re just that perfect! now go on, get baking, and let those lovely aromas fill your home!
Cheesy Bliss Rolls with Irresistible Honey Butter Card
⚖️ Ingredients:
- 3 cups (360g) all-purpose flour
- 2 tablespoons (25g) granulated sugar
- 1 teaspoon (5g) salt
- 2 ¼ teaspoons (7g) active dry yeast
- 1 cup (240ml) warm milk (110°F or 43°C)
- 2 tablespoons (28g) unsalted butter, melted
- 1 large egg
- 1 cup (100g) shredded cheese (cheddar, mozzarella, or a blend)
- ¼ cup (57g) unsalted butter, softened
- 2 tablespoons (30ml) honey
- ½ teaspoon (2g) ground cinnamon (optional)
🥄 Instructions:
- Step 1: In a warm bowl, combine warm milk and yeast; let it sit for 5 minutes until foamy.
- Step 2: Add melted butter, sugar, egg, and salt; whisk until smooth.
- Step 3: Gradually add flour, stirring until a rough dough forms.
- Step 4: Knead for 8-10 minutes on a floured surface until smooth.
- Step 5: Place dough in a greased bowl; cover with a towel or plastic wrap.
- Step 6: Let rise in a warm place for 1 hour or until doubled in size.
- Step 7: Punch down the risen dough and turn it onto a floured surface.
- Step 8: Divide into 12 equal pieces; flatten each piece, and place 1 tablespoon of cheese in the center.
- Step 9: Fold the dough over the cheese and pinch to seal; shape into a ball.
- Step 10: Place rolls on a lined baking sheet; cover and let rise for another 30 minutes.
- Step 11: Preheat oven to 375°F (190°C).
- Step 12: Bake for 20-25 minutes, until golden brown.
- Step 13: In a bowl, mix softened butter, honey, and cinnamon until combined.
- Step 14: Brush warm rolls with honey butter before serving.
Previous Recipe: Easy Bake Nutella Cookies - Quick & Simple Treats for Everyone
Next Recipe: My Easy Microwave Red Velvet Cake with Frosting: 15-Minute Sweetness