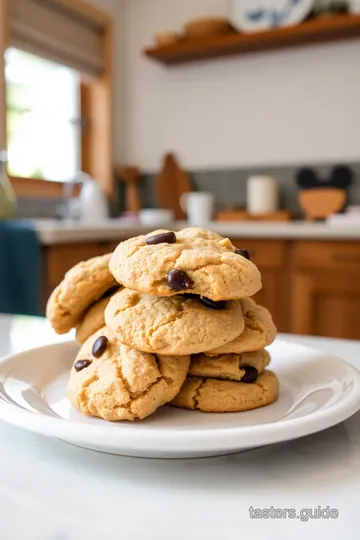
Disney Delight Cookies
Ready to create magical memories? Bake Disney Cookies: Sweet, Joyful Treats with colorful sprinkles and rich flavor that’ll delight the whole family!

- Welcome to the Wonderful World of Bake Disney Cookies: Sweet, Joyful Treats
- Your Essential Ingredients Guide for Baking Disney Cookies
- Professional Cooking Method: Bake Disney Cookies Like a Pro!
- Pro Tips & Secrets for Your Magical Cookie Adventure
- Perfect Presentation: Let’s Make ‘Em Pop!
- Storage & Make-Ahead: Keep Those Cookies Fresh
- Creative Variations: Unleash Your Inner Baking Wizard
- Complete Nutrition Guide: Know What You’re Munching On
- Frequently Asked Questions
- Recipe Card
Welcome to the Wonderful World of Bake Disney Cookies: Sweet, Joyful Treats
Have you ever taken a bite of a cookie that transported you back to a magical moment? a soft, chewy delight that reminds you of laughter-filled days, like running around disney parks with cotton candy in hand and a heart full of dreams.
Oh my gosh, i can almost hear the ride music now! that’s why i'm here today, to share my love for disney cookies .
With this recipe, you’ll not only bake cookies; you’ll create joyful treats that spark nostalgia and pure happiness.
A Brief Stroll Through Cookie History
Let’s step back a bit. cookies have a rich history, dating back centuries. but the charm of disney-inspired baking truly caught fire when disney parks began celebrating their unique, colorful treats.
You’ve probably seen those colorful sprinkle cookies that look like they just jumped off a movie screen! today, we’re making our own whimsical adventure right in your kitchen.
These cute little nibbles are not just for the holidays or parties; they can bring a splash of magic to any day!
Speaking of time, this recipe is super easy! you’ll need about 1 hour and 30 minutes from start to finish, and don’t worry if you’re new to baking.
With a little measuring and mixing, you’ll be a cookie rockstar in no time.
Quick Costs and Yields
When it comes to costs, you’ll find that the ingredients here are budget-friendly. a batch yields about 24 cookies , so you'll have plenty to share with friends and family or to keep all to yourself (no judgment here!).
Why You'll Love These Cookies
There’s something special about these cookies. they aren't just another sweet treat; they come with health benefits too! sure, they have sugar, but they’re bursting with delicious vanilla flavor that can lift your mood.
The addition of colorful sprinkles against a backdrop of soft, chewy goodness makes these celebration cookies ideal for birthdays, family get-togethers, or even a simple friday night at home.
These cookies stand apart from other recipes because they mix two of your favorite worlds: nostalgia and sweetness. you might find your little ones gathered around the kitchen, happily helping decorate as part of this fun cooking activity .
Plus, who can resist bright, colorful sprinkles ? these playful touches make them perfect for any festive occasion.
A Little Help for Our Baking Adventure
So, how to make cookies this magical? with just a handful of simple ingredients, you’re already halfway there! here’s a sneak peek of what you’ll need: all-purpose flour, butter, eggs, and a few other goodies.
Keep reading because soon, we'll dive into the ingredients you'll need to recreate these delightful bites.
Our disney delight cookies are waiting! let’s get ready to sprinkle some whimsical treats your way and bring joy, one cookie at a time.
The baking part is not just a task; it’s a chance to connect, get messy, and create lasting memories. grab your mixing bowls; the magic of baking is right around the corner!
Your Essential Ingredients Guide for Baking Disney Cookies
Let’s get real. every wizard in the kitchen knows that the secret to baking magical treats starts with having the right ingredients.
If you're all set to bake disney cookies: sweet, joyful treats , then grab your apron, because we’re diving into an ingredient treasure trove that’ll make your sweet treat baking both fun and flavorful!
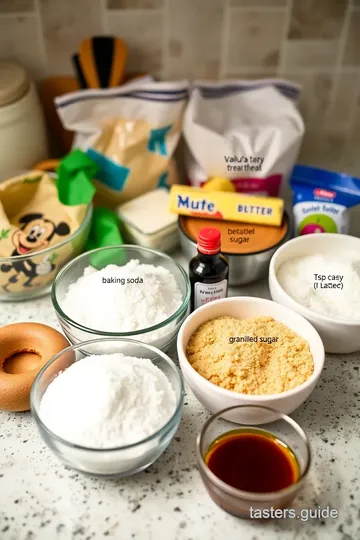
Premium Core Components
Measurements matter : first things first—let’s talk about measurements. if you're using the us system, make sure your all-purpose flour is 2 ½ cups or around 312 grams .
For the metric folks, you'll need to weigh out those ingredients, so keep a scale handy!
Quality counts : not all flour is created equal. look for a fine texture and a nice, clean smell. butter? go for unsalted; your cookies will thank you! if you can’t bear to part with your baking dollars, steer clear of anything that looks dusty or old.
Storage Smarts : Keep your flour in a cool, dry place—after all, no one wants funky-tasting cookies. A good rule of thumb? Your spices and vanilla extract last around 1-2 years if stored properly! And trust me, you don’t want to open that ancient bottle of vanilla when you're ready to start baking!
Freshness finds : when shopping for eggs, look for ones with a “sell by” date at least three weeks away.
Fresh eggs make all the difference. and don’t forget to check that expiration date on those chocolate chips too!
Signature Seasoning Blend
Now, let’s spice things up! Ever thought about how a little sprinkle of this and that can transform your cookies?
Essential Spice Combos : For our magical cookie recipe, we’re sticking with vanilla extract, but feel free to add a hint of cinnamon or nutmeg if you're feeling adventurous.
Herb Pairing Daydreams : If you wanna jazz it up, think about some melt-in-your-mouth cookie variations. Imagine creating colorful sprinkle cookies that pop with character!
Flavor enhancers & aromatics : trust me, a dash of salt amplifies sweetness. it’s pure magic! and if you’re feeling really wild, you could try out different extracts like almond or orange.
Notes of flavor can take your cookies from bland to grand!
Smart Substitutions
Okay, here’s where it gets real. We all have those pantry days when we run out of things. No worries, I getcha!
Common Alternatives : If you’re out of butter, coconut oil makes a solid substitute. It adds a nice hint of flavor, plus it’s super trendy right now.
Dietary Mods : Got gluten sensitivities? No problem! You can easily swap in a gluten-free flour blend.
Emergency Replacements : Can’t find sprinkles? Toss in some nuts or dried fruit; they work like a charm! Just keep it colorful for those character-themed cookies !
Kitchen Equipment Essentials
Let’s talk tools because, trust me, a slow whisk can ruin the day!
Must-Have Tools : Make sure you’ve got baking sheets, mixing bowls, and a good ol’ electric mixer. If you don’t own one, don’t sweat it—your arm is a tiger!
Alternative Options : No parchment paper? Get crafty with buttering your sheets. And if you don’t have a cooling rack, use the back of another baking sheet.
Preparation Tips : Since we’re making soft, chewy cookies, remember to chill that dough. It’s a game-changer for cookie shape!
Storage Solutions : Keep your cookies fresh by stacking them in an airtight container with parchment paper in between layers. Average freshness? About a week—if they last that long!
Now that we’ve covered our bases on ingredients, storage, and tools, you’re all geared up to embark on this whimsical baking adventure .
Let’s jump straight into baking those magical disney cookies that’ll have you reminiscing about your last visit to the parks! get ready for the step-by-step to create a beautiful batch of disney delight cookies: magical sweet treats .
It's time to make some cookie magic!
Professional Cooking Method: Bake Disney Cookies Like a Pro!
If you’ve ever dreamt of baking cookies straight out of a disney movie, you’re in for a treat with this guide.
Bake disney cookies: sweet, joyful treats is not just about whipping up dough; it's about creating magical memories in your kitchen.
When i first started baking, it was chaotic, to say the least. flour everywhere, butter mismeasured—you know the drill. let's help you skip some of those rookie mistakes and make your cookie journey smooth, sweet, and fun!
Essential Preparation Steps
Mise en place
before you start, get all your ingredients lined up. this is called mise en place , and it's the secret superhero tactic in professional kitchens.
Measure out your 2 ½ cups of all-purpose flour and 1 teaspoon of baking soda ahead of time. trust me, it saves time and keeps you from scrambling later.
Everything from your unsalted butter to those colorful sprinkles should be within arm’s reach.
Time management tips
think of your baking like a race. you need to know when to sprint and when to take it slow.
If you're chilling the dough for 30 minutes (like we will), use that time for cleanup or prep your oven.
Also, don’t forget to preheat to 350° f — i can’t stress how important this is!
Organization strategies
a clean workspace is a happy workspace! keep a trash bowl handy for quick disposal of wrappers and papers.
And trust me, a good spatula is your best friend for mixing and scooping dough.
Safety Considerations
Baking is usually pretty safe, but remember to watch those oven mitts! Oven temperatures can get really hot , so always protect your hands.
Step-by-Step Process
-
Prep the Baking Sheets
Preheat your oven to 350° F and line your baking sheets with parchment paper. This makes cleanup super easy! -
Mix the Dry Ingredients
In one bowl, whisk together your flour, baking soda, and ½ teaspoon salt . Set it aside because we’ll mix the inspiration next! -
Cream It Up
Take another bowl and cream 1 cup of softened butter with ¾ cup of granulated sugar and ¾ cup of brown sugar until it’s fluffy—think the texture of a cloud! -
Eggcellent Addition
Add two large eggs, one at a time, mixing well after each. Stir in two teaspoons of vanilla extract . This is where the magic starts to happen! -
Combine ingredients
slowly add your dry mix to the wet mix. just combine it until it’s mixed. over-mixing is a no-no if you want those cookies to be soft and chewy . -
Add the good stuff
time for the fun part—fold in 1 cup of chocolate chips and ½ cup of colorful sprinkles with a spatula.Got a favorite character from disney? imagine taking a bite while thinking about them!
-
Chill Out
Cover your dough and chill it for 30 minutes. This keeps your cookies from spreading too much in the oven. -
Bake ‘em up
scoop your dough onto your lined sheets, about 2 inches apart. bake them for 10- 12 minutes until the edges are golden.But remember, the centers should still look a tad soft.
-
Cooling Time
After baking, let those beauties cool on the sheet for 5 minutes before transferring them to a cooling rack. You want to stop the cooking right there!
Expert Techniques
Now that you’ve made your cookies, let’s talk about some ways to level up.
- Quality Checkpoints: Press the center of the cookie lightly before removing them from the oven. If it springs back, you’re golden!
- Troubleshooting Tips: If they spread too much, your butter might have been too soft. Next time, chill it a bit longer or use slightly colder butter.
Success Strategies
To avoid common pitfalls:
- Don’t skip chilling the dough. It’s crucial for that soft, chewy texture.
- Double-check your measurements. There's magic in accuracy!
- Make-ahead options: You can chill your dough or even freeze the cookies before baking. Just remember to adjust the baking time a bit.
We’ve gone through the basics, but there’s always more to learn in the world of sweet treat baking. From kid-friendly baking to celebration cookies , there’s a whole world waiting.
Additional Information
Stay tuned, because I'll be diving into some cool cookie decorating ideas next. Get ready to unleash your creativity and make those Disney cookies as magical as they can be!

Pro Tips & Secrets for Your Magical Cookie Adventure
Hey there, fellow cookie lovers! if you're ready to bake disney cookies: sweet, joyful treats , i’ve got a treasure trove of pro tips that'll make your baking experience even more delightful.
First off, listen closely: don't overmix your dough! i used to whip mine to death, thinking it’d make my cookies fluffier.
Nope! just makes them tough as nails. go for that light mix to keep them soft and chewy.
Now, let’s talk time-saving techniques . if you’ve got a busy schedule (who doesn’t?), chilling the dough can be your best friend.
You can whip it up the night before, let it rest in the fridge, and voilà! you’re ready for a quick cookie spree the next day.
Magic, right?
For a bit of flavor enhancement , think about adding a dash of cinnamon or nutmeg. trust me, it takes those simple vanilla cookie treats to a whole new level of yum.
And when it comes to presentation, the game is all about the garnish ! a sprinkle of colorful confetti or a drizzle of chocolate on top makes things pop.
Your cookies will look so good, they’ll practically scream, “eat me!”
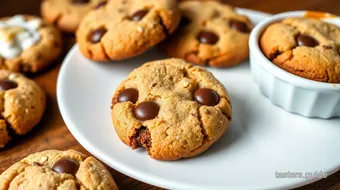
Perfect Presentation: Let’s Make ‘Em Pop!
Alright, moving on! you’ve baked these cute little character-themed cookies. now it’s showtime! plating techniques can turn your treats from basic to breathtaking.
Use simple white plates for a classic look or colorful trays to really make those colorful sprinkle cookies stand out.
Garnishing is key, y’all! some edible glitter or a few strategically placed sprinkles adds that extra touch of visual appeal .
Get creative! you can even shape your cookies like mickey mouse or other fun forms. talk about a conversation starter at parties!
And don’t forget about color combinations . if you’re making cookies for a celebration, matching them with the theme can be super fun.
Think red and green for christmas or bright pastels for spring. a little planning on colors makes all the difference!
Storage & Make-Ahead: Keep Those Cookies Fresh
Now, onto storage. let’s be real—no one wants stale cookies! to keep that soft and chewy goodness alive, pop your batch in an airtight container .
They’ll stay fresh for up to a week! if you need to stash them for longer, consider freezing them. just thaw them out when a cookie craving strikes!
If you’re prepping for a gathering, making your dough ahead of time is a game-changer. you can prepare it, chill it, and have it ready to go.
Just make sure when you’re ready to bake, you give it about 10- 15 minutes out of the fridge to soften a little.
Trust me, those simple baking recipes turn into last-minute miracle workers!
Creative Variations: Unleash Your Inner Baking Wizard
Feeling adventurous? let’s spice it up a bit with some creative variations ! you can easily switch up flavors. how about adding some peanut butter into the mix for a nutty twist? or swap out the chocolate chips for white chocolate and add a sprinkle of sea salt for a fancy touch.
If you’re worried about dietary restrictions, don’t sweat it! these cookies can be made gluten-free simply by using a gluten-free flour blend and dairy-free with some vegan butter.
It’s all about inclusivity in the baking world, right?
And speaking of variations, don’t be afraid to get seasonal. in summer, toss in some dried cranberries or lemon zest.
And in winter, maybe some warming spices or peppermint for a festive kick.
Complete Nutrition Guide: Know What You’re Munching On
Now, about that nutrition guide . each cookie (let’s say) has roughly 120 calories , which isn’t too shabby for a sweet treat.
Plus, with ingredients like butter and sugar, you are definitely getting your dose of joy while indulging.
But don’t forget—portions matter! I usually like to remind myself to not just munch away mindlessly, especially when there’s a batch of those beautiful Disney cookies on the counter.
Overall, enjoy these sweet, delicious cookies and know that they’re not just snacks; they’re treasures of family memories and celebrations! Now grab the kiddos, and let’s make some magic in the kitchen!
So, my friends, get to those cookie sheets and start baking. whether it's a nostalgic dessert recipe or a brand-new fun cooking activity with the kids, just remember to keep it light, keep it fun, and above all—keep it delicious.
Happy baking!
Frequently Asked Questions
What makes the "Bake Disney Cookies: Sweet, Joyful Treats" recipe special?
The "Bake Disney Cookies: Sweet, Joyful Treats" recipe captures the fun and magic of Disney parks with fun shapes, colorful decorations, and a delightful vanilla flavor. It's an enjoyable baking activity that brings loved ones together and creates lasting memories!
Can I use different mix-ins in the "Bake Disney Cookies"?
Absolutely! You can customize your cookies by adding nuts, swapping semi-sweet chocolate chips for white chocolate, or even including dried fruits for a unique twist. Feel free to get creative with your favorite flavors!
How should I store my "Bake Disney Cookies: Sweet, Joyful Treats"?
To keep your cookies fresh, store them in an airtight container at room temperature for up to a week. For longer storage, you can freeze the baked cookies or the dough itself for up to three months; just thaw and bake as needed!
What are some tips for beginner bakers when making these cookies?
For beginner bakers, it’s essential to measure your ingredients accurately and avoid overmixing the dough, which can make cookies tough. Also, chilling the dough before baking is crucial to achieving the perfect texture and preventing spreading.
Can I make the "Bake Disney Cookies" gluten-free or dairy-free?
Yes! You can use a gluten-free flour blend as a substitute for all-purpose flour to make them gluten-free. For a dairy-free option, simply replace the unsalted butter with a vegan butter alternative and use dairy-free chocolate chips.
What are the nutritional details for "Bake Disney Cookies: Sweet, Joyful Treats"?
Each cookie contains approximately 120 calories, with 1.5g of protein, 6g of fat, and 16g of carbohydrates. These values can vary based on specific ingredient brands and measurements, so it's a good idea to check your actual ingredients for precise nutritional information.
Disney Delight Cookies Card
⚖️ Ingredients:
- 2 ½ cups all-purpose flour
- 1 teaspoon baking soda
- ½ teaspoon salt
- 1 cup unsalted butter, softened
- ¾ cup granulated sugar
- ¾ cup packed brown sugar
- 2 large eggs
- 2 teaspoons vanilla extract
- 1 cup semi-sweet chocolate chips
- ½ cup colorful sprinkles
🥄 Instructions:
- Step 1: Preheat your oven to 350°F (175°C). Line baking sheets with parchment paper.
- Step 2: In a mixing bowl, whisk together flour, baking soda, and salt. Set aside.
- Step 3: In another bowl, use an electric mixer to cream together softened butter, granulated sugar, and brown sugar until light and fluffy.
- Step 4: Add eggs one at a time, mixing well after each addition. Stir in vanilla extract.
- Step 5: Gradually add the dry mixture to the wet mixture, mixing until just combined.
- Step 6: Gently fold in chocolate chips and sprinkles using a silicone spatula.
- Step 7: Cover the dough with plastic wrap and chill in the refrigerator for 30 minutes.
- Step 8: Scoop tablespoons of dough onto the prepared baking sheets, spacing them about 2 inches apart. Bake for 10-12 minutes or until the edges are slightly golden.
- Step 9: Allow cookies to cool on the baking sheet for 5 minutes before transferring to a cooling rack to cool completely.
Previous Recipe: Ultimate Sunny Eggs on Toasted Sourdough Bliss: A Sunday Morning Treat
Next Recipe: Delicious Quick Taco Soup with Crunchy Fritos: An Easy Comfort Meal