Celebration Graduation Sheet Cake: A Festive Baking Adventure!
Looking to Bake Graduation Sheet Cake for Celebration Fun? Try my easy, fluffy vanilla almond cake topped with vibrant buttercream for the perfect graduation treat!

- Let's Celebrate: The Perfect Graduation Sheet Cake
- A Slice of History
- Why This Cake Rocks
- Tips and Tricks for Success
- Essential Ingredients Guide for Your Graduation Sheet Cake
- Celebrate with a Graduation Sheet Cake: Your Go-To Guide!
- Pro Tips & Secrets to Level Up Your Cake Game
- Perfect Presentation: Make That Cake Pop
- Storage & Make-Ahead: Keep it Fresh
- Creative Variations: Get Adventurous
- Complete Nutrition Guide: Know What You’re Serving
- Encouraging Conclusion
- Frequently Asked Questions
- Recipe Card
Let's Celebrate: The Perfect Graduation Sheet Cake
Oh my gosh, i still remember the day i graduated! i mean, come on—it felt like a huge milestone, right? friends, family, and all that amazing food.
Speaking of food, let’s chat about the star of the show: the cake! when i decided to bake graduation sheet cake for celebration fun , it transformed my party from "just okay" to "totally unforgettable!"
If you’re like me, cake is a must for any celebration. and frankly, who doesn’t love a great cake at a graduation party? this easy sheet cake recipe is not just delicious, but it's also a visual delight.
Picture a fluffy vanilla almond cake with creamy buttercream frosting drizzled with colorful cake decorations. don’t you just want to dive right in?
A Slice of History
The sheet cake isn’t just a modern marvel. it's been around for decades, ruling birthday parties and celebrations across america.
Originating in the mid-19th century, people loved its simplicity and delightful flavor. fast forward to today, and it's still a crowd favorite, especially at graduation parties!
With large batch cake recipes , these cakes are perfect, especially when feeding a group of hungry students and proud parents.
Plus, they’re super easy to prepare. you'll spend just about 20 minutes prepping and 30 minutes baking. it's a win-win!
Why This Cake Rocks
Okay, let’s talk benefits, because this cake isn't just good—it’s great . first off, it’s a joyous focal point at any celebration.
The sweet flavors of vanilla almond cake paired with smooth homemade buttercream frosting is a match made in dessert heaven.
Talk about bringing smiles to the crowd!
And health-wise? it’s not the best, but let’s be real—it's cake! you can add a sprinkle of fresh fruit on top to balance it out.
You know, just to say you’re "healthy." also, adding colorful decorations makes it feel festive, and everyone loves some decorative cake toppings .
Thinking of serving this cake? it’s not just for graduations! it’s great for any special occasion! whether you're throwing a casual backyard bbq, a classroom graduation party, or a formal family gathering, this cake fits right in.
Trust me! plus, it’s way more fun than a boring old pie.
Tips and Tricks for Success
If you're worried about pulling off this magical cake creation, don’t be! Here are some baking tips to make your life easier:
-
Use room temperature ingredients : This helps in achieving that fluffy texture we all love. No one wants a dense cake, right?
-
Frost once cool : Always let that beauty cool completely before slapping on the buttercream. I’ve had my fair share of melting disasters—you don’t want to learn the hard way!
-
Color it up : Use food colorings to jazz up the frost—it's like bringing the party into your batter!
-
Chill for stability : After frosting, stick the cake in the fridge for a bit. It makes it way easier to add those fun decorations later.
-
Try new flavors : Feeling adventurous? Swap almond for coconut or add lemon zest in the mix for a whole new world of taste!
Now, are you ready to dive into the ingredients list? get your mixing bowls, spatulas, and trusty oven prepped! we’re on our way to creating that unforgettable graduation sheet cake.
With those colorful layers and creamy goodness, it’s gonna be a hit! so gear up, and let’s get baking. this cake is not just about dessert; it’s about friendship, celebration, and unforgettable memories!
Essential Ingredients Guide for Your Graduation Sheet Cake
So, it’s that time of year again—graduation season! if you’re throwing a bash for your favorite grad, you definitely need a show-stopping cake.
And let’s be real here, a bake graduation sheet cake for celebration fun is going to be the star of the dessert table! but before we dive headfirst into mixing and baking, let’s chat about the essential ingredients you’ll need and how to make the most of them.
Premium Core Components
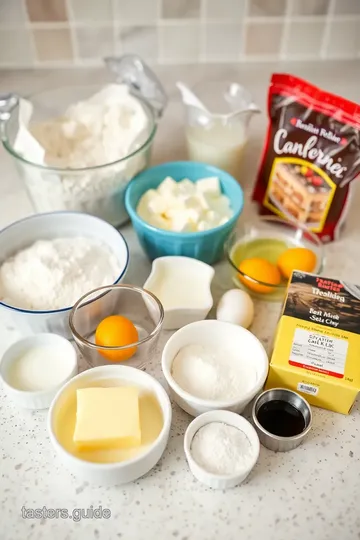
First things first, when it comes to getting started, it’s all about those premium core ingredients . you’re gonna need 2 ½ cups (312 g) of all-purpose flour and 2 ½ teaspoons of baking powder.
A pinch of ½ teaspoon salt does wonders to enhance all those sweet flavors. quality counts, so grab some good butter— 1 cup (226 g) of it, soft and ready to cream with 2 cups (400 g) of granulated sugar.
You want that combination to be light and fluffy, trust me!
To make this cake sing, don’t forget the liquids! 1 cup (240 ml) of whole milk and 4 large eggs get mixed in later.
Vanilla extract and almond extract add a lovely flavor profile. to ensure freshness, always check the expiration date of your ingredients.
And store any leftover flour and sugar in a cool, dry place!
Signature Seasoning Blend
Now, let’s talk about making your cake zing with taste! a signature seasoning blend is key here. while we’re keeping it simple, think about adding a sprinkle of cinnamon or nutmeg to the mix for a fun twist.
Don’t be afraid to play with herbs or other flavor enhancers. for a colorful touch, let’s not forget about the frosting.
You can whip up some creamy buttercream with 1 cup (226 g) of unsalted butter and 4 cups (480 g) of powdered sugar.
Add a couple tablespoons of cream for that luscious texture, plus your favorite food coloring for that celebratory vibe!
Smart Substitutions
Planning to take on dietary needs? no problem! there are smart substitutions that can save the day. swap the all-purpose flour with a gluten-free alternative if you have celiac guests.
Switch out butter for vegan margarine or coconut oil—it works just as well. and if you're out of eggs? a flax egg made from 1 tablespoon ground flaxseed and 3 tablespoons water can step in like a pro!
Kitchen Equipment Essentials
Before you start mixing, let’s tackle some kitchen equipment essentials . you’ll need a 9x13 inch (23x33 cm) sheet pan to bake your cake, and an electric mixer for creaming that butter and sugar together.
Seriously, don’t try to do it by hand unless you’re feeling super strong that day! make sure you have rubber spatulas and offset spatulas on deck too.
They’re perfect for frosting the cake and getting every last bit of that buttery goodness out of the bowl.
For easy storage, consider using airtight containers to keep your dry ingredients fresh. Nobody wants stale flour in their celebratory desserts!
Wrapping It Up
So, yeah, gearing up to bake graduation sheet cake for celebration fun is not just about slapping ingredients together. it’s a whole process! from knowing what to use to making sure you’ve got the right equipment, every step is steeped in thought.
Remember, the key to a great sheet cake is all about balance and freshness!
Next up, let’s dive into the fun part—the step-by-step instructions that’ll have you whipping up this delightful cake in no time.
You’re gonna impress all your classmates, their families, and yes, that savvy neighbor who leaves you asking, “how did you do that?!” let’s get baking!
Celebrate with a Graduation Sheet Cake: Your Go-To Guide!
Oh gosh, it’s that time of year again! graduation season is here, and whether you’re celebrating a high school, college, or something in between, it’s time to whip up a crowd-pleasing sheet cake .
I’ve got an easy and delicious recipe that’ll make you the rockstar of the party. trust me, you’ll want to bake graduation sheet cake for celebration fun !
Essential Preparation Steps
Now, let’s dive right in! First things first, let’s chat about mise en place —that fancy French term just means getting all your ingredients out and ready. You’ll want:
- 2 ½ cups all-purpose flour
- 2 ½ tsp baking powder
- ½ tsp salt
- 1 cup unsalted butter, softened
- 2 cups granulated sugar
- 4 large eggs
- A splash of vanilla and almond extracts
- And don’t forget your whole milk !
Organizing these ingredients makes it so much easier and keeps you from feeling like you’re in a donut shop when you’re searching for powdered sugar at the last minute.
When it comes to time management , here’s my pro tip: set a timer! for this cake, you'll need 30 minutes for baking.
Plus, add another 10 minutes for cooling but make sure you totally resist the urge to dive in too soon.
I mean, we’re talking about frosting here!
Oh, and safety first, friends! When handling hot pans, make sure you’ve got those potholders ready. Nobody wants an unexpected burn to go with their cake.
Step-by-Step Process
Let’s break this down into clear steps, shall we?
- Preheat the oven to 350° F ( 175° C) , and grease your sheet pan.
- In a bowl, whisk your dry ingredients: the flour, baking powder, and salt.
- In a large mixing bowl, cream together the butter and sugar until it’s light and fluffy—about 5 minutes . Think of it like giving your cake a spa day!
- Add the eggs one by one while mixing, followed by the vanilla and almond extracts.
- Gradually mix in your flour mixture and the milk. Alternate them, starting and ending with flour. Just until combined—no need to overmix!
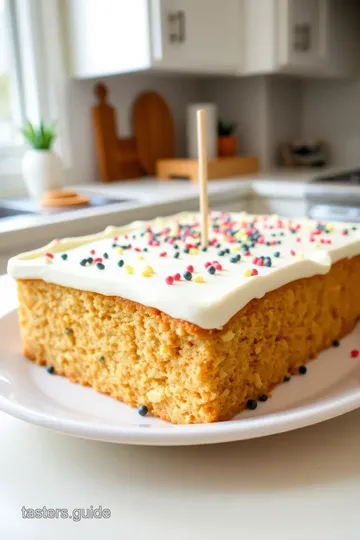
Now, pour that batter into the prepared pan and smooth it out. bake for 25- 30 minutes . you’ll know it’s ready when a toothpick inserted in the center comes out clean.
Let it cool for 10 minutes in the pan, then transfer it to a wire rack to cool completely.
This is crucial, or your frosting will melt away like it’s on a summer day in a dog park.
Expert Techniques
Now that you know the basics, let’s get fancy. first off, let’s talk buttercream frosting . beat softened butter until creamy, then blend in powdered sugar and a splash of heavy cream.
It should be smooth. if it’s not, you might need to add a little more cream—don’t worry, we’ve all been there.
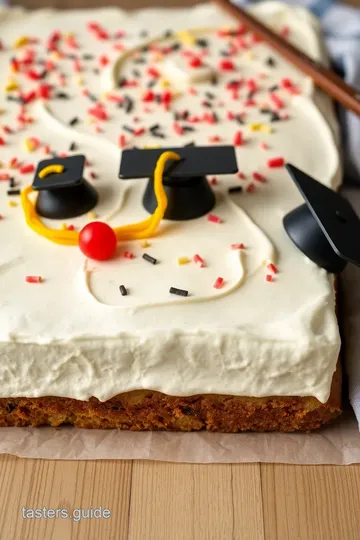
Once your cake is cool, spread that frosting on top using an offset spatula. if you want to jazz things up, add some fun decorative cake toppings like sprinkles or edible glitter.
Make it pop like a graduation ceremony!
Success Strategies
Avoiding common mistakes is key to cake success. forgetting to cool your cake? that’s a rookie move! believe me, i’ve made that mistake, and no one wants a melted frosting mess on their hands.
For quality assurance , always taste your frosting before slathering it on. you might want to add a touch more vanilla! also, have a plan for leftovers.
Cut those pieces up, put them in dessert containers, and give some to the neighbors. it feels good to share, trust me!
Final Touches
There’s nothing like a sweet celebratory dessert to mark the occasion. with colorful cake decorations and creative cake flavors, you’re all set to impress.
Plus, you’ll have loads of candy options leftover for the adults to enjoy while reminiscing about their own graduation day.
As we wrap this up, remember that the beauty of baking a graduation cake is not just in the eating—it’s the joy of creating something special for those you love.
So grab your apron, channel your inner baker, and make this a magical event.
Additional Information
By now, you’re hopefully buzzing with ideas and excitement for your graduation celebration. Stay tuned for more festive cooking recipes and tips on baking sheet cakes, enhancing your culinary skills to treat your family and friends all year long! Happy baking, friends!
Pro Tips & Secrets to Level Up Your Cake Game
Let’s dive in! baking a graduation sheet cake is not just about following a recipe; it’s also about putting a little love and thought into the process.
Here are some fun insights and time-saving techniques i've picked up over the years.
Chef's Personal Insights
Oh my gosh, when i first started baking, i always thought the secret to great cakes was in the recipe.
Yeah, they matter, but what actually makes the cake shine is you! your vibe and those little touches make it special.
If you're using an easy sheet cake recipe , don't be afraid to experiment. swap in different extracts or mix in some zest for a punch of flavor!
Time-Saving Techniques
Let’s be real—sometimes life gets busy! one trick i love is making the cake batter a night ahead and stashing it in the fridge.
It’s one less step for your busy day! also, using an offset spatula for frosting speeds up the process, trust me.
It’s like a magic wand for spreading the buttercream!
Flavor Enhancement Tips
If you want your cake to taste like pure happiness, add a pinch of salt to your frosting. just a pinch! it helps balance out the sweetness.
Oh, and don’t skip on using real vanilla extract ; it makes all the difference. if you’re feeling adventurous, throw in some almond extract or even a splash of hazelnut for a fun twist.
Presentation Advice
Alright, let’s talk about that pretty presentation. first impressions matter, right? choosing the right color combinations for your frosting and decorations can elevate your cake tenfold.
You can’t go wrong with a classic white buttercream topped with pops of color from sprinkles or edible flowers. after all, this is a special occasion cake!
Perfect Presentation: Make That Cake Pop
You’ve baked a beautiful cake; let’s make it look amazing too!
Plating Techniques
Using a simple cake stand can elevate your presentation instantly. if you’re short on time, some colorful parchment paper underneath your cake can give it a lovely backdrop.
And always, i mean always , slice your cake into even squares. nobody wants to deal with a messy slice at a graduation party !
Garnish Ideas
Try adding fresh fruit on top like strawberries or raspberries—it’s eye-catching and tasty! Want a little glam? Edible glitter goes a long way in making your graduation cake design truly sparkle.
Visual Appeal Tips
Think about height! adding decorations to one side of the cake or creating an ombre effect with your buttercream frosting can make it super visually appealing.
Trust me, your guests will oooh and aaah at how pretty it looks!
Storage & Make-Ahead: Keep it Fresh
Storage Guidelines
After your fabulous cake is made, let it cool completely. if you’re not serving it right away, wrap it in plastic wrap and store it at room temperature.
Just don’t let it sit out too long; that cake deserves a comfy spot!
Reheating Instructions
If you’ve got leftovers (which is rare but can happen), just microwave a slice for about 10-15 seconds for a cozy treat. Just stay close to avoid any cake explosions!
Creative Variations: Get Adventurous
Flavor Adaptations
Feeling like trying something new? Go wild; add chocolate chips or mix in some nuts for crunch. A swirl of caramel in the batter? Yes, please!
Dietary Modifications
Remember that not everyone has the same dietary needs. you can easily turn this into a gluten-free cake recipe by swapping out regular flour for a gluten-free blend.
Just follow the measurements, and you’re golden!
Complete Nutrition Guide: Know What You’re Serving
Let’s keep it real—everyone loves a delicious cake, but it’s good to know what’s in it. this cake is around 290 calories per slice , and while that sounds like a treat, it’s also light enough that you won’t feel guilty celebrating.
Health Benefits
With eggs, milk, and a bit of butter, this cake brings in some protein and calcium. It’s not a health food, but hey, it’s a celebration !
Encouraging Conclusion
At the end of the day, baking isn’t just about whipping something up in the kitchen; it’s about creating memories.
Whether you’re gathering for graduation or just because, serving a homemade cake brings people together. so go ahead, bake your graduation sheet cake for celebration fun , and remember to enjoy the time spent in the kitchen.
Happy baking, my friends!
Frequently Asked Questions
How do I ensure my cake comes out fluffy when I bake a graduation sheet cake for celebration fun?
To achieve a light and fluffy cake, make sure to cream the butter and sugar sufficiently until it's pale and airy. Additionally, ensure all your ingredients are at room temperature, as this helps them blend more easily and rise properly while baking.
What are some fun ways to decorate my graduation sheet cake?
You can use a variety of decorations to make your cake festive, including edible glitter, colored sprinkles, and fondant decorations. Piping colorful buttercream designs or drawing the graduate's school colors can also add a personal touch.
Can I make the bake graduation sheet cake for celebration fun ahead of time?
Yes, you can prepare the cake a day in advance. Just make sure to cool it completely before wrapping it tightly in plastic wrap and store it at room temperature. Frost the cake on the day of serving to maintain freshness and aesthetic appeal.
What should I do if my buttercream frosting is too runny?
If your buttercream frosting turns out too runny, gradually add more powdered sugar until you reach the desired consistency. Additionally, ensure your butter is not too soft; it should be at a creamy but firm consistency to hold its shape well.
How should I store leftover graduation sheet cake?
Store any leftover cake in an airtight container or tightly covered with plastic wrap to maintain freshness. It can be kept at room temperature for 2-3 days, but for longer preservation, refrigerate it for up to a week. Be sure to bring it back to room temperature before serving.
Can I make this cake gluten-free?
Yes, you can easily make a gluten-free version of the graduation sheet cake by substituting all-purpose flour with a gluten-free baking blend. Make sure to check that the other ingredients, like baking powder, are also gluten-free.
Celebration Graduation Sheet Cake: A Festive Baking Adventure! Card

⚖️ Ingredients:
- 2 ½ cups all-purpose flour
- 2 ½ tsp baking powder
- ½ tsp salt
- 1 cup unsalted butter, softened
- 2 cups granulated sugar
- 4 large eggs
- 1 tsp vanilla extract
- 1 tsp almond extract
- 1 cup whole milk
- 1 cup unsalted butter, softened (for frosting)
- 4 cups powdered sugar
- 2 tbsp heavy cream
- 1 tsp vanilla extract (for frosting)
- Food coloring (assorted colors for decoration)
- Edible glitter
- Colored sprinkles
- Fondant decorations
🥄 Instructions:
- Step 1: Preheat the oven to 350°F (175°C). Grease and flour the sheet pan.
- Step 2: In a bowl, whisk together flour, baking powder, and salt. Set aside.
- Step 3: In a large bowl, cream the butter and granulated sugar until light and fluffy (about 5 minutes).
- Step 4: Beat in the eggs one at a time. Add vanilla and almond extracts, mixing until combined.
- Step 5: Gradually add the flour mixture and milk, starting and ending with flour. Mix until just combined.
- Step 6: Pour the batter into the prepared sheet pan and smooth the top. Bake for 25-30 minutes or until a toothpick comes out clean.
- Step 7: Allow the cake to cool in the pan for 10 minutes, then transfer to a wire rack to cool completely.
- Step 8: Beat softened butter until creamy. Gradually add powdered sugar and cream. Mix until smooth. Add vanilla and color as desired.
- Step 9: Spread an even layer of frosting over the cooled cake using an offset spatula. Decorate with sprinkles and other toppings.
- Step 10: Slice into squares and serve at the graduation celebration!
Previous Recipe: Quick Vintage Glass Vases Salad Delight: A Charming Garden Fresh Dish
Next Recipe: Easy Langostino Tails in Creamy Mushroom Gravy: A Family Favorite!