Delightful & Crispy Baked Halibut Wraps
Looking for the best Bake Halibut Wraps - Delightful & Crispy? My easy, herb-infused recipe will have your family asking for seconds at dinner!

- A Fishy Journey to Delightful & Crispy Baked Halibut Wraps
- A Quick Peek Behind the Recipe
- Why You’ll Love These Wraps
- Essential Ingredients Guide: Elevate Your Cooking Game
- Professional Cooking Method: Mastering the Art of Baked Halibut Wraps
- Pro Tips & Secrets
- Perfect Presentation
- Storage & Make-Ahead
- Creative Variations
- Complete Nutrition Guide
- Frequently Asked Questions
- Recipe Card
A Fishy Journey to Delightful & Crispy Baked Halibut Wraps
You ever had that one dish that takes you back in time, like a little memory train? for me, it’s definitely my mom's crispy halibut wraps.
I remember her bustling around the kitchen, a splash of lemon here, a sprinkle of herbs there, while my siblings and i would hang around, hoping for a taste test.
Now, fast forward, and here i am, sharing that love in this recipe for bake halibut wraps - delightful & crispy .
Trust me, these will knock your socks off!
So, what’s the scoop on these tasty bundles? halibut has long been a corner piece of american seafood—think buttery flavor and tender meat.
Marinaded in lemon and herbs, and wrapped snugly in tortillas, this dish blends the freshness of the sea with the comfort of homestyle cooking.
Plus, anyone can rock these wraps, no chef hat required. we're talking easy fish recipe status, my friends.
A Quick Peek Behind the Recipe
Halibut has been hanging out in kitchens for ages, especially on the west coast, where folks are obsessed with fresh seafood.
With its mild taste, it attracts both seafood lovers and skeptics alike. nowadays, halibut continues to shine in homes across the country, from fancy dinner parties to laid-back weeknight dinners.
Here’s what i love about these baked halibut wraps: they’re super straightforward! you’ll spend just 15 minutes prepping and maybe 20 minutes baking .
Throw in a little marinating time, and you'll have a delicious meal in around 45 minutes . yum! they serve up nicely for family dinners but are also chic enough for entertaining, making them a total crowd-pleaser.
Plus, they won’t break the bank. a pound of halibut usually runs around $15-20, and when you think about cost, it's gold for a great dish when you feed 4.
Why You’ll Love These Wraps
Let’s break down the benefits of the baked halibut wraps! first off, anyone looking for healthy seafood dishes will find these wraps nutritious and satisfying .
Packed with protein, halibut is a powerhouse fish. high in vitamins, low in calories, it’s clear why it’s a go-to for those chasing high-protein dinner options .
And if you’re looking for the lowdown on occasions to serve these? think casual weeknight meals, outdoor gatherings, or even those swanky dinner parties! you can fancy them up with sauces or keep it chill with a side of greek yogurt.
They fit in anywhere!
One of the unique kicks about these wraps? you can get creative with what you stuff in there—think crunchy veggies, zesty herbs, and citrus goodness.
You could take these to another level by swapping in gluten-free tortillas if you're catering to dietary needs or even try other seafoods, like salmon.
So, what’s the catch? (See what I did there?) These wraps are quick, fresh, and ready to tailor to your taste. Just switch up the veggies or dive into different sauces!
Alright, now that we’ve lured you in, let’s get to the important stuff—the ingredients! Get your shopping list ready because these fish and vegetable wraps are gonna be your new go-to, whether you’re meal-prepping for the week or whipping up something elegant for your dinner crew!
Essential Ingredients Guide: Elevate Your Cooking Game
Listen up, my fellow food ensoiasts! cooking doesn’t have to be rocket science. it can be as simple as pie—especially if you stock your kitchen with the right ingredients .
So whether you’re gearing up to bake halibut wraps - delightful & crispy or whipping up some quick dinner ideas, here's your go-to guide for essential ingredients that'll make every meal a hit.
Premium Core Components
Let’s kick this off with the premium core components you need for any dish. Here’s what you should know:
-
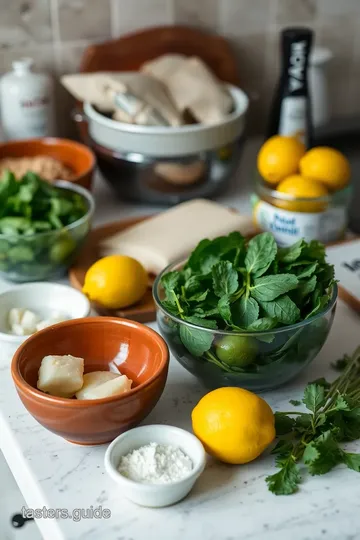
Measurements : Always nail those measurements! For our halibut wraps, you’re gonna want 1 lb (450g) of halibut fillets. That’s the perfect size to keep things juicy.
-
Quality indicators : fresh halibut can be identified by its mild smell—not fishy at all! the flesh should be firm and shiny.
Pro tip : check the eyes! clear, bulging eyes are a good sign.
-
Storage guidelines : keep fish in the coldest part of your fridge and use it within 1-2 days. if you’re not using it soon, freeze that bad boy! it’ll last about 3 months.
-
Freshness Tips : Look for bright, vibrant herbs if you’re adding those to your dishes. Fresh parsley and dill can elevate your wrap like nobody’s business.
Signature Seasoning Blend
Now that we’ve got the ingredients covered, let’s talk about signature seasoning blends . This is where you can get creative!
-
Essential Spice Combinations : You can’t go wrong with garlic and lemon paired with your fish. These are basically BFFs in the kitchen.
-
Herb Selections : Fresh herbs are where the magic happens! Mix parsley with dill for a zesty, herb-infused flair.
-
Flavor Enhancers : Don’t sleep on the power of citrus! A dash of lemon juice can brighten up any baked fish recipe . You can even experiment with citrus-infused seasonings.
-
Regional Variations : Don’t be scared to switch it up! Add some Cajun seasoning for a kick or go Mediterranean with oregano and basil.
Smart Substitutions
We all have those days where we realize we’re out of something. No fret! Here are some smart substitutions :
-
Common Alternatives : If you can’t find halibut, try tilapia or cod. These fish hold up well in wraps too!
-
Dietary Modifications : Want gluten-free wraps? Swap in corn tortillas or lettuce leaves. Bonus: They’re light and super fresh!
-
Emergency Replacements : Running low on cabbage? Grab some spinach or kale—that’ll add some crunch and nutrients in a pinch!
-
Seasonal Options : In the summer? Toss in some fresh zucchini or roasted bell peppers for seasonal goodness in your wraps.
Kitchen Equipment Essentials
Last but not least, let’s chat kitchen equipment essentials . You don't need a Michelin-star kitchen to whip up impressive meals!
-
Must-have Tools : A good chef knife and a baking sheet are essentials. Seriously, you can’t do much without them!
-
Alternative Equipment Options : No baking sheet? Use a cast iron skillet! Just be sure it’s well-seasoned.
-
Preparation Tips : Set yourself up for success—read through the recipe before starting. It’s amazing what you’ll catch!
-
Storage Solutions : Invest in some airtight containers for leftovers. You’ll thank yourself on busy nights when you’ve got healthy seafood dishes ready to go!
So there you have it! this guide to essential ingredients, smart substitutions, and must-have tools will take your cooking from basic to gourmet.
Now, let’s dive into making those bake halibut wraps - delightful & crispy . trust me, your taste buds are in for a treat!

Professional Cooking Method: Mastering the Art of Baked Halibut Wraps
Cooking is an adventure. sometimes it’s a wild ride, and other times it’s a walk in the park. one of my recent culinary heart-throbs has been making baked halibut wraps - delightful & crispy .
These babies not only taste amazing but are also packed with healthy goodness. let’s dive into this process together and get the crispy goodness flowing!
Essential Preparation Steps
Before you start tossing ingredients around, let’s talk about mise en place . it sounds fancy, but it just means having everything ready.
Chop your herbs, measure your oils, and set out your tortillas. trust me, it makes the world of difference.
Next up, time management ! it’s easy to get distracted, especially when you're daydreaming about that first bite. set a timer for your halibut's marinade— 10 minutes is perfect.
It gives you just enough time to sip your drink and plan your dinner table setup.
Now, organization is key. keep your workspace clear. i usually set everything to the right of the stove, and my baking sheet is right in front.
Safety is no joke either; clean as you go, and make sure to wash your hands after handling raw fish.
Step-by-Step Process to Flavor Town
-
Preheat & prepare : fire up that oven to 400° f ( 200° c) . lay some parchment paper on your baking sheet.
Everyone has a friend who skips this step and ends up crying over a burnt cooking disaster, right?
-
Marinate the halibut : here’s the juicy part—whisk together olive oil, lemon juice, zest, garlic, sea salt, and herbs. toss in your halibut fillets and let them soak up that flavor for 10 minutes .
-
Tortilla Assembly : Lay your tortillas out. In each, pile on the shredded cabbage, carrot, and bell pepper. It’s like building a flavor fortress!
-
Halibut Placement : Now for the star of the show—place your marinated halibut on those vibrant veggies.
-
Wrap It Up : Fold in the sides of the tortilla and roll from the bottom to snuggle that halibut in securely.
-
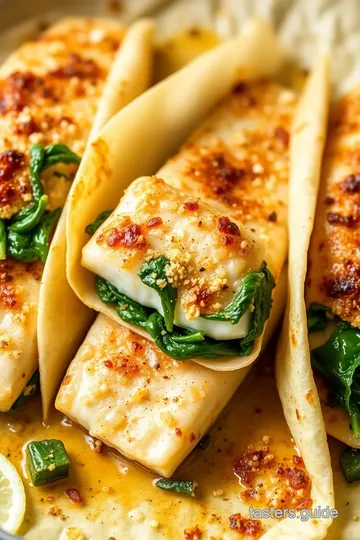
Bake the wraps : pop those wraps seam-side down on your baking sheet. bake for 15- 20 minutes until your wraps are golden and crispy.
Halibut should hit an internal temp of 145° f ( 63° c) .
-
Serve the magic : after pulling them from the oven, let them cool for a few. it's hard, i know.
But trust me; the flavors meld beautifully. serve with a dollop of greek yogurt if you’re feeling extra fancy.
Expert Techniques for Heavenly Wraps
Now that you’ve wrapped up your masterpieces, it’s time for some pro tips. first, work on those marinades . a well-marinated fish will be juicy and downright delectable.
Make sure the halibut is evenly coated—nobody likes a fish that’s shy on flavor. if you're feeling adventurous, give it a quick sear for that extra crunch before wrapping.
Quality checkpoints? Absolutely! Use a trusty meat thermometer to ensure you’ve hit that glorious 145° F ( 63° C) mark.
Oh, and let’s talk mistakes. Sometimes, the halibut can be dry if overcooked. Yikes! Avoid that by keeping your watchful eye on timers and checking in with that thermometer.
Success Strategies for Baked Halibut Wraps
Learning from mistakes is key. for instance, i once wrapped halibut too tightly, and it spilled out all over like a fish taco explosion.
Not the kind of party i had in mind! always roll gently!
Perfect results come from practice. Try experimenting with those wrap recipes . Want to kick it up a notch? Consider adding jalapeños for some heat or switching up the veggies.
And do you want a make-ahead option? You can marinate your halibut in advance and let it chill in the fridge. It's a clever way to save time, especially on busy weeknights.
So, now you've got a roadmap to Baked Halibut Wraps - Delightful & Crispy! These wraps are perfect for picnics, family dinners, or whenever you need a quick dinner idea.
Additional Information
If you’re looking for something fresh, fun, and delicious, dive into the world of healthy seafood dishes . explore options like oven-baked halibut and all their gourmet potential.
Whether you're cooking with halibut or trying creative seafood wrap variations , there is no end to the delicious possibilities that await you.
Pro Tips & Secrets
Alright, folks, let’s dive into making these baked halibut wraps - delightful & crispy . i’ve been in the kitchen enough to know a few secrets that’ll amp up your game.
First off, marinating is key. let those halibut fillets sit in the zestful goodness of lemon, garlic, and herbs for at least 10 minutes —trust me, the flavors will soak in beautifully.
Need a time-saver? skip the searing step if you're in a rush, but if you can spare an extra couple of minutes, give the fillet a quick sear before wrapping.
It adds that crunchy outside we all crave.
When it comes to flavor enhancements , don't skimp on the seasonings. if you’re feeling adventurous, throw in a pinch of cayenne pepper or a squeeze of sriracha for some kick.
Finish with a fresh squeeze of lemon right before you serve, because lemon and fish are best friends.
Perfect Presentation
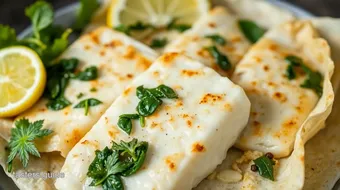
Let’s talk presentation , because we eat with our eyes first, right? start by neatly plating your wraps on a large platter.
For a pop of color, sprinkle some parsley or fresh dill on top. you could even add lemon wedges for a pleasant visual and a hint of freshness.
For garnishing, think of cabbage and bell peppers ! lay some shredded veggies beside the wraps—it’s like a mini salad that complements the dish.
If you’re feeling fancy, drizzle some greek yogurt over the top or use it as a dip on the side.
This will make your oven-baked halibut look like a gourmet treat. seriously, it’s all about those little touches.
Storage & Make-Ahead
Okay, so you made these fabulous wraps, and either you’re planning a meal prep like a boss or you’ve got leftovers. Either way, I’ve got your back!
Storage guidelines say to let any leftovers cool completely before you pop them in an airtight container. they’ll stay fresh for up to 3 days in the fridge.
If you need them to last longer, you can freeze them for about a month, just make sure they’re well-wrapped!
When it comes to reheating , the microwave isn’t your best bud here. it can make the wraps soggy, so pop them in a toaster oven or regular oven to revitalize that crispiness —just 10- 15 minutes at 350° f ( 175° c) will do the trick.
Creative Variations
Now, if you’re feeling like mixing things up, let’s jump into some creative variations . you could try swapping out halibut for salmon or tilapia .
Oh my gosh, or for a mediterranean flavor , why not toss in some feta and olives into your wrap?
Thinking seasonal? in summer, add some fresh diced tomatoes or ripe avocados. it’ll give your wraps that extra “wow” factor.
If you’re trying to adapt for different diets, make these wraps gluten-free with some brown rice wraps or lettuce instead of tortillas.
Also, consider lighter options if you’re looking for nutritious dinner options this spring.
Complete Nutrition Guide
Let’s get serious for a sec—here’s the scoop on the nutrition of these awesome wraps. a serving packs in about 320 calories with a solid 28 grams of protein .
You’re getting a good dose of healthy fats from the olive oil and fish too. plus, with all those veggies, they’re loaded with fiber.
You gotta love that high-protein dinner kick from halibut! not only will it keep you satisfied, but it’s also a win for heart health.
You can also cater to those who are counting carbs or need meal prep fish recipes by adjusting serving sizes or skipping the tortilla altogether.
So there you have it! baked halibut wraps - delightful & crispy are not just another fish recipe—they’re a canvas for your culinary creativity! with these tips and tricks, you're all set to whip up something yummy and satisfying.
I can’t wait for you to try out these wraps for your next dinner. whether it’s a cozy family meal or entertaining some friends, everyone will ask what’s in those flavorful little parcels! so grab your ingredients, get cooking, and let’s keep the deliciousness rolling.
Happy cooking!
Frequently Asked Questions
How can I make my Bake Halibut Wraps - Delightful & Crispy even more flavorful?
To enhance the flavor of your Baked Halibut Wraps, ensure the halibut is well-coated with the marinade. You can also experiment with additional herbs or spices, such as smoked paprika or cumin, to add depth. For an extra layer of taste, consider briefly searing the halibut before wrapping to develop a nice crust.
Can I use a different type of fish for the Baked Halibut Wraps?
Yes, you can easily substitute halibut with other fish like salmon or tilapia. Just be sure to adjust the cooking time slightly, as different fish have varying thickness and cook at different rates. Make sure the fish reaches an internal temperature of 145°F (63°C) for safe consumption.
What is the best way to store leftover Bake Halibut Wraps - Delightful & Crispy?
Store any leftover wraps in an airtight container in the refrigerator for up to 2 days. For best results, reheat them in an oven at 350°F (175°C) to maintain their crispiness instead of using a microwave. You can also freeze the wraps after baking; just ensure they’re tightly wrapped to avoid freezer burn.
Can I make the wraps ahead of time for a quick dinner option?
Absolutely! You can prepare the halibut and assemble the wraps, then cover and refrigerate them up to a few hours before baking. Just remember to let them sit at room temperature for about 10 minutes before baking to ensure even cooking. This is a great way to save time during dinner preparation!
What are some healthy side dishes to serve with Baked Halibut Wraps?
Pair your Baked Halibut Wraps with a light salad, such as arugula with lemon vinaigrette, or roasted vegetables like asparagus or zucchini for a nutritious meal. Quinoa or brown rice can also be a great base for a well-rounded dinner. To add a refreshing touch, try serving with a side of sliced cucumbers or a yogurt-based dipping sauce.
What should I do if I don't have whole wheat tortillas?
If you don’t have whole wheat tortillas, feel free to use any type of wrap you have on hand, such as corn, spinach, or even lettuce for a low-carb option. You can also use gluten-free tortillas if necessary, making the dish suitable for gluten-sensitive individuals.
Delightful & Crispy Baked Halibut Wraps Card
⚖️ Ingredients:
- 1 lb halibut fillets, skinless and boneless
- 1 tbsp olive oil
- Juice of 1 lemon
- Zest of 1 lemon
- 2 cloves garlic, minced
- 1 tsp sea salt
- ½ tsp black pepper
- 2 tbsp fresh parsley, chopped
- 1 tbsp fresh dill, chopped
- 4 large whole wheat tortillas or wraps
- 1 cup shredded cabbage (green or red)
- 1 medium carrot, julienned
- ½ cup bell pepper, thinly sliced
- ½ cup Greek yogurt (or sour cream), for serving (optional)
🥄 Instructions:
- Step 1: Preheat oven to 400°F (200°C) and line a baking sheet with parchment paper.
- Step 2: In a mixing bowl, combine olive oil, lemon juice, lemon zest, garlic, salt, pepper, parsley, and dill. Add halibut and turn to coat. Let marinate for 10 minutes.
- Step 3: Lay out tortillas on a clean surface. In the center of each wrap, layer the shredded cabbage, carrot, and bell pepper.
- Step 4: Place marinated halibut on top of vegetables in each wrap.
- Step 5: Fold the sides of the tortillas over the filling, then roll from the bottom up to secure the wrap.
- Step 6: Place wraps seam-side down on the prepared baking sheet and bake for 15-20 minutes, until crispy and halibut is cooked through.
- Step 7: Serve hot with Greek yogurt or sour cream on the side if desired.
Previous Recipe: Easy & Juicy Sear Sirloin Steak with Flavorful Herb Butter: My Family Favorite
Next Recipe: Easy & Juicy Smoke Tender Ribs for Delicious BBQ Flavor: My Family's Favorite Recipe