Biscuits with Sesame and Millet Flour: 5 Easy Steps for Nutritious Goodness!
Want delicious biscuits with sesame and millet flour? Discover how to create crispy, gluten-free biscuits that are perfect for any snack! Try it today.

- Nutty Millet & Sesame Biscuits: A Culinary Journey
- The Magic Behind This Recipe
- Health and Nutrition Highlights
- Recipe at a Glance
- Quality Ingredients Breakdown
- Kitchen Equipment Essentials
- Nutty Millet & Sesame Biscuits: A Wholesome Twist on a Classic
- Professional Secrets
- Perfect Presentation
- Storage and Make-Ahead
- Creative Variations
- Complete Nutrition Guide
- Expert FAQ Solutions
- Recipe Card
Have you ever wondered how a simple biscuit can carry the weight of tradition, while also bursting with modern-day nutrition? let me tell you, this isn’t just any biscuit we’re talking about—i'm here to introduce you to nutty millet & sesame biscuits .
These delightful treats take the classic biscuit to a whole new level with their earthy flavors and wholesome goodness . not only are they a breeze to whip up, requiring about 40-45 minutes from start to finish, but they also hover around a medium difficulty level .
So, whether you’re a baking novice or a seasoned pro, you’ll find yourself loving this adventure in your kitchen!
Now, let’s whisk away to a bit of history, shall we? the humble biscuit, or "biscuit" as the british might call it, has been a beloved staple ever since the anglo-saxons embraced the joy of baking with simple ingredients.
(fun fact: they called it a "little cake.") fast-forward to today, and we have a continuous evolution of this playful snack into healthier, guilt-free treasures.
What makes my nutty millet & sesame biscuits so special? well, they combine millet flour—a gem of a gluten-free flour that’s packed with dietary fiber —with toasted sesame seeds, creating a nutty depth that complements either sweet or savory toppings.
Now, why make these biscuits? let’s talk about their clear benefits: they’re not just tasty; they bring a host of nutritional perks .
We're living in a time where we often struggle to find snacks that don't make us feel sluggish, which is why these biscuits serve as protein-rich snacks and healthy biscuit alternatives .
Nutty Millet & Sesame Biscuits: A Culinary Journey
Starting on the journey of these biscuits takes us to a rich culinary heritage. isn't it fascinating how certain ingredients hold stories that span generations? millet, a crop that has been cultivated in various cultures for thousands of years, is celebrated today for its fiber-rich and nutritious qualities.
Similarly, sesame seeds, with their toastiness, lend not just flavor but also a slice of history, as they have been used in cooking across the globe.
The origin story? picture warm homes filled with the scents of baking while families gather around the table—these biscuits are a nod to such heartwarming moments.
Today, their popularity continues to rise, whether gracing afternoon teas or serving as lightly crispy biscuits during breakfast. if you fancy a healthy breakfast idea, these biscuits fit the bill just right!
The Magic Behind This Recipe
Let’s delve into the magic of flavors! what’s truly unique about these biscuits lies in the synergy between earthy flavors in baking and the nutty, buttery notes from the sesame and millet.
Seriously, the toasted sesame flavor hits all the right notes.
Plus, the techniques used here are pretty foolproof . with expert-tested methods, anyone can nail that perfect fluffy biscuit texture . my baking tips for biscuits would be to keep everything cold and resist the urge to overwork the dough.
Those simple steps yield biscuits that are crispy on the outside yet tender inside.
And if you’re short on time? I’ve got time-saving tips for ya! Pre-measure your ingredients, and you’ll be surprised at how quickly this recipe comes together.
Health and Nutrition Highlights
Now, onto the health side of things—better get your pens ready for these nutritious snacks ! these biscuits are a powerhouse thanks to the nutritional benefits of millet flour.
Rich in dietary fiber , these biscuits not only aid in digestion but help keep you full longer.
For those with dietary preferences, i’ve got you covered with dairy-free options . and whether you’re looking for a wholesome afternoon treat or a smart breakfast pastry, rest assured these beauties pack a punch in balanced nutrition facts .
Recipe at a Glance
So, here’s a quick snapshot for ya:
- Total Preparation Time: 40-45 minutes
- Skill Level Required: Medium
- Serving Size: About 12 biscuits
- Cost Efficiency: Super wallet-friendly!
Now that we’ve set the stage for these delightful biscuits with sesame and millet flour , let’s dive into what you need to bring this recipe to life.
Trust me; your kitchen is about to be filled with the most inviting scents, and you’ll be proudly serving up some homemade biscuits that’ll make even the toughest critics swoon!
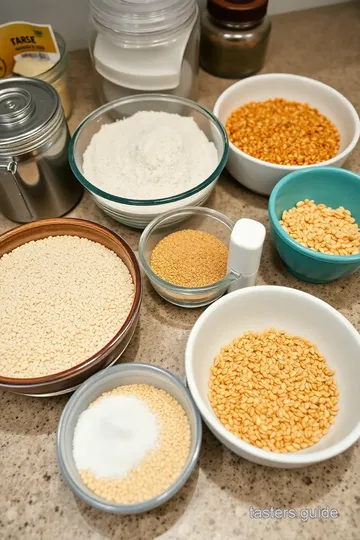
Quality Ingredients Breakdown
Alrighty, friends! let’s dive into what makes those nutty millet & sesame biscuits so darn scrumptious. it all starts with quality ingredients .
Think of them as the foundational stones of your recipe castle—you want sturdy ones!
Premium Core Ingredients
So, what do we need? Here’s the lowdown:
-
1 cup (120g) millet flour : this stuff is pure gold! it’s nuttier and packed with dietary fiber , which is ideal if you’re looking for nutritious snacks .
When picking your millet flour, look for a fine texture—like a soft pillow for your biscuits.
-
1 cup (120g) all-purpose flour (or gluten-free option) : This gives it that classic biscuit texture. Go for unbleached if you can; your biscuits will thank you later!
-
1/2 cup (60g) toasted sesame seeds : ah, the golden nuggets! if they smell nutty and look crispy when you buy them, you’re set.
If you have to toast them yourself, do it on low heat to avoid any burnt tragedies (yikes!).
-
1 tablespoon baking powder : This is how we get our biscuits to rise gloriously. Spongy goodness incoming!
-
1/2 teaspoon salt : Just a pinch! It enhances flavors and helps bring all the ingredients together.
-
1/4 cup (60g) cold unsalted butter : Cold is key here! Blend it into the dry mixture to get that fluffy biscuit texture.
-
3/4 cup (180ml) milk (or plant-based milk) : This is where we introduce moisture. Stick to cold milk; it helps keep the dough less sticky.
And hey, pro tip: Keep all these goodies in airtight containers to keep them fresh. You don’t want to turn your biscuits into stale stones later on!
Signature Seasoning Blend
Now let’s chat about the magic that brings these biscuits to life! You know, the kind of flavor explosion that gets your taste buds dancing?
-
Spice combinations : Go for a warm pinch of cinnamon if you fancy a sweet twist; it can totally change the biscuit game.
-
Herb selections : You could toss in some rosemary or thyme if you're feeling funky—trust me, they add an unexpected earthiness that'll blow your mind!
-
Flavor enhancers : You could even sneak in some nutritional yeast for a cheesy vibe—perfect for you vegan biscuit lovers!
Smart Substitutions
Discovered you’re out of millet flour? No sweat!
-
Alternative options : Try some oat flour or almond flour. They’re great, but remember, they might need a little extra binding.
-
Dietary swaps : Need it gluten-free? Go for a 1:1 gluten-free flour blend, and you’re golden!
-
Emergency replacements : No sesame seeds? No biggie! Pumpkin seeds can bring a lovely nutty crunch.
-
Seasonal variations : If you're deep into summer, fresh basil or chives could be a delightful addition for those savory biscuit recipes.
Kitchen Equipment Essentials
Alright, let’s not forget the tools of the trade! Without the right gear, even the best ingredients can go to waste, right?
-
Must-have tools : A good mixing bowl is essential for all that whisking and folding. It's a non-negotiable!
-
Recommended appliances : A food processor makes prepping quicker, especially when you're combining textures like butter into flour.
-
Helpful gadgets : Biscuit cutters are like magic wands—seriously! They help you achieve that perfect biscuit shape.
-
Home alternatives : Don’t have a rolling pin? A wine bottle works wonders. (Just remember to share the biscuits with your wine!)
Pro Ingredient Tips
Now, let’s move to some insider info that’ll elevate your cooking game:
-
Selection secrets : Always check the date on your flour and seeds. Freshness delivers flavor!
-
Quality markers : If you can, pay attention to organic or responsibly sourced ingredients. Your body will thank you!
-
Storage solutions : Use cool, dry places for your flours to prolong their lifespan.
-
Money-saving tips : Sometimes bulk buying can save a pretty penny. Plus, that just means more homemade biscuits in your future!
Alright, my biscuit-loving pals, you’re now armed with the essentials to whip up some biscuits with sesame and millet flour.
Next up, we’ll jump into the juicy part—how to get all this into your oven and create that wonderfully crispy snack you’ll be proud to share! stay tuned!
Nutty Millet & Sesame Biscuits: A Wholesome Twist on a Classic
Oh my gosh, i’ve got something yummy to share! you know those moments when you’re craving something crispy and light but still want to feel good about snacking? that’s exactly how i stumbled upon these nutty millet & sesame biscuits.
I was fiddling around in the kitchen one afternoon, yearning for a healthy alternative to those store-bought snacks that always leave me feeling a bit, well, ugh.
These biscuits are not just delish; they’re also packed with the earthy goodness of millet, which is super rich in dietary fiber – hello, “fiber-rich snacks”! plus, they’re gluten-free, so my gluten-sensitive pals can enjoy them too.
Essential Preparation Steps
Before diving in, let’s talk about mise en place —that fancy term we all hear in cooking shows. it’s all about getting your ingredients and tools ready.
For this recipe, you’ll need millet flour , toasted sesame seeds , and a few basic baking essentials. measure everything out first.
Trust me; it’ll make your life so much easier and less chaotic.
Prep techniques: when it comes to mixing, i like to take a relaxed approach. toss the dry ingredients together first: the millet and all-purpose flour (or your favorite gluten-free blend) and the sesame seeds.
The toasted sesame flavor truly takes these biscuits up a notch. i always toast mine; it brings out such a nice, nutty aroma!
Time management: this recipe is super friendly! you’re looking at about 10 minutes of active prep and then another 15 minutes of let-it-rest time .
So, while your dough is chilling, you can put your feet up—or better yet, prep some tea for when the biscuits come out of the oven!
Organization tips: i always keep my workspace tidy. as i bake, i try to clean as i go. not only does it keep me sane (less mess, less stress!), but it’s also great for when you want to show off your baking skills to friends.
Professional Cooking Method
Alright, let’s get down to the nitty-gritty on how to whip these up!
Step 1: Preheat your oven to 400°F (200°C) and line a baking sheet with parchment paper.
Step 2: in a mixing bowl, combine 1 cup of millet flour, 1 cup of all-purpose flour, ½ cup of toasted sesame seeds, 1 tablespoon of baking powder, and ½ teaspoon of salt.
Step 3: cut in cold cubed butter using your fingers or a pastry cutter until the mixture resembles coarse crumbs.
Keeping everything cold? that’s a critical step to achieving that fluffy biscuit texture!
Step 4: Pour in ¾ cup milk (or a dairy-free option) and stir gently until just combined; remember, don’t overmix ! The dough should be just slightly sticky.
Step 5: turn out the dough onto a floured surface and pat it into a rectangle about 1 inch thick .
Cut out the biscuits using a cutter and place them on the baking sheet. this is where the magic happens, folks!
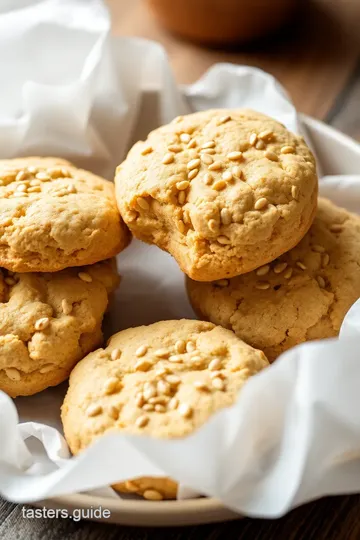
Step 6: If you’re feeling fancy, sprinkle some more sesame seeds on top before popping them in the oven.
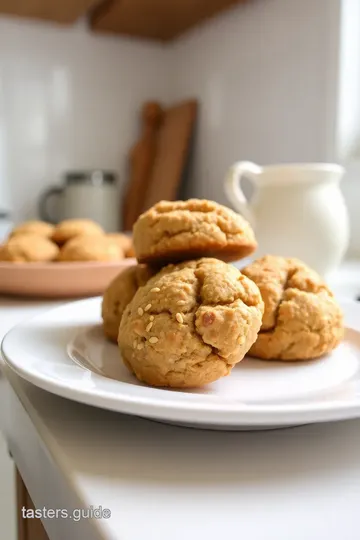
Step 7: Bake for 15-20 minutes . Look for that golden brown color; they’ll be puffed and lightly crispy. It’s such a satisfying visual cue!
Expert Techniques
Now, onto a few expert tips to ensure your biscuits turn out amazing :
-
Timing precision: keep an eye on your oven! each one can be a little different. if you aren't sure, give them a poke with a toothpick.
If it comes out clean, you’re golden.
-
Success Indicators: Look for that golden brown and slightly puffed appearance. And, oh, the smell? It’s heavenly!
-
Quality Checks: Give one a gentle squeeze once they cool. You want them to be slightly crispy on the outside and tender inside. Yummy!
Success Strategies
Baking can sometimes feel a bit like a science experiment, right? But fear not; I’ve got some troubleshooting tips for you:
-
If your biscuits flatten too much, make sure your butter is super cold. Keeping ingredients cool is key!
-
If they look pale, pop them back in for a few extra minutes.
-
And for a perfect results guide , remember: handle the dough as little as possible to keep them light and airy!
Now, if you’re curious about some additional ways to enjoy these biscuits and maybe even mix things up a bit, stay tuned! i’ve got ideas that’ll take these crispy delights to the next level, from serving suggestions to variations that’ll keep your taste buds hopping.
Whether you're making homemade biscuits for afternoon tea snacks or crafting some gluten-free goodies for your next brunch, there’s plenty of fun to be had in the kitchen!
Professional Secrets
Okay, let’s dive into the kitchen secrets that’ll help you whip up those delicious biscuits with sesame and millet flour like a pro.
One insight from my own kitchen escapades is using cold ingredients . it’s a game changer! cold butter and milk help achieve that tender yet flaky texture we all adore.
Seriously, i’ve tried it both ways, and the difference is night and day.
When it comes to expert techniques, think of rubbing the butter into the flour as a mini workout. get your fingers working until the mix resembles coarse crumbs—that’s your secret formula for a fluffy biscuit texture .
Trust me, no one wants a dense biscuit, right? and here’s a little kitchen wisdom i’ve gathered: don’t be afraid to test the dough .
A quick poke can tell you if it’s too sticky or too dry.
The success guarantee? Simply follow these baking tips for biscuits, and you’ll be on your way to creating crispy, golden goodness that everyone will rave about.
Perfect Presentation
Presentation matters, folks! plating techniques can take your homemade biscuits from good to drop-dead gorgeous. imagine dusting a light sprinkle of flour on your work surface before you cut the biscuits—so chef-y ! and if you want your biscuits to shine, a quick egg wash before popping them in the oven will give them a lovely glaze, making them look all golden and alluring.
For garnish ideas, how about a scattering of toasted sesame seeds on top? it not only tastes great but adds a lovely visual appeal.
And serving suggestions? these biscuits are fab with a side of your favorite jam or honey, making them perfect afternoon tea snacks.
When people see your beautifully plated biscuits, they won’t believe you made them yourself!
Storage and Make-Ahead
So, you’ve made a batch of these healthier biscuit alternatives , and you’re wondering how to keep them fresh? first, cool them completely before storing.
Place them in an airtight container, and they’ll last for up to a week, but let’s be honest—who can resist warm biscuits straight from the oven?
Preservation methods are straightforward. you can freeze them too! just wrap them tightly and toss them in a freezer bag; they’ll be good for about 3 months.
To reheat, pop them in a low oven (around 350°f) for about 10 minutes. freshness tip: never reheat in the microwave unless you like soft biscuits.
We want that light and crispy exterior, remember?
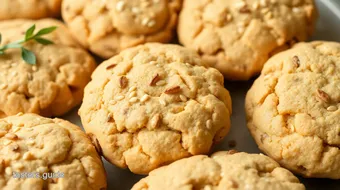
Creative Variations
Now, let’s get creative! the cool thing about baking with millet and sesame is the earthy flavors in baking just pop.
You can totally switch flavors depending on your mood! want a sweet biscuit? add a swirl of honey or a dash of cinnamon.
Feeling savory? finely chopped herbs or even cheese would elevate them beautifully.
Seasonal twists work wonders too. think about adding grated carrot in the spring or cranberries around the holidays. this way, you can enjoy those nutritious snacks year-round! and if you’re after regional variations, consider mixing in some local ingredients that reflect your area’s flavor.
That’s how cuisines evolve!
Complete Nutrition Guide
In terms of nutrition, these biscuits are a protein-rich snack making them awesome for breakfast. made with millet flour, they’re packed with dietary fiber , which is always a win for gut health.
If you’re counting calories, each biscuit clocks in at around 130 calories, making it a guilt-free indulgence.
Wondering about portion guidance? try to keep it to one or two biscuits if you’re planning to combine them with a meal, especially since they’re quite filling.
Not to forget, they are also excellent sources of vitamins and minerals, thanks to those wholesome ingredients.
Expert FAQ Solutions
Let’s tackle some common concerns. if your biscuits aren’t turning out quite right, it might be due to overmixing. remember, less is more when incorporating your liquids! an expert answer to the question "why did my biscuits spread too much?" is usually because of too much fat or not enough flour.
And if you’re troubleshooting a flat biscuit, try chilling your dough before baking. no one wants a sad, flat biscuit, right? success tips : always trust the process.
Baking is as much about feel as it is about measurements!
In conclusion, baking these biscuits with sesame and millet flour is about creating a delightful treat that’s both healthy and delicious.
It’s a simple process that yields impressive results. whether you’re having them for breakfast, as a snack, or pairing them with your afternoon tea, these biscuits are sure to be a hit.
So roll up those sleeves and get baking—your taste buds will thank you!
Biscuits with Sesame and Millet Flour: 5 Easy Steps for Nutritious Goodness! Card
⚖️ Ingredients:
- 1 cup (120g) millet flour
- 1 cup (120g) all-purpose flour (or gluten-free all-purpose flour for a gluten-free option)
- 1/2 cup (60g) sesame seeds, toasted
- 1 tablespoon baking powder
- 1/2 teaspoon salt
- 1/4 cup (60g) unsalted butter, cold and cubed
- 3/4 cup (180ml) milk (or plant-based milk)
- 2 tablespoons sesame seeds, to sprinkle on top before baking
🥄 Instructions:
- Step 1: Preheat the oven to 400°F (200°C). Line a baking sheet with parchment paper.
- Step 2: In a large mixing bowl, whisk together millet flour, all-purpose flour, toasted sesame seeds, baking powder, and salt.
- Step 3: Add the cold, cubed butter to the flour mixture. Use your fingers or a pastry cutter to rub the butter in until the mixture resembles coarse crumbs.
- Step 4: Pour in the milk and stir gently until just combined. Do not overmix; the dough should be slightly sticky.
- Step 5: On a floured surface, turn out the dough and gently pat it into a rectangle about 1 inch thick. Cut out biscuits using a biscuit cutter and place them on the prepared baking sheet.
- Step 6: Sprinkle additional sesame seeds on top if desired.
- Step 7: Bake for 15-20 minutes or until golden brown and cooked through. Visual cue: biscuits should be puffed and lightly golden.
- Step 8: Allow the biscuits to cool slightly on a wire rack before serving.
Previous Recipe: Brownie Brands Label: 5 Delicious Ways to Make Decadent Dreamy Brownies!
Next Recipe: Lisbon food filled with yellow: 5 Amazing Bacalhau à Brás Recipes!