Decadent Vanilla Bread Pudding with Creme Anglaise
Looking for a comforting dessert? This easy vanilla bread pudding is packed with flavor and nostalgia, made with just 8 ingredients. Perfectly paired with homemade creme anglaise, it's a must-try!

Oh my gosh, have i got a treat for you! i still remember the first time i made bread pudding .
I was knee-deep in a kitchen disaster involving pancakes that just wouldn’t flip. in a last-ditch effort to salvage my brunch attempts, i threw together some stale bread, eggs, and milk.
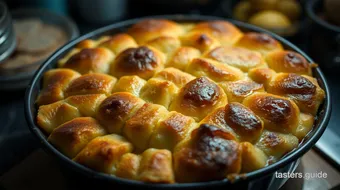
Fast forward an hour, and there it was: my warm, comforting creation, golden brown and drizzled in creamy goodness. yep, that moment cemented my love for the best easy vanilla bread pudding recipe .
You ever had a dessert that just wraps you in a cozy hug? that’s what this recipe does! it's the ultimate comfort food —sweet, rich, and just plain delicious.
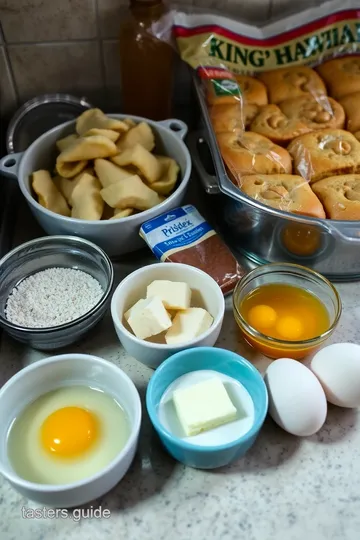
And guess what? you’ll only need 8 simple ingredients to whip it up, many of which you probably have lying around.
Let’s dive into the sweet world of bread pudding ingredients and discover how to make this warm dessert your family will crave!
Recipe Overview
Did you know that bread pudding has roots steeped in history? originating in england, this dish was a clever way to use up stale bread—no waste here! fast forward to modern times, and it’s a star at every potluck, family gathering, and cozy night in.
Today, it’s found a special place among classic american desserts , showing just how loved this creamy, egg-based delight is.
Making this vanilla bread pudding is a breeze—it’s an easy dessert recipe that takes only 55 minutes from start to finish .
That’s less time than it takes for a netflix episode! and the best part? the total cost per serving is super budget-friendly.
You’ll get a generous 8 servings without breaking the bank, making it perfect for larger gatherings or just because you want to indulge.
Key Benefits
Now, here’s where things get even better. this classic vanilla dessert is not just a guilty pleasure; it packs a punch in the nutrition department too.
We’re talking about protein from eggs, calcium from milk, and healthy fats from cream. who knew something so delicious could be kinda good for you, right?
Perfect for special occasions , this dessert shines at holiday dinners, birthday bashes, or any family gathering. Trust me, when you serve this warm, drizzled with a homemade creme anglaise , everyone will be asking for seconds—if they can even wait that long!
Compared to other desserts, this bread pudding has the advantage of being easily customizable. you can throw in fruit, nuts, or even a splash of your favorite liqueur for a grown-up twist.
Plus, it’s a fantastic option for using up that stale bread instead of tossing it out—total win!
Now that we’re all revved up about this dreamy, creamy dessert , let’s get into what you’ll need to assemble this showstopper.
Gather your bread pudding ingredients , and let’s get baking! This is gonna be fun!
Your Ultimate Essential Ingredients Guide
Hey there, food lovers! are you ready to step up your cooking game? i’m here to guide you through all the essential ingredients you need in your kitchen for chef-level meals.
We’ll break it down into easy bits, so even if you're just starting out, you'll feel like a pro. let’s dive in!
Premium Core Components
First off, let’s talk about your premium core components . You know, those ingredients that can make or break a dish?
-
Measurements: whether you're measuring in cups or grams, it's key to get that right. for instance, if a recipe calls for 2 ½ cups of whole milk (that’s about 480 grams), follow it! precision is everything, my friend.
-
Quality Indicators: Want to pick the best vanilla? Look for pure vanilla extract—not the fake stuff! For milk, go for organic whole milk if you can. It makes a huge difference!
-
Storage guidelines: ingredients don’t last forever! keep your spices in a cool, dark place, and be aware that they can lose their potency.
A good rule of thumb? most spices last about 1-2 years, while the fridge is the friend of dairy!
-
Freshness tips: ever wonder how to pick ripe fruit? for avocados, if it gives a little when you gently squeeze it, it's ready to rock.
A little tip: check the stem for color; if it’s green, you’re in business!
Signature Seasoning Blend
Now, moving on to that magical section we all love: signature seasoning blends . You want flavor? You got it!
-
Essential Spice Combinations: Think garlic powder, onion powder, and smoked paprika—that combo just screams flavor! Try mixing them for a quick hit of yum in your dishes.
-
Herb Selections: Fresh or dried? Honestly, I’m team fresh for most dishes! Basil, oregano, and thyme are classics that complement many recipes.
-
Flavor Enhancers: Don’t forget about aromatics! Onions and garlic are like the dynamic duo of flavor-building. Sauté them at the start for a base that just brings everything together.
-
Regional Variations: Ever tried Italian seasoning or Cajun spice blends ? They can completely change the vibe of your meals without requiring much effort.
Smart Substitutions
Oops! Ran out of an ingredient? No sweat! Here’s where smart substitutions come to the rescue!
-
Common Alternatives: If you’re out of eggs, try unsweetened applesauce or mashed bananas. It’s a game-changer for some baking recipes.
-
Dietary Modifications: Going gluten-free? Swap regular flour for almond or coconut flour. Just keep in mind that the ratios might look a little different!
-
Emergency Replacements: A little low on sugar? Honey, maple syrup, or even agave nectar can step in for a sweet touch!
-
Seasonal Options: Just like the seasons, ingredients can change. Use what’s in season for bursting flavors. Right now, fresh berries are everywhere, making for a perfect ingredient in a luscious vanilla bread pudding!
Kitchen Equipment Essentials
Last but not least, let’s cover your kitchen equipment essentials . Can’t cook without your trusty tools!
-
Must-Have Tools: A good chef’s knife, cutting board, mixing bowls, and a sturdy baking dish are all must-haves. Don’t underestimate the power of a quality whisk either!
-
Alternative Equipment Options: Don’t have a whisk? A fork can do the trick in a pinch. Need a rolling pin? Use a wine bottle instead!
-
Preparation Tips: Prepping ingredients before getting into the cooking groove will save you a ton of time. Seriously, you’ll thank me later.
-
Storage Solutions: Invest in some good airtight containers. They’re perfect for keeping dry ingredients fresh and making your pantry look snazzy, too.
So there you have it! you’re now armed with a rock-solid essential ingredients guide . whether you're crafting the best easy vanilla bread pudding recipe or experimenting with baking for beginners , knowing your ingredients is key to creating some seriously delicious homemade desserts.
Ready to put all this knowledge to use? Let’s jump right into the delicious details of how to make bread pudding ! You’ll be serving up warm, sweet goodness in no time!
Mastering Professional Cooking: Essential Preparation for Success
Alright, friends! let’s dive deep into the world of professional cooking methods. this ain’t just about slapping some ingredients together; it's about creating culinary magic.
So, buckle up for a ride through essential preparation steps to ensure your kitchen adventure is seamless and successful.
Essential Preparation Steps
Mise en place: this fancy french term means “everything in its place.” it's the golden rule of professional cooking! before you start, chop all your veggies, measure your spices, and gather your ingredients.
This way, when it’s time to cook, you won’t be digging through the pantry like a squirrel looking for a nut.
Trust me, it makes a world of difference!
Time management tips: cooking isn’t just about ingredients; it’s also about timing. sketch out a game plan. are there components that need longer cooking times? get those going first! you don’t want to be staring at a pot of potatoes when your chicken is done.
Being organized before you start will save you the headache later on.
Organization strategies: keep your workspace tidy! having a clutter-free area allows you to focus on what’s important. use bowls for prepped ingredients and keep your tools handy.
Pro tip: clean as you go. this isn’t just a nifty trick, it's like a warm hug when you look around and see a tidy kitchen towards the end of your cooking marathon.
Safety considerations: please, please, please wash your hands! a moment's neglect can lead to hours of regret. keep your cutting boards separate for meat and veggies.
And always use a sharp knife. dull knives are the sneaky culprits behind kitchen mishaps. remember, safety first, culinary excellence second!
Step-by-Step Process
Alright, now that we’ve got the basics down, let’s get into the nitty-gritty. Here’s a clear, numbered walkthrough that makes cooking feel more like a fun project than a chore.
-
Preheat the Oven: Get that oven going at 350° F (that’s about 175° C for our metric friends).
-
Prep Your Ingredients: Chop, dice, and marinate. Organize your ingredients and set them up so they flow into your cooking process effortlessly.
-
Temperature Control Points: Be mindful of heat. Different foods need different temperatures. For example, let that chicken sizzle in medium-high heat , while simmering sauces often need a gentler medium-low .
-
Timing precision: every dish has a window. for our classic vanilla bread pudding , you’ll bake it for 35- 40 minutes .
If it wobbles a bit when shaken, you’re on the right track!
-
Visual cues for doneness: use your eyes! a golden crust is often the sign of a perfectly baked dish. don’t be afraid to poke a fork in there if you’re unsure; you want it cooked, not prehistoric.
Expert Techniques
We’re getting into some expert territory now! This is where you can really show off your skills and nail that dish.
-
Professional Methods: Techniques like poaching, braising, or sous-vide aren’t just for fancy restaurants. Try them at home! Learning to braise meats, for example, will elevate your game significantly.
-
Critical steps explained: don’t skip resting your meats after cooking. letting them sit for a few minutes locks in those juicy flavors.
This doesn't just apply to meats; let your baked goods cool too!
-
Quality Checkpoints: Always taste as you go. If your dish lacks flavor, a pinch of salt or a dash of vinegar can take it from blah to WOW.
-
Troubleshooting Tips: If your sauce is too thin, simmer it longer. If it’s too thick, add a splash of stock or water. Cooking is all about adapting!
Success Strategies
To finish strong, let’s chat about avoiding pitfalls and making your practice shine.
-
Common Mistakes to Avoid: One biggie? Not adjusting your seasoning. Always taste your dish repeatedly.
-
Quality Assurance Tips: Use fresh ingredients whenever you can. They are the heart and soul of quality dishes.
-
Perfect Results Guide: Don’t rush your process. Good things come to those who wait!
-
Make-Ahead Options: Consider batch cooking. Many dishes, like our luscious bread pudding , can be made ahead and just popped in the oven when guests arrive.
Now that we’ve laid down the groundwork for professional cooking techniques, you'll be well-prepped for what’s next. get ready to whip up some deliciousness and learn more about additional tips to level up your kitchen game.

Additional Recipe Information
When it comes to the best easy vanilla bread pudding , it’s all about the little details that take a comforting dessert to the next level of deliciousness.
Let’s dive into some nifty tips and tricks that’ll have your family coming back for seconds!
Pro Tips & Secrets
Oh my gosh, this bread pudding is so easy, you’ll feel like a baking pro in no time! here’s a little secret: use stale bread for the best results.
If you got day-old king's hawaiian rolls lurking in your pantry, you’re golden! not only do they soak up that sweet custard beautifully, but they bring an amazing sweetness to the party.
Want to save some time? prep the night before! cube your bread and mix the custard, then cover and pop it in the fridge overnight.
The next morning, it's just a matter of baking it. easy peasy, and it saves you some stress on a busy day.
For enhancing flavors , i like to throw in a pinch of nutmeg or cinnamon! it makes the aroma divine and adds a touch of warmth.
Plus, did i mention that adding a splash of bourbon or rum gives it a grown-up charm? trust me, your taste buds will thank you!
Perfect Presentation
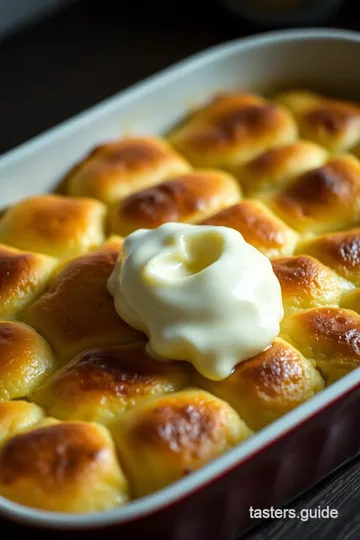
Now, let’s chat about how to make this dessert as pretty as it is tasty. First off, plating is key ! Serve your warm bread pudding in bowls and drizzle with that homemade creme anglaise —that silky-smooth custard sauce really elevates the dish!
For a pop of color, consider garnishing with fresh berries or maybe a sprig of mint. it’s like dressing up your dessert for a fancy dinner party, right? you can even sprinkle a little powdered sugar on top to really make it shine.
Trust me, that visual appeal makes everyone want to dive in!
Storage & Make-Ahead
Alright, so once you're done enjoying that warm slice of heaven, you might have leftovers. don’t stress! this bread pudding keeps pretty well.
Store it in an airtight container in the fridge for about 3 to 4 days . to reheat, pop it in the oven at 350° f for about 15 minutes, and it’ll taste almost as good as fresh out of the oven.
If you want to make it ahead of time, you can bake it a day before your event. just let it cool completely, cover, and place it in the fridge.
Right before serving, reheat with the creme anglaise on the side, and voila —a quick and easy dessert that’ll wow your guests!
Creative Variations
Now, let’s get wild with some variations! feeling fruity? toss in some sliced bananas or chopped apples to the mix for a fruity twist.
You could also swap the cream for coconut milk if you’re going dairy-free. the best part about this recipe is that it’s entirely flexible; make it your own!
Think of it this way: this is your playground for dessert! got some chocolate lovers in the house? drizzle a bit of chocolate sauce on top or even mix in chocolate chips before baking.
You can take it in so many directions , and it’ll still be the same comforting dessert you love!
Complete Nutrition Guide
Don’t let the decadence fool you—this dessert has its perks! here’s a simple breakdown: a single serving packs around 310 calories .
Sure, it’s a treat, but it’s made mostly from basic ingredients like eggs, milk, and bread—an egg-based dessert that’s both cozy and filling.
Just be mindful of portion sizes! this recipe serves about 8 . cut it into smaller pieces for a lighter indulgence.
Just don’t skimp on that creamy sauce —that’s the cherry on top!
Expert FAQ Solutions
Thinking about making this vanilla bread pudding? Here are some common questions I’ve come across:
-
Can I use different types of bread? Absolutely! Feel free to experiment with any soft bread— French bread, challah, or even a nice brioche !
-
What do I do if my custard looks lumpy? A quick strain through a fine mesh sieve should do the trick! It’s all about keeping that creamy custard texture .
-
How do I know when it’s done? Look for a nice golden color, and if it jiggles slightly in the center, you’re all set!
In the end, bread pudding isn’t just dessert; it’s a bit of nostalgia, a warm hug in a bowl. so don’t overthink it; just whip it up and enjoy the sweet, warm delight of your best easy vanilla bread pudding .
Your family will love it! keep experimenting and have fun with it; remember, the kitchen is where the magic happens!
Decadent Vanilla Bread Pudding with Creme Anglaise Card
⚖️ Ingredients:
- 1 (12-pack) King
- s Hawaiian Original Sweet Rolls (or 1 (12oz) loaf Brioche bread), ideally dried out overnight
- 3 tbsp unsalted butter + more for greasing the pan (45g)
- 4 large eggs
- 2 egg yolks
- 2 ½ cups whole milk (480g)
- 1 cup heavy cream (240g)
- ¾ cup granulated sugar (165g)
- 2 tsp pure vanilla extract
- Optional: pinch of salt
🥄 Instructions:
- Step 1: Preheat oven to 350°F (175°C) and grease a 7x11 inch baking dish with unsalted butter.
- Step 2: Chop the Kings Hawaiian Rolls into 1.5-2 inch cubes and arrange in the greased baking dish.
- Step 3: In a nonstick saucepan, whisk together eggs, egg yolks, whole milk, heavy cream, sugar, vanilla, and a pinch of salt.
- Step 4: Place the saucepan over medium-low heat and gently stir until the butter melts. Do not wait for the mixture to thicken.
- Step 5: Pour the custard mixture evenly over the bread, ensuring all pieces are well-soaked. Reserve 1.5 to 2 cups for later.
- Step 6: Press down gently on the bread to eliminate dry spots.
- Step 7: Transfer to the oven and bake for 35-40 minutes, until golden and only slightly wobbly when shaken.
- Step 8: On low heat, return the reserved custard to the stove. Stir constantly until it thickens slightly. Strain for a smooth sauce.
- Step 9: Serve warm bread pudding drizzled with creme anglaise and dusted with powdered sugar.
Previous Recipe: My Grandma's Ultimate Creamy Baked Mac and Cheese Recipe
Next Recipe: Ultimate Crispy Fried Mashed Potato Balls: A Family Favorite