Delicious Nata Fruit Pudding: A Creamy Treat in 40 Minutes
Looking for a delightful dessert? Try my Delicious Nata Fruit Pudding in 40 Minutes! This creamy treat combines vibrant fruits and custard. Perfect for any occasion!

- A Sweet look into into Delight: Nata Fruit Pudding
- A Little Bit of History with a Modern Twist
- Why You’ll Lovin’ It: The Key Benefits
- Time to Gather What You Need!
- Your Go-To Guide for Essential Ingredients
- Mastering the Art of Professional Cooking
- Pro Tips & Secrets for the Delicious Nata Fruit Pudding in 40 Minutes
- Perfect Presentation: Plating Like a Pro
- Storage & Make-Ahead: Keep it Fresh
- Creative Variations: Get Adventurous with Your Pudding
- Complete Nutrition Guide: Your Pudding Breakdown
- Wrapping It All Up
- Frequently Asked Questions
- Recipe Card
A Sweet look into into Delight: Nata Fruit Pudding
Oh my gosh, let me tell you about the first time i made delicious nata fruit pudding in 40 minutes .
I was having friends over, and i wanted to wow them with a dessert that wasn’t your average run-of-the-mill sweet.
So, i decided to whip up this tropical delight from portuguese roots. the moment i served it, i felt like a rockstar! everyone was diving in, savoring the creamy custard paired with fresh fruit.
Honestly, it felt so rewarding to see their faces light up with every spoonful.
A Little Bit of History with a Modern Twist
Nata pudding, or as some call it, the portuguese custard treat , has a rich history. it hails from portugal and was traditionally made with just a handful of simple ingredients.
Over the years, it’s found its way into our hearts and homes, evolving into various versions around the globe. fast forward to today, and it’s a super popular dessert, especially during summer.
Who doesn’t love a creamy fruit dessert on a hot day, right?
Now, who’s gonna say no to a dessert that’s ready in just 40 minutes ? this recipe is a breeze! seriously, all you need is about 15 minutes for prep, 15 minutes for cooking, and bam! you can have a chill dessert ready to wow your gatherings.
Plus, it yields about four servings, making it perfect for small get-togethers. and don’t worry about breaking the bank; making this pudding is surprisingly cost-efficient with pantry staples.
Why You’ll Lovin’ It: The Key Benefits
Aside from the taste, let’s talk health for a hot second. this nutritious pudding dessert is packed with the goodness of fresh fruits.
You can load it up with your faves—be it sweet strawberries or tropical mangoes. each serving provides a light, satisfying experience that feels indulgent without the guilt.
Not only is it delicious, but this pudding is also vastly adaptable! you can play around with dessert variations and substitutions .
For a chocolate-lover’s twist, add cocoa powder. for a lighter flair, use coconut milk instead of heavy cream. oh, the possibilities are endless, especially when you consider how you can switch up your custard with fresh fruit toppings!
What's even better? this creamy delight is a simple dessert for gatherings . whether it's a backyard bbq or a fancy dinner party, it will impress everyone.
Plus, it’s versatile enough for any occasion, making it a go-to for parties and holidays alike.
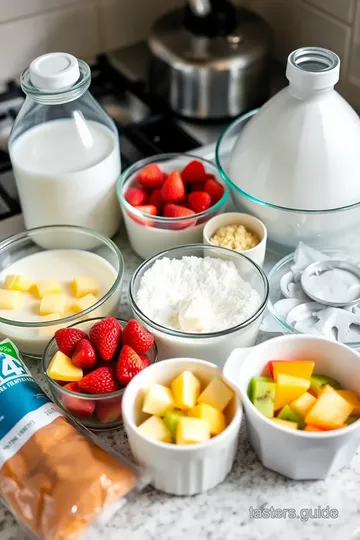
Time to Gather What You Need!
Okay, now that I’ve whetted your appetite, let’s get to the nitty-gritty—the ingredients! You’ll need some basic items you probably already have in your kitchen:
For the pudding, grab:
- Whole milk and heavy cream (the dream team!),
- A couple of scattered tablespoons of sugar,
- Cornstarch (for that luscious thickness),
- A bit of vanilla, and
- An egg yolk to bring it all together.
For the fruit topping, head to the store or your fridge and pick out a colorful mix of fresh fruits like strawberries, kiwi, or mango.
And don’t forget some optional fresh mint for garnishing. It adds a pop of color and enhances those sweet and tangy flavors .
So, ready to dive in? let’s turn these ingredients into a creamy, dreamy pudding that smells and tastes like summer! get your whisk ready because we’re about to create a dessert that’ll make you the mvp of your next gathering! and don’t worry—i’ll guide you through it every step of the way.
Let’s go!
Your Go-To Guide for Essential Ingredients
Hey friend! let’s talk about something super important in our kitchen adventures: essential ingredients . knowing your staples can seriously make or break a recipe.
Trust me, nobody wants to get halfway through making something gooey and delicious only to realize they forgot a key component!
Premium Core Components
First off, let’s nail down some premium core components you gotta have. when you’re shopping, think about the quality. check for fresh produce, unprocessed oils, and organic spices if you can.
And hey, if you’re buying dairy, go for the whole milk and heavy cream because that’s where the richness lives .
Here are some details to save you a trip back to the store:
- Milk : Look for expiration dates (it's usually about 2-3 weeks).
- Heavy Cream : If it’s thick, you’re golden!
- Granulated Sugar : No clumps? You’re good.
As for storage , most of these goodies can hang out in a cool, dry place. but milk and cream? keep those chilled ! after they’re opened, use them within a week or so.
Signature Seasoning Blend
Now, let’s dive into that signature seasoning blend . Spice it up! The combinations are endless, but here are a few must-haves to elevate your cooking:
- Cinnamon and nutmeg for those warm flavors in cozy desserts.
- Chili powder and cumin for some depth in savory dishes.
- A touch of garlic powder spearheads just about any comfort food.
When you’re picking your herbs, think about what complements your dish. fresh basil with tomatoes? yes, please! or think about a zesty parsley to flay some richness like in our delicious nata fruit pudding in 40 minutes .
Smart Substitutions
Okay, life happens. Sometimes you don’t have everything on the list, but no worries ! Here are some smart substitutions :
- If you don’t have heavy cream, use coconut milk for that silky texture.
- No vanilla extract? A pinch of almond extract can really do the trick.
- And for eggless versions, a bit of cornstarch can be a lifesaver!
I swear, the joys of cooking are all in flexibility!
Kitchen Equipment Essentials
Let’s not forget about your kitchen equipment . Here’s what I consider must-haves :
- A good whisk : not just for eggs, but for creamy puddings and dressings!
- Measuring cups and spoons : seriously, they make life SO much easier.
- A medium saucepan : perfect for our pudding!
But if you find yourself without a whisk, grab a fork! It’s all about improvisation. When prepping, I’ve learned that having a clean workspace is key, too. It saves you scrambling mid-recipe!
Get Ready for Deliciousness!
So there you have it, your essential ingredients guide to help you whip up all kinds of goodies , like that nata pudding recipe we can’t stop raving about.
With your pantry stocked, you’re all set to whip up this creamy fruit dessert that takes just 40 minutes .
Imagine if you're throwing a dinner party—this dessert will be the cherry on top, or should i say the lush fruit topping?
Feeling confident? i hope so! grab your gear, and let’s make that delicious nata fruit pudding . it’s the perfect treat that’s not only a quick pudding dessert but also a showstopper .
You’re going to love it, trust me! now, let’s get into those instructions and start cooking!

Mastering the Art of Professional Cooking
When it comes to whipping up something delightful in the kitchen, understanding professional cooking methods can be a game changer.
So, let’s dive right into it: how about we aim to impress our friends with a delicious nata fruit pudding in 40 minutes ?
Essential Preparation Steps
First up, let’s chat about mise en place . this fancy term just means getting everything ready before you start cooking.
It’s like laying out all your cards on the table before a poker game. trust me, it saves you from scrambling around looking for that one measuring cup when you should be whisking away.
Time management is key, especially if you’re like me and get distracted by a sizzling pan or a cute puppy video.
I’ve learned that planning your activities in chunks makes a huge difference. for this pudding, give yourself about 15 minutes for prep , 15 minutes for cooking , and 10 minutes for chilling .
Easy peasy!
As for organization strategies , keep your workspace tidy. nothing feels worse than a messy counter when you’re feeling creative in the kitchen.
And hey, let’s not forget safety considerations ! always be cautious when handling hot pans. i once had a “battle” with a boiling pot of water—trust me, the water won!
Step-by-Step Process
Now let’s get to the heart of the matter. Here’s how we’re going to make this pudding:
-
Prepare the pudding mixture: in a medium saucepan, combine 1 cup of whole milk , 1 cup of heavy cream , 3 tablespoons of sugar , and 1 tablespoon of cornstarch .
Whisk that bad boy until smooth. set this over medium heat, continuously whisking until it thickens—about 5- 7 minutes .
-
Add Flavorings: Off the heat, stir in 1 teaspoon of vanilla extract and 1 egg yolk . Whisk it real good!
-
Chill the pudding: pour your mixture into serving cups. let them cool on the counter for 10 minutes , then pop them into the fridge for another 10 minutes .
I know, it’s hard to wait!
-
Prepare the Fruit Topping: While our lovely pudding chills, chop up 1 cup of fresh fruits . Think strawberries, mangoes, and kiwi for that tropical vibe!
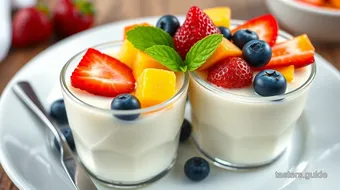
-
Assemble and Serve: Top those cups with your fruit, and maybe a sprig of mint if you’re feeling fancy.
Make sure to keep an eye on your cooking temperatures, and remember—precision is key. if the pudding looks somewhat too liquidy, give it another minute or two on the heat.
And look for visual cues: a nice glossy top without any lumps means you’re on the right track!
Expert Techniques
When we’re talking professional methods , there are a few tricks to keep in mind for that glorious pudding.
-
Quality checkpoints: Always taste your pudding before chilling. That creamy goodness should have a balance of sweetness.
-
Troubleshooting tips: If your pudding doesn’t thicken as expected, no worries! Just simmer it a bit longer, whisking gently until you hit that sweet spot.
Success Strategies
Let’s be honest, we all mess up sometimes. avoid common mistakes, like not whisking continuously. it's the number one rule! also, for that perfect creamy texture, use fresh ingredients .
Trust me; proper quality matters more than you think.
For those who like to plan ahead, this pudding can be made in advance . just top it with fruit right before serving.
That’s why it’s perfect for gatherings or when you need easy dessert recipes up your sleeve!
Quick pudding desserts like this one can dazzle in no time! And who doesn’t love a refreshing summer dessert after a hot day?
Additional Information...
So, there you have it! with just 40 minutes , you can bring a slice of portuguese cuisine into your home with this creamy fruit dessert .
I mean, who wouldn’t want to impress their friends and family with a tropical fruit pudding that’s as easy to make as it is to eat? get out there and make this pudding! you’ll be enjoying a delightful custard with fresh fruit in no time—and honestly, it’s worth every second in the kitchen.
Happy cooking!
Pro Tips & Secrets for the Delicious Nata Fruit Pudding in 40 Minutes
Alright, friends! let’s dive into some pro tips and secrets that’ll take your nata pudding recipe to the next level.
Having a few tricks up your sleeve can really transform that creamy fruit dessert into something spectacular.
First off, don’t skip the whisking. seriously, this step is crucial. while cooking your pudding, whisk continuously . this keeps your pudding smooth and free of lumps.
Nobody wants a bumpy pudding, right? think of it as a workout for your arms, and bonus, you’ll end up with a silky-smooth treat!
If you’re crunched for time, here’s a little gem: chill your pudding more effectively by spreading it out in shallow dishes.
This way, it cools quicker, and you won’t be staring at your fridge, willing it to chill faster. who has time for that?
For flavor enhancement, don’t be afraid to go wild! consider adding a splash of almond extract or a sprinkle of nutmeg for a little twist.
It’s all about those bold, sweet and tangy flavors. add lemon zest if you’re feeling fancy!
Lastly, get creative with how you present your pudding. Serve it in those cute little jars or stylish cups. Before you know it, you’ll be plating up something that looks like it came straight out of a fancy restaurant!
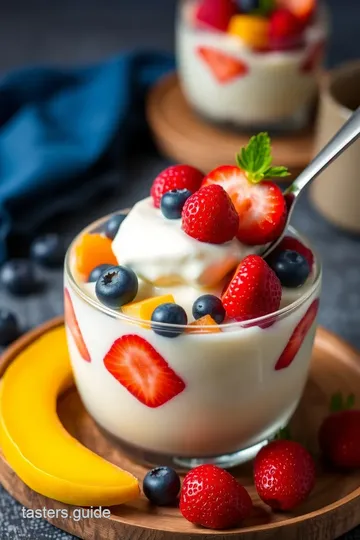
Perfect Presentation: Plating Like a Pro
Now, let’s get into the art of presentation . Honestly, folks, you eat with your eyes first. A well-presented dish can make even the simplest dessert feel like a special occasion.
Start with the basics: color combinations . using a mix of bright fruits like strawberries, mangoes, and kiwis makes your pudding come alive! you've got creamy yellow vanilla custard with pops of color everywhere.
It’s like a little party in a cup.
Garnishes can turn the dessert from simple to stunning. add fresh mint leaves for a pop of green. and for a touch of elegance, sprinkle a little powdered sugar on top.
It sounds fancy, but it’s super simple! when in doubt, remember, a little goes a long way.
Storage & Make-Ahead: Keep it Fresh
Thinking of making this tropical fruit pudding ahead of time? great idea! storage guidelines are pretty straightforward. keep your pudding in the refrigerator in airtight containers.
It’ll stay fresh for about 3 days , but i doubt it’ll last that long because it’s just too darn yummy.
If you want to keep your pudding from getting watery, don’t add the fruit topping until right before you serve.
That way, it stays fresh and vibrant — and nobody wants a soggy topping! when it’s time to reheat, a quick zap in the microwave for about 10-15 seconds will do the trick.
Just remember to stir it up afterwards so it warms evenly.
Creative Variations: Get Adventurous with Your Pudding
Let’s talk about some creative variations . Heck, this pudding is a blank canvas! You can change things up depending on what you have on hand or the season.
For a chocolate twist, mix in cocoa powder. it transforms your custard with fresh fruit into something indulgent and rich! you can even swap out the fruits for what’s in season; think peaches in summer or apples in fall.
It’s all about adapting to what you love!
Got dietary restrictions? no problemo! you can whip up a dairy-free version by using coconut milk instead of heavy cream.
Just like that, you have a delicious and nutritious pudding dessert for everyone!
Complete Nutrition Guide: Your Pudding Breakdown
This nutritious pudding dessert isn’t just tasty; it’s got some good stuff too! each serving is around 210 calories , which isn’t too shabby for a dessert.
You’ve got protein and healthy fats from the milk and cream, so it’s worth every spoonful!
Looking for dietary considerations? If you’re watching your sugar, feel free to reduce the granulated sugar or try using a natural sweetener. Balancing flavors with health is totally doable!
Wrapping It All Up
So, there you have it! the inside scoop on making the delicious nata fruit pudding in 40 minutes . i promise you, once you whip this up, you’ll have people asking you for the recipe.
It’s an easy dessert recipe that’s perfect for gatherings or just a night in. and who doesn’t love a smooth and creamy pudding that doesn’t take all day to make?
Try it out, have fun with it, and don’t be afraid to make it your own. After all, cooking is all about experimentation and enjoying the process. Happy pudding making, friends!
Frequently Asked Questions
What makes the "Delicious Nata Fruit Pudding in 40 Minutes" so special?
The "Delicious Nata Fruit Pudding in 40 Minutes" stands out due to its creamy custard-like texture paired with fresh, vibrant fruits. The quick preparation time allows you to whip up this intricate dessert for any occasion, making it a convenient choice for both gatherings and quiet nights at home.
Can I use frozen fruits instead of fresh for the topping?
Yes, you can use frozen fruits if fresh ones are not available. Just make sure to thaw and drain any excess moisture before dicing and topping the pudding to prevent it from becoming watery.
How should I store the "Delicious Nata Fruit Pudding in 40 Minutes"?
Store the pudding in an airtight container in the refrigerator for up to 3 days. It’s best to top with fruits just before serving to keep them fresh and maintain their texture.
Can I make this pudding in advance?
Absolutely! You can prepare the pudding a day ahead; just store it covered in the fridge. When ready to serve, simply add fresh fruits and any optional garnishes you desire.
What are some variations I can try with this pudding recipe?
Feel free to experiment with flavors! Add cocoa powder for a chocolate version or spices like cinnamon for warmth. You can also substitute heavy cream with coconut milk for a dairy-free option, and try different fruits based on your preference or season.
Is this pudding suitable for people with dietary restrictions?
Yes, the recipe can be modified to accommodate various dietary needs. Use almond or coconut milk for a dairy-free version, and substitute sugar with a suitable sweetener if needed. Just ensure any fruit toppings align with the dietary guidelines you’re following.
Delicious Nata Fruit Pudding: A Creamy Treat in 40 Minutes Card
⚖️ Ingredients:
- 1 cup (240 ml) whole milk
- 1 cup (240 ml) heavy cream
- 3 tablespoons (30 g) granulated sugar
- 1 tablespoon (10 g) cornstarch
- 1 teaspoon vanilla extract
- 1 large egg yolk
- 1 cup mixed fresh fruits, diced (e.g., strawberries, kiwi, mango)
- Fresh mint leaves (for garnish, optional)
- Additional fruit slices (for garnish, optional)
🥄 Instructions:
- Step 1: In a medium saucepan, combine the whole milk, heavy cream, sugar, and cornstarch. Whisk until smooth.
- Step 2: Heat over medium heat, whisking continuously until the mixture begins to thicken (about 5-7 minutes).
- Step 3: Remove the saucepan from heat. Stir in vanilla extract and add the egg yolk. Whisk thoroughly.
- Step 4: Pour the pudding into serving cups or bowls. Allow it to cool for about 10 minutes at room temperature before refrigerating it for another 10 minutes.
- Step 5: While the pudding is chilling, dice the mixed fruits.
- Step 6: Top the chilled pudding with the diced fruits. Garnish with fresh mint leaves if desired.
Previous Recipe: My Family's Favorite Sautéed Chicken Tenders with Sweet Apple Glaze
Next Recipe: Easy & Moist Bake Swedish Walnut Color Cake in 50 Minutes: Perfect for Any Occasion