Deliciously Crafty Jelly Month Club Jams
Ever wondered how to make vibrant jams? Join me in the Jelly Month Club! Here are my favorite easy recipes that celebrate seasonal flavors. Let’s get cooking!

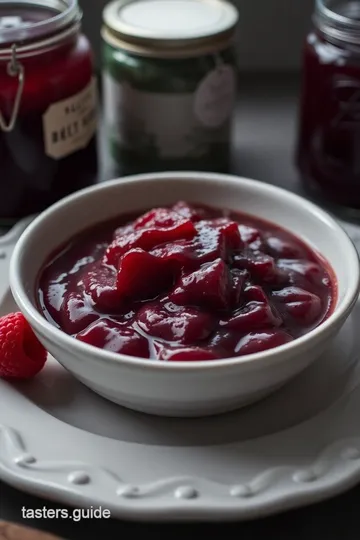
Have you ever found yourself staring at jars of vibrant fruit preserves at a farmer’s market, wondering how on earth to get that beautiful, glossy jelly consistency? i totally get it.
A few summers back, inspired by the jelly month club , i decided to dive into homemade jelly recipes. boy, was that adventure a mix of triumph and hilarious kitchen mishaps! but every spoonful reminded me of why i keep trying.
The sweet, tangy flavor of homemade jelly beats anything from a store, hands down!
Crafting your own jelly isn’t just a fun kitchen project; it’s also a gateway to flavor exploration! you can whip up everything from berry jams to unique jelly recipes using seasonal fruits, and each jar can have its own story.
Who knew canning techniques could lead to such creative glory? so, if you’re ready to hop into the world of jelly-making, i promise it’ll be a sweet ride!
Recipe Overview
The tradition of making jelly has been around for centuries and connects deeply with american culture. historically, folks made preserves during fruit harvests to store the flavors for colder months.
With the rise of diy canning and the jelly month celebration , this craft has seen a resurgence in popularity.
Nowadays, everyone is raving about infused jellies and various fruit combinations.
Making jelly is a medium difficulty task; yes, it requires some technique like understanding pectin use in jelly , but don't sweat it too much! if you've got some kitchen must-haves for jelly making , you can totally nail this.
It's about an hour of active cooking, which yields about 4 cups of jelly. plus, the cost is pretty friendly too, especially if you’re using fruits that are in season.
Key Benefits
Now, let’s chat benefits, because honestly, who doesn’t want to hear how awesome their homemade jelly is? first off, it’s downright delicious! seasonal jams burst with the fresh flavors of fruits, making every bite a little celebration.
Plus, you can scale your sugar levels; there are plenty of low-sugar jelly options out there.
Ah, and let’s not forget nutrition! most jellies pack a punch of vitamins from the fruit and can be adapted for dietary needs—how about vegan jelly options ? trust me, you’ll feel good spreading it on your toast or adding it to your charcuterie boards.
Think about your special occasions too! homemade jelly is an incredible gift idea. picture this: you pour your beautifully jarring fruit preserves into little jars, slap on some cute labels, and voila—instant charm! it's perfect for holidays or as homemade gifts for loved ones.
So, whether you're dolloping it on pancakes or pairing it with a warm biscuit, the versatility and creative flair of jelly-making elevate your breakfast (or any meal!) game.
Alright, are you ready to dive into making some magic in the kitchen? Let's round up those ingredients and get cookin’!
Essential Ingredients Guide for Jelly Making
So you're ready to dive into the world of homemade jelly? oh my gosh, you’re in for a treat! crafting your own jellies is like capturing summer in a jar.
Let’s break down everything you need, from premium core components to those clever smart substitutions .
Premium Core Components
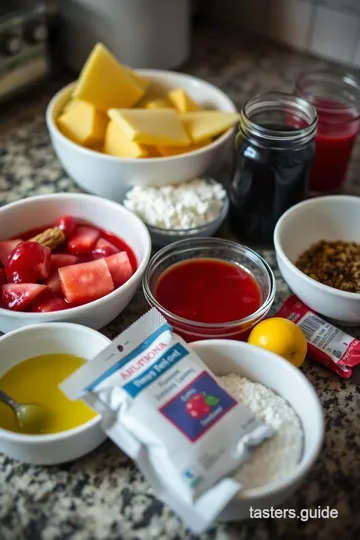
First off, let’s chat about the essential ingredients you’ll need. you’ll typically want to stick with fresh fruit juices or purees—berries are a popular choice.
Here's a quick reference for measurements to keep it easy:
- 4 cups (960 ml) fruit juice, like fresh grape or mixed berry.
- 1 cup (200 g) granulated sugar.
- 1-2 tablespoons (15-30 ml) fresh lemon juice to bite up that sweetness.
- 1 packet (1.75 oz or 49 g) fruit pectin, which is your jelly's secret superhero.
Quality indicators are crucial . look for juice without added sugars; fresh is best! as for storage, once you’ve made your jelly, it can last up to a year in a cool, dark place.
But keep an eye on those jars—if the seal pops or it smells funny, toss it. nothing ruins a good breakfast like sketchy jelly!
Signature Seasoning Blend
Now, jelly isn’t just sugar and fruit! you can jazz things up with flavor enhancers. think about adding spices or herbs for a twist.
For instance, try a lavender jelly for a fancy touch or add ginger for that spicy zing. remember, there are regional variations too! some folks down south love their spicy jalapeño jelly.
It makes a killer glaze for meats!
Smart Substitutions
Sometimes, you've got to roll with the punches. what if you’re out of pectin? no sweat! common alternatives include using unflavored gelatin or even adjusting the sugar level.
Just be careful with consistency; you don’t want soup in a jar! and if you catch a craving for jelly but want something a little lighter, there are low-sugar jelly options out there that don’t skimp on flavor.
Oh, and don’t forget about seasonal fruits! whatever you have on hand can be a game-changer. berry jams might be perfect now, but come fall, apple or pear jellies could steal the show.
Kitchen Equipment Essentials
Let’s not overlook your kitchen must-haves for jelly making. You’re gonna need:
- A large saucepan (to get that jelly bubbling).
- Sterilized jars with lids for proper canning. I always keep mine in hot water until I’m ready to fill.
- A canning funnel to avoid those sticky spills. Trust me; your future self will thank you.
- A ladle and a wooden spoon for stirring that magic mix.
Think you might not have the fancy tools? No problem. You can use a regular pot and jars you’ve saved from store-bought products—just make sure they’re clean and sanitized!
Wrapping It Up
Making jelly is not just a task, it’s a fun adventure! as you take on your fresh, uniquely flavored creations, you’re not just preserving fruit.
You’re preserving memories, moments in time, or even kicking off your very own jelly month club with friends and family.
Remember to experiment along the way. you’ll have some hits, maybe a few misses, but that’s part of the fun! after all, the best jelly recipes come from creativity and a bit of courage.
So grab that fruit, dust off those jars, and let's get to the cooking part!
And oh, while you’re at it, consider gifting your homemade jellies. They make fantastic presents! Can’t wait to see what flavors you whip up. Happy canning!
Mastering the Art of Professional Jelly Making
Oh my gosh, if you’ve ever wanted to be that person who brings creative, drool-worthy homemade jelly to gatherings, you’re in the right place! today, we’re diving into the delicious world of seasonal jams inspired by the jelly month club .
It’s all about making unique jelly recipes that are beyond toast-ready. whether you’re tackling berry jams, grape jelly recipes, or even infused jellies, it’s your time to shine.
Essential Preparation Steps
Mise en Place – Get Organized!
First thing’s first, let’s get your kitchen prepped. mise en place means organizing all your ingredients and tools before you start.
You want to have 4 cups of fruit juice , 1 cup of sugar , and 1 packet of pectin ready to go.
Trust me, this saves time—especially when things start bubbling away.
Timing is Everything
Jelly making is an art, and timing is crucial. you’ll spend about 20 minutes prepping and 30 minutes cooking, so keep an eye on the clock.
Having your jars sterilized and cooling set up can save you those frantic moments at the end.
Safety First!
And let’s not forget, safety is key. using boiling water for your jars? ensure they’ve boiled for at least 10 minutes .
That includes the lids too! you don’t want contamination ruining your homemade jelly .
Step-by-Step Process
Let’s Get Cookin’!
Now for the fun part! Follow these steps for jelly that’ll knock socks off your friends:
- Sterilize Jars: Boil those bad boys for 10 minutes.
- Prepare Fruit Juice: Squeeze out juice from your chosen fruits—or get store-bought, no shame here!
- Combine Ingredients: Mix the fruit juice, 1 cup of sugar, and lemon juice. Stir until it’s smooth.
- Add Pectin: Sprinkle that pectin over your mix. No clumps allowed!
- Cook Mixture: Heat it up on medium. Stir until it reaches a nice rolling boil.
- Boil: Keep that boil going for about 1- 2 minutes until your thermometer reads 220° F ( 104° C) .
- Test for Set: Do the "wrinkle test" on a cold plate. If it sets, you’re golden!
- Infuse Flavor: This is where you can get wild—add vanilla or fresh herbs.
- Fill Jars: Use that funnel, fill ‘em, leaving a little headspace.
- Seal and Cool: Clean those rims, seal them tight, and let them cool at room temperature.
Expert Techniques
Quality Checkpoints
Before you pat yourself on the back, let’s hit some quality checkpoints. if your jelly doesn’t set, no worries—just reheat it with more pectin and sugar.
Also, remember: don’t overdo the cooking! you want that fresh taste, not a burnt mess.
Troubleshooting Tips
For the perfect jelly consistency, your fruit juice should be balanced—a bit acidic from the lemon juice helps. if you’re feeling super adventurous, try out herbal jelly recipes or even low-sugar jelly options .
The possibilities are endless!
Success Strategies
No Mistakes Here!
One common mistake? Not sterilizing jars properly. Let’s avoid botulism, friends! Always label and date your jars, too. It’s like a little time capsule of flavor.
Quality Assurance Tips
Try various fruit combinations for jelly—strawberry with basil is a crowd-pleaser! And guess what, those kitchen must-haves for jelly making are just a quick online order away.
Ready for More?
So there you have it! with a little practice, you’ll be the go-to for flavorful fruit juices turned into artisan jellies.
You might even inspire your jelly month celebration with friends and family. imagine gifting them homemade jelly or using it for seasonal jams.
Trust me, making your own jelly is more than just a treat; it’s a bonding experience with the fruit and flavors that celebrate each season.
And hey, if you want a deeper dive into jelly making or explore creative jelly flavors, i’ve got more tips and tricks up my sleeve.
Let’s keep this jelly party going with a bit more additional information on canning techniques and recipe variations. happy jelly making, y’all!
Pro Tips & Secrets for Jellies
When diving into the jelly-making world, i wish someone had just whispered a few secrets to me. first off, listen up – don’t skimp on pectin .
It’s the unsung hero of achieving that perfect jelly consistency. trust me, nothing is sadder than a sweet, syrupy mess! and remember the golden rule - always read the instructions on your pectin packet .
Each brand can be a little different.
Time-Saving Techniques
Let's face it: we’ve all got a busy life, and spending hours in the kitchen isn’t always on the agenda.
So, if you wanna save some time, prep your jars ahead of time . wash ’em, sterilize ‘em, and have ‘em all ready in advance.
You’ll be flying through that jelly-making process before you know it. oh, and if you’re feeling adventurous, think about double-batching .
More jelly means more smiles, right?
Flavor Enhancement Tips
Wanna kick up the flavor a notch? try this: after stirring in your pectin, let your jelly mixture simmer for a bit before you bring it to a boil.
That lets those flavors mingle and dance – it’s almost like getting seconds before the feast. oh, and if you’re using a fruit juice base? fresh lemon juice is your bff .
It balances out sweetness beautifully and just brightens everything up.
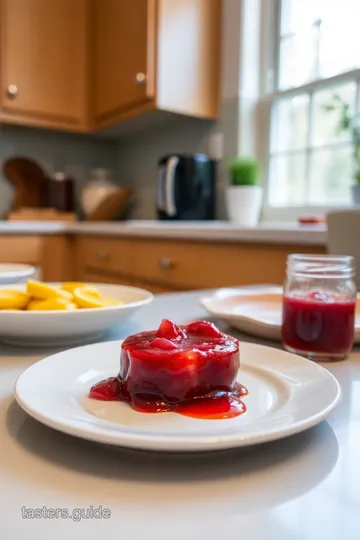
Presentation Tips
Okay, let’s talk eye candy . plating isn't just for fine dining; it matters in the jelly world too! consider using mismatched jars for that charming, rustic vibe.
You know – the ones that look like they came straight from grandma’s pantry. to garnish, fresh mint leaves or even edible flowers can bring that pop of color to your spread.
Pair your jellies with complimentary cheese on a chic wooden board and voilà— insta-ready feast !
Perfect Presentation
Plating isn’t just for fine dining, and it matters in the jelly world too! i love using mismatched jars for that charming, rustic vibe.
You know—the ones that look like they came straight from grandma’s pantry. sprinkle fresh mint leaves or even edible flowers for an extra pop of color.
Pair your jellies with complimentary cheese on a chic wooden board, and voilà— insta-ready feast !
Storage & Make-Ahead
Let’s get real: no one wants to waste their delicious creations. storing jellies properly is key! keep your jars in a cool, dark place.
Once opened, store in the fridge and consume within a month—if it lasts that long, right? and if you wanna prep ahead, you can make jelly weeks in advance for that jelly month celebration .
Just be sure to label those jars with their flavors and dates!
Freshness Duration
Homemade jellies can last up to a year if sealed properly. but the fresher they are, the better they taste.
And depending on the fruits used, flavors can evolve as they age. for instance, berry jams are phenomenal fresh, but herbal jelly recipes like rosemary or lavender can improve in flavor over time.
Who knew preserves could be so complex?
Creative Variations
Alright, let’s get creative! the beauty of jelly recipes is flexibility. fancy a spicy kick? try a jalapeño jam . or if you’re feeling fancy and are yearning for something out of the box, whip up a lavender jelly .
Seasonal jars can even allow you to use whatever fruits you’ve got on hand, making fruit preserves an adventurous delight.
Speaking of twists, you gotta dive into fruit juice jams —totally underrated!
Complete Nutrition Guide
So, you’re probably wondering about the nutrition breakdown of your sweet creations. a tablespoon of jelly can house about 50 calories —not too shabby for a scrumptious treat! it’s mostly sugar, but hey, nothing wrong with a little sweetness in life, right? just keep an eye on your portions, especially if you’re trying to keep things healthy.
Expert FAQ Solutions
If you stumble upon trouble while making jelly, don’t fret! a common concern is jelly not setting. if that happens, just reheat it, then mix in some extra pectin and sugar until it reaches the right consistency.
You’ve got this!
So, there you have it—your no-nonsense guide to all things jelly! whether you’re a seasoned pro or just dipping your toes into the jelly month club , i promise you’ll find joy in crafting these sweet treats.
Remember, every jar tells a story! so get out there, experiment, and happy jarring !
Deliciously Crafty Jelly Month Club Jams Card

⚖️ Ingredients:
- 4 cups (960 ml) fruit juice (e.g., grape, raspberry, or mixed berry)
- 1 cup (200 g) granulated sugar
- 1-2 tablespoons (15-30 ml) lemon juice (juiced fresh)
- 1 packet (1.75 oz or 49 g) fruit pectin (e.g., Sure-Jell)
- ½ teaspoon (2 g) vanilla extract or almond extract (optional)
- Fresh herbs (like mint or basil) for infusion (optional)
🥄 Instructions:
- Step 1: Sterilize jars by cleaning them and placing in boiling water for 10 minutes.
- Step 2: Prepare fruit juice by blending and straining whole fruits or using a juicing machine.
- Step 3: Combine fruit juice, lemon juice, and sugar in a large saucepan and stir until sugar dissolves.
- Step 4: Sprinkle pectin over juice mixture while stirring to avoid clumping.
- Step 5: Heat mixture over medium heat, stirring continuously until it reaches a rolling boil.
- Step 6: Maintain a rolling boil for 1-2 minutes; use a thermometer if desired to check temperature (~220°F or 104°C).
- Step 7: Perform the wrinkle test on a cold plate to check if it has thickened.
- Step 8: Stir in vanilla or herbs if desired; let steep for a few minutes.
- Step 9: Using a ladle and funnel, fill sterilized jars with the hot jelly, leaving ¼ inch headspace.
- Step 10: Wipe rims clean, seal with lids, and allow to cool completely at room temperature.
Previous Recipe: How to Make Amazing Ron Roberto Rum-Infused Coconut Chicken
Next Recipe: My Grandmother's Cherry Bomb Candy: 5 Easy Ways to Relive Childhood!