Halloween cookies cutters: 5 Easy Ways to Make Spooktacular Treats!
Looking for halloween cookies cutters? Discover easy recipes and cookie decorating ideas to create delicious spooky cookies for your Halloween party!

- Are You Ready to Get Your Bake On this Halloween?
- A Bite of History: The Origins of Sugar Cookies
- The Ultimate Guide to Mastering Spooktacular Halloween Sugar Cookies
- What Makes This Recipe Special
- Health and Nutrition Highlights
- Recipe at a Glance
- Perfect Ingredients Selection
- Kitchen Equipment Essentials
- Pro Ingredient Tips
- Expert Cooking Method for Spooktacular Halloween Sugar Cookies
- Game-Changing Tips
- Perfect Presentation
- Storage and Make-Ahead
- Creative Variations
- Complete Nutrition Guide
- Expert FAQ Solutions
- Recipe Card
Are You Ready to Get Your Bake On this Halloween?
Oh my gosh, have you ever thought about what makes halloween cookies so special? i mean, it’s not just the decorations or the spooky shapes; there’s something about mixing flour, sugar, and a bit of creativity that brings the whole family together, right? maybe it’s the time spent in the kitchen or the sweet aroma filling the house, but halloween baking really does have a magic of its own.
Today, i’m diving into the world of spooktacular halloween sugar cookies, and let me tell you, it's both fun and totally kid-friendly—a perfect recipe to whip up with your little goblins!
Now, here's the kicker: this particular recipe is not just an ordinary sugar cookie recipe. it takes about 30 minutes to prepare, plus a little time to bake, and you get 24 delightful cookies out of it.
The difficulty level? easy peasy! you’ll be decorating those cookies like a pro in no time. so grab your halloween cookie cutters and let’s make some treats that would impress even the pickiest of ghouls!
A Bite of History: The Origins of Sugar Cookies
Sugar cookies have a long and savory history that dates back to the 1700s, believe it or not. originating in nazareth, pennsylvania, these cookies were once known as "nazareth cookies.
" they soon spread through the colonies and evolved over the years. from the simple recipes of yesteryear to the festive delights we know today, sugar cookies have stood the test of time.
How awesome it is that we can create joy and sweet memories with something so historical?
What makes these cookies truly special, besides their soft and sweet flavor, is how versatile they are. people have transformed this humble cookie into festive cookie recipes that celebrate every occasion, from christmas to halloween.
And what’s not to love about making hauntingly delightful treats for a halloween party?
The Ultimate Guide to Mastering Spooktacular Halloween Sugar Cookies
These spooktacular halloween sugar cookies are a representation of rich culinary heritage and joyous celebrations. with the rise of themed cookies, it’s fascinating to see how they have become synonymous with holiday bakes, especially during halloween.
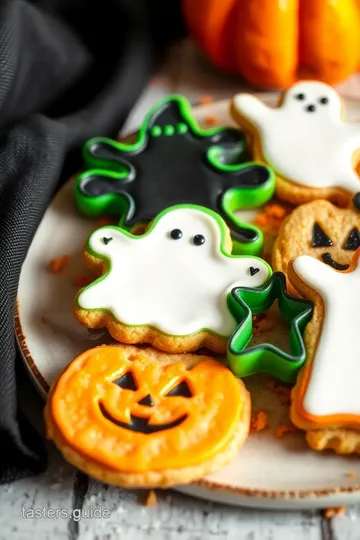
The joy of using halloween cookie cutters to create shapes like pumpkins, ghosts, and bats adds that extra layer of fun to baking.
Not only that, but this modern-day phenomenon means people are sharing cookie decorating ideas and lots of creative cookie decorating on social media—bring on the colored royal icing!
What Makes This Recipe Special
So, what sets these halloween sugar cookies apart from your regular old sugar cookies? first off, the flavor combination is simply delightful.
The buttery, sweet dough serves as a perfect base for any halloween-themed decorations you desire. plus, the technique is foolproof—seriously, it’s hard to mess up when baking these treats.
And let's not forget the royal icing! you’ll be using royal icing recipes to create colorful designs that will wow your family and friends.
Trust me; even if you’re not an expert in cookie decorating techniques, you’ll feel like a master baker. pro tip: chill that dough to keep your cookie shapes intact! it really helps.
Health and Nutrition Highlights
Sure, we all want a delicious treat, but it’s always nice to know what we’re putting into our bodies, right? these cookies, surprisingly enough, can be a part of a balanced snack if enjoyed in moderation.
Each cookie packs around 120 calories, with some decent sugar and fat from that delightful butter. you can even try substituting half of the all-purpose flour with whole wheat flour for a healthier twist that doesn’t skimp on taste.
Recipe at a Glance
Here's a quick snapshot of what you're diving into:
- Total Preparation Time : 30 minutes
- Cooking Time : 10-12 minutes
- Total Time : About 42 minutes
- Serving Size : 24 cookies
- Difficulty Level : Easy
- Cost Efficiency : Surprisingly low—most ingredients are kitchen staples!
So, ready to dive into the next section and gather the ingredients? trust me, you might want to stock up on halloween cookie cutters and get ready to create some spooky magic in your kitchen! let's get those baking gloves on and whip up some delicious homemade cookies that’ll not only look fantastic but taste even better.
Are you excited? i know i am!
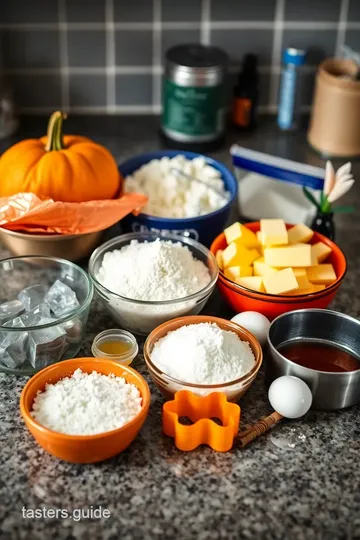
Perfect Ingredients Selection
Oh my gosh, let’s get into the nitty-gritty of picking the perfect ingredients! you know, the right ingredients can really elevate your halloween baking game, especially when you’re making those iconic festive cookie recipes like spooktacular halloween sugar cookies.
Trust me, getting this part down is half the battle.
Premium Core Ingredients
Alright, first up, let’s talk about the star players – your premium core ingredients. for sugar cookies, i’m talking about all-purpose flour (2¾ cups), unsalted butter (1 cup, that’s 2 sticks, softened), and granulated sugar (1½ cups).
Seriously, the quality of these ingredients matters a ton.
When you're choosing flour, look for a high protein content because it’ll give you that lovely structure. also, don’t skimp on the butter! real butter makes everything better – i mean, who doesn’t love that rich flavor? and when you pick your sugar, go for granulated rather than alternatives.
It'll give you that perfect crisp texture in the oven.
Psst, a quick tip: store your flour in a cool, dry place. And if you’re feeling adventurous with flavor, grab almond extract (1 teaspoon) to give your cookies that special touch—it’s so worth it!
Signature Seasoning Blend
Now, let’s sprinkle in some magic with your signature seasoning blend. while cookies might not scream “spices,” incorporating a hint of nutmeg or cinnamon can enhance your halloween cookie designs beautifully.
Mix up a blend of these with some vanilla extract (1 tablespoon) for that warm, nostalgic vibe.
And don’t forget to add color! For your royal icing, food colors like orange, purple, and black will totally amp up your cookie decorating ideas, making those spooky cookies pop with life.
Smart Substitutions
Look, i get it – sometimes you’re out of an ingredient, or maybe your friend has a dietary need. always have alternative options in your back pocket.
If you’re out of butter, coconut oil works in a pinch. egg allergies? try a flaxseed meal mixed with water as a substitute.
It worked wonders for my halloween dessert ideas one year!
Always consider seasonal variations too! If you can’t find certain spices, use pumpkin pie spice around Halloween – perfect for that festive flair!
Kitchen Equipment Essentials
Next, let’s chat about what you’ll need in the kitchen. Trust me, you don’t need to go all-out like a professional pastry chef.
Must-Have Tools
A rolling pin is a must for your cut-out cookies, and bake sheets lined with parchment paper are essential. You don't want those cute shapes sticking when they’re hot! Also, if you’re planning to get fancy with your royal icing, grab some piping bags – they’ll change your cookie decorating techniques forever!
Recommended Appliances
If you can, a good stand mixer or a hand mixer is a godsend for mixing that lovely dough. it saves your arm from aching, especially when you’re whipping up festive treats for your halloween party.
Home Alternatives
Don’t sweat it if you don’t have fancy tools. A glass or wine bottle can substitute for a rolling pin, and a ziplock bag (with a corner trimmed off) can take the place of a piping bag in a pinch! It’s all about improvising, ya know?
Pro Ingredient Tips
Alright, my friend, this is the secret sauce to becoming a cookie champion. look for fresh ingredients; stale baking powder or old spices can ruin your halloween cookie designs.
Always check the expiration dates, especially if you’re getting into seasonal baking where ingredients might hang around a bit longer.
And storage solutions? for cookies, an airtight container works wonders for keeping them fresh. if you’re planning to gift your cookies, think about cute packaging as part of your cookie presentation ideas.
It’s all about making them delightful to look at and to eat!
So, now that you’ve gathered all your stellar ingredients and tools, it’s time to put your apron on and jump into the fun part: mixing, baking, and decorating! get ready, because in the next section, we’ll be diving deep into the step-by-step cooking instructions.
Trust me, you’ll have a hauntingly good time making these spooky cookies!
Expert Cooking Method for Spooktacular Halloween Sugar Cookies
So, my friends, if you’re ready to whip up some mouth-watering, festive treats for halloween, you’re in for a real treat with these spooktacular halloween sugar cookies.
Picture this: it’s a chilly october evening, the leaves are turning, and the excitement of halloween is in the air.
It’s the perfect time to bake these adorable cut-out cookies that will not only look delightful but taste amazing, too.
Let's dive into this process together, step by step.
Essential Preparation Steps
Before jumping into mixing, i always swear by doing your mise en place . this french term means to have everything in its place, and honestly, it makes cooking feel so much smoother! gather all your ingredients: 2 3/4 cups of all-purpose flour, 1 teaspoon of baking powder, 1 teaspoon of salt, and so on.
Don’t forget to soften your butter! you want it creamy for that delightful texture.
When it comes to prep techniques , it’s super easy. grab a bowl and whisk the flour, baking powder, and salt together – simple! this ensures the baking powder gets evenly distributed.
Now, for some time management : i like to set a timer for each step. it keeps the flow going.
Sometimes, i’ll even clean up a bit as the dough chills, so i don't drown in chaos!
Organization tips are key, too. as you measure your ingredients, keep them grouped by type. it prevents that last-minute scramble for flour when you’re all set to mix.
Trust me, i’ve been there, and it’s a mess.
Professional Cooking Method
Now onto the fun part: making the cookies!
Step-by-Step Process
- Prepare the Cookie Dough : In a bowl, whisk your flour, baking powder, and salt together. In another bowl, cream the softened butter and sugar until fluffy – about 3-4 minutes. Then, mix in an egg, vanilla, and almond extract if you’re feeling adventurous!
- Combine : Slowly add that flour mixture until just combined. Overmixing leads to tough cookies, and we’re not going there. Divide the dough, wrap it up, and let it chill in the fridge for at least an hour. The chilling helps prevent that dreaded spreading when you bake – and we want our Halloween cookie designs looking spook-tacular!
Temperature Control & Timing Precision
Preheat that oven to 350°f (175°c). after chilling, roll out your dough on a floured surface to about 1/4-inch thick, and cut out your shapes using those adorable halloween cookie cutters.
Hooray for pumpkin, ghost, and bat shapes!
Bake them for 10-12 minutes. Golden edges are your key success indicators here – you want them set but not brown. Keep watching those little beauties!
Expert Techniques
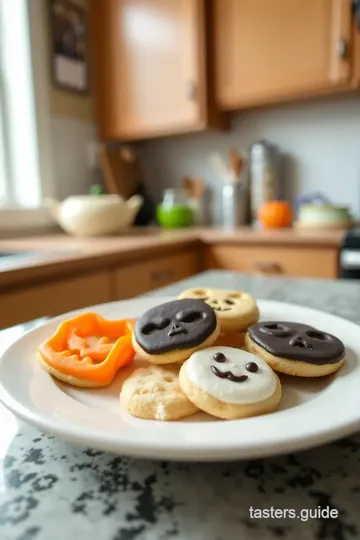
After baking, the real artistry begins with cookie decorating techniques .
-
Royal icing prep : combine 4 cups of powdered sugar and meringue powder. gradually add water until smooth and glossy.
Divide it and mix in your food coloring (orange, black, purple – oh my gosh, it’s like a halloween party on your kitchen counter!).
-
Decorate : use piping bags (or just a ziplock with the corner snipped off if you’re like me and don’t want to spend on fancy stuff) to decorate your cooled cookies.
I find a toothpick is excellent for detailing. let those cookies dry completely for about 4-6 hours – patience is key to avoid smudging!
Success Strategies
Now, let’s make sure you’re all set to create cookies that are as good as they look.
- Troubleshooting tips : If your royal icing isn’t thick enough, add a bit more powdered sugar. For too thick? Just a splash more water.
- Quality assurance : When decorating, ensure that the icing is not overly runny - it should hold its shape.
- Perfect results guide : Taste test a few as you go; quality control is important! Just make sure no one sees you sampling—unless they’re in on the fun.
We’ve got the perfect recipe here for easy halloween cookies that even the kids can help with. fantastic for festive gatherings, halloween parties, or just a cozy night in with some spooky themed desserts.
Now, you’ve got your essential baking tips, the expert method down, and your beautiful Halloween cookies ready for display!
Additional Information Section
With these spooktacular halloween sugar cookies, you're not just making treats; you're crafting memories, whether it's baking with kids or displaying your cookie presentation ideas at a halloween gathering.
Stay tuned as we explore even more cookie decorating ideas , delve into creative flavor variations, and whip up some themed treats for your halloween parties.
You’re going to love where this cookie adventure takes you!
Game-Changing Tips
Alright, friends, gather around because we’re diving into some seriously game-changing tips that’ll elevate your Halloween baking to a whole new level!
Professional Insights
First off, think about how you can take those classic halloween treats and give them a fresh twist! i mean, who doesn’t love a good sugar cookie? but instead of just any plain ol’ cookie, you could try melding flavors into the dough.
Ever thought of adding a touch of almond extract for that extra kick? it’s a game changer, trust me!
Expert Techniques
When it comes to cookie decorating ideas, you want your kitchen to feel like a fun little workshop. just grab those halloween cookie cutters—pumpkins, ghosts, and bats—and let your imagination roam.
I always set up my decorating station with all my icing colors ready, and honestly, it’s like being a kid again!
Kitchen Wisdom
Remember, preparation is key! chill your dough before rolling; it keeps those shapes nice and crisp. if you don’t, your cookies might come out looking more like blobs than spooktacular cookies.
No one wants that horror story at their halloween party!
Success Guarantees
Let me tell you, one of the best guarantees for success in the kitchen is a good quality royal icing recipe.
With the right mix of meringue powder and water, you get that perfect glossy finish that makes cookies look professional.
You’ll be the talk of the treat table!
Perfect Presentation
Plating Techniques
Okay, so once those beauties are iced and ready to rock, you want to make sure they’re presented fabulously. I love using dessert stands to create a little height on the table—makes it feel more festive, don’t you think?
Garnish Ideas
Sprinkle some colored sugars on top while the icing is still wet; it adds that extra spooktacular touch. Little details make a big difference!
Serving Suggestions
Serve up your Halloween cookies alongside some spooky-themed desserts, and voilà! You’ve got the ultimate treat platter. Use themed decorative paper or a vibrant tablecloth to make everything pop!
Visual Appeal Tips
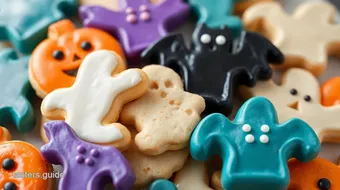
To enhance that visual appeal, I like to group my themed cookies by color. So those orange pumpkins with the black bats—just a feast for the eyes!
Storage and Make-Ahead
Storage Guidelines
Let’s not forget about practical things, like how to keep those cookies fresh! Store them in an airtight container, and they can last up to a week.
Preservation Methods
You can also freeze them if you want to get ahead of the game! Just make sure they’re in a single layer before you store them in a freezer bag.
Reheating Instructions
If you’re freezing, here’s a little pro tip: when you take them out to thaw, do it overnight in the fridge to keep them soft.
Freshness Tips
And if you have some extras (which—let's be honest—is likely), pop an apple slice in the container; it helps keep the cookies from going stale.
Creative Variations
Flavor Adaptations
Now, let’s get creative, shall we? What if, instead of your classic vanilla sugar cookies, you try a pumpkin spice in the dough? Perfect for those fall vibes!
Dietary Modifications
For our gluten-free friends, no worries! You can use a gluten-free baking blend and still get those fun shapes and flavors that everyone loves.
Seasonal Twists
Switch it up through the seasons! Why stick with just Halloween cookie designs? You can create Christmas-themed cut-out cookies just a few weeks later.
Regional Variations
Why not channel some regional flavors? Try adding spices that reflect different cultures—like a hint of chai masala for an Indian twist in your sugar cookies.
Complete Nutrition Guide
Now let’s dive into the nitty-gritty: nutritional information!
Detailed Breakdown
These sugar cookies clock in at around 120 calories a piece. They’re not exactly health food, but hey, they’re treats!
Health Benefits
We can’t forget, sugar cookies can bring a lot of joy—just saying! And when baking with kids, you’re teaching valuable skills like measuring and creativity.
Dietary Information
If you’re worried about diet, consider swapping the butter for a healthier alternative, like coconut oil, for a unique flavor.
Portion Guidance
As for portion guidance, I like to make 24 cookies in this batch—easy to share or save for later!
Expert FAQ Solutions
Got common concerns? I’ve got expert answers!
Common Concerns
Wondering what to do if your dough is too sticky? Just add a bit more flour until it feels workable.
Expert Answers
And if your royal icing doesn’t seem to hold its shape? You might need a bit more meringue powder.
Troubleshooting Guide
If your cookies spread too much in the oven, make sure to chill the dough longer next time!
Success Tips
Keep an eye on that bake time because every oven is different. It can be a real-life horror show if you overbake!
So, in conclusion, baking these spooktacular halloween sugar cookies not only fills your home with festive smells, but it also creates a space for fun and creativity.
Plus, they’re a perfect treat for any halloween party. enjoy every step of this journey, and happy halloween baking!
Halloween cookies cutters: 5 Easy Ways to Make Spooktacular Treats! Card
⚖️ Ingredients:
- 2 3/4 cups all-purpose flour
- 1 teaspoon baking powder
- 1/2 teaspoon salt
- 1 cup unsalted butter, softened (2 sticks)
- 1 1/2 cups granulated sugar
- 1 large egg
- 1 tablespoon vanilla extract
- 1 teaspoon almond extract (optional, for flavor)
- 4 cups powdered sugar, sifted
- 3 tablespoons meringue powder
- 6 tablespoons water (more as needed)
- Food coloring (orange, purple, and black)
🥄 Instructions:
- Step 1: In a medium bowl, whisk together the flour, baking powder, and salt. Set aside.
- Step 2: In a large bowl, cream the softened butter and granulated sugar on medium speed until light and fluffy (about 3-4 minutes).
- Step 3: Add the egg, vanilla extract, and almond extract (if using) to the butter mixture. Beat until combined.
- Step 4: Gradually add the dry ingredient mixture to the wet mixture, mixing on low speed until the dough comes together.
- Step 5: Divide the dough into two discs, wrap in plastic wrap, and refrigerate for at least 1 hour (or until firm).
- Step 6: Preheat your oven to 350°F (175°C) and line baking sheets with parchment paper.
- Step 7: Remove one disc of dough from the fridge, and roll out to about 1/4-inch thickness on a lightly floured surface.
- Step 8: Use Halloween cookie cutters to cut out shapes, placing them on the prepared baking sheets.
- Step 9: Bake the cookies in the preheated oven for 10-12 minutes, or until the edges are lightly golden.
- Step 10: Allow cookies to cool on the baking sheet for 5 minutes, then transfer to a wire rack to cool completely.
- Step 11: In a medium bowl, combine sifted powdered sugar and meringue powder. Gradually add water, mixing until smooth.
- Step 12: Divide icing into bowls and tint with food coloring as desired.
- Step 13: Once cookies are cool, decorate using the royal icing and allow it to dry completely.
Previous Recipe: Flower Cookie Cutter: 5 Easy Ways to Make Delicious Sugar Cookies!
Next Recipe: Thermal Cooking Asian Recipes: 5 Easy & Delicious Teriyaki Chicken Dishes!