Spray Wax & Gum Stains Away Fast!
Discover how to make Spray Wax & Gum Stains Away Fast! with my simple, eco-friendly recipe that tackles stains effectively. Check it out!

Get Stains Out with a Chit-Chat: Spray Wax & Gum Stains Away Fast!
Okay, picture this: you’re at a party, and somehow, someway, you’ve ended up with a big ol' gum stain right on your favorite shirt.
Seriously, how does that even happen? you’re standing there, trying to be cool, but inside you're like “oh my gosh, why this?" and let’s face it, gum stains aren’t just annoying; they can turn a fab night into a mini-disaster! but hey, don’t panic! with my spray wax & gum stains away fast! , your worries can go right out the door!
Recipe Overview: Gum Removal Like a Boss
You might be wondering, where did this amazing homemade cleaner come from? well, it actually borrows inspiration from old-school cleaning hacks our grandparents probably used.
This easy mix of household ingredients is not just a hit at parties; it's also gained traction in today's eco-conscious world.
Now, you don’t need a chemistry degree to whip this up – trust me, it's as simple as mixing up a quick dinner!
Speaking of time, you’re looking at about 10 minutes total to get this baby together. yep, just 10! that leaves you plenty of time to tackle those other chaotic messes life throws at you.
Plus, this diy cleaner is all about being cost-effective too. you’re yielding about 12 ounces of gum-fighting goodness. your wallet will be thanking you!
Key Benefits: Why You Need This in Your Arsenal
Let’s break it down. first off, it’s a cleaning champion that’s not just a quick fix, but super eco-friendly too.
We’re talking non-toxic cleaner with ingredients that you probably already have lying around – like vinegar , baking soda , and some dish soap .
And don’t even get me started on those essential oil benefits ! add a few drops, and your home smells like a spa.
Who knew fighting stains could feel so good?
Plus, this homemade cleaning solution makes you the star of the show during gatherings. surprise your guests not just with snacks but the ease of keeping your space gum-free.
Whether it’s a birthday bash, movie night, or just sunday brunch, this spray is the go-to secret sauce for maintaining a polished look amidst all the fun.
What’s even better? this spray not only works on clothes but also does wonders on carpets and other surfaces. forget about spending big bucks on harsh chemicals; this stain removal technique is a much safer alternative , keeping your home fresh and your family safe.
Let’s Transition to Ingredients, Shall We?
So, you’re definitely on board with this light-hearted and practical stain fighter, right? here’s the thing: simplicity and accessibility are key! you’ll be gathering ingredients that are nearly always in a typical american kitchen.
Think of it this way: with just a few household ingredients and a splash of creativity, you’re about to tackle those pesky gum stains like a pro.
Ready to get your hands on this homemade cleaner? Let’s dive into the alchemy of everyday ingredients that’ll have you saying bye-bye gum stains before you know it! Get your spray bottle and let’s get mixing!
Essential Ingredients Guide
When you step into the kitchen, having the right ingredients can make or break your cooking game. let’s dive into some premium core components that every home cook should have at their fingertips.
Trust me, you’ll feel like a pro in no time!
Premium Core Components: Get the Basics Right
First off, let’s chat measurements. Here’s the deal:
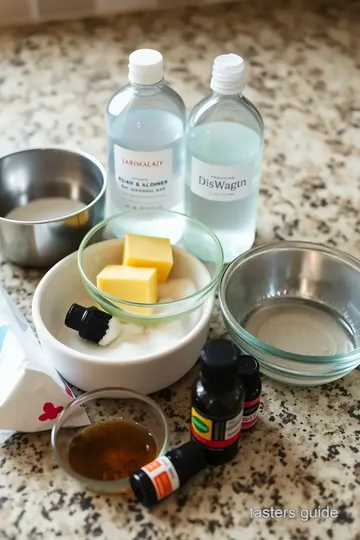
- 1 cup water (240 mL)
- ½ cup white vinegar (120 mL)
- 1 tablespoon dish soap (15 mL)
- 2 teaspoons baking soda (10 g) (optional, but super effective)
Knowing these amounts is key for whipping up everything from a savory dish to your own homemade cleaning solution .
Quality indicators matter too. Fresh herbs should smell fragrant, and spices should have vibrant colors—dull means they’re past their prime.
Storing your ingredients well can extend their shelf life . Keep spices in a cool, dark place. For herbs? A zip-top bag in the freezer works wonders!
And if you’re ever unsure if something is fresh, trust your nose. A sniff test can save you from a kitchen crisis!
Regional Flavors: Signature Seasoning Blend
Okay, so let’s make this fun and a bit zesty. Having a signature seasoning blend can really elevate your cooking. Think about combining basics like:
- Garlic powder with onion powder
- A dash of oregano and basil
Each region has its own spin—Italian, Mexican, Asian—you name it. Feel free to adventure with your mix! It’s all about what tickles your taste buds.
Flavor enhancers and aromatics, like fresh ginger or cumin , can also transform a dish. If you’re feeling savvy, try to add some regional variations!
Smart Substitutions: Keeping It Flexible
Ever found yourself mid-recipe and realized you’re missing something? Don’t sweat it! Here come the smart substitutions .
If you’re out of dish soap , you can even use a bit of baking soda as a natural stain remover or a diy cleaning product when mixed with water.
Plus, for harsh days, there are always those quick stain solutions hanging around your pantry.
Need a dietary modification ? Swap out regular dish soap for an eco-friendly version.
And let’s not forget— seasonal options ! When you can, use what’s fresh. If you’ve got the time, a little garden in your kitchen can yield fresh herbs all year round!
Kitchen Equipment Essentials: Tools of the Trade
Once you’ve got your ingredients down, you’ll need the right tools. Here’s a peek at some kitchen equipment essentials :
- Measuring cups for precision
- A good mixing bowl to combine ingredients
- A whisk or spoon (whatever floats your boat!)
If you’re really into cost-effective cleaning solutions , using a spray bottle (preferably dark glass if you can get it) for your homemade cleaning mixture will save you trips to the store.
And hey, if you’re serious about green cleaning methods , make sure your tools reflect that ethos too!
Finally, the Power of Household Ingredients
Don’t underestimate the magic of wholesome household products. things like vinegar , baking soda , and even essential oils can work wonders together.
Ever tried vinegar cleaning formula ? it gets tough stains out like a champ!
So, while you’re mastering those cooking skills, keep this in mind: having a stock of these essential ingredients and storing them well can save you from mess ups in the kitchen (or the living room).
And let’s be real—who hasn’t battled a stubborn stain?
When life gives you gum stains, you whip up a batch of that Spray Wax & Gum Stains Away Fast! Trust me, it’s going to be a game-changer! Get ready to elevate your cleaning routine and say hello to your new best friend, the gum removal spray !
Next up, I’ll share the full instructions to help you mix that perfect batch. Stay tuned!
Mastering the Art of Professional Cooking: The Essentials
Oh my gosh, cooking can be such an adventure! it’s like being a mad scientist, only better because you end up with delicious food.
But you know, there are some tricks of the trade that'll help you level up your kitchen game. let’s dive into some essential professional cooking methods that’ll make you feel like a pro in no time.
Essential Preparation Steps
First up, let’s talk about mise en place —which is just fancy chef lingo for “everything in its place.” basically, you’re gonna want to gather all your ingredients and tools before starting.
This makes your cooking flow smoother than melted butter on a warm biscuit. trust me, once you get the hang of this, you’ll wonder how you ever did without it.
Now, on to time management tips . you don’t want to be scrambling like a chicken with its head cut off.
Plan your meals and have a timeline in mind. for example, if something needs to simmer for 30 minutes , start that first! while it’s doing its thing, prep other parts of your dish.
Organization strategies kick in here too. keep your kitchen clean. it'll make you feel better while cooking and save you from finding that rogue potato peeler under a pile of dirty dishes! safety is key, folks—always remember to handle knives with care, and keep your cooking space free of clutter.
Step-by-Step Process
Let’s break this down with clear, numbered instructions! A solid cooking process is a lifesaver:
- Gather your ingredients.
- Preheat the oven to 350° F if baking.
- Start your prep: chop, slice, and dice.
- Control your temperature! For frying, aim for 375° F for that perfect golden brown crust.
- Keep an eye on the clock—timing is precision, baby!
Don’t forget those visual cues for doneness . for instance, meat should read 165° f internally for safety. fish? look for that flaky texture.
And, trust me—your nose will tell you when things get aromatic!
Expert Techniques
Once you’re comfortable, it’s time to add some expert flair. a great technique to master is sautéing , which requires a trusty non-stick pan and medium-high heat.
The goal here is to keep things moving; stir frequently to avoid burning.
Understand your critical steps ; things like searing meat for that nice crust or creating a quick sauce in the same pan you just cooked in.
That's flavor right there! you’ll definitely want to watch out for the quality checkpoints too. does everything smell mouthwatering? good sign!
Sometimes, despite your best efforts, mishaps happen! don’t fret. always have a few troubleshooting tips in your back pocket. if a sauce is too salty, toss in a little sugar or cream to balance it.
An overcooked dish? cut it into smaller pieces to make it less noticeable.
Success Strategies
Let’s be real: nobody’s perfect. you’re gonna make mistakes—lots of them. avoid common blunders like overcrowding your pan, which leads to steaming instead of crisping.
And remember: use a probe thermometer when necessary; nothing’s worse than undercooked poultry!
Ensure quality assurance by tasting as you go. if it’s not right, you can fix it! with your own stain treatment guide , you might even create your best version of a meal.
Need to make-ahead options ? chill your leftovers for next week’s lunch. meal prepping is a game changer!
And hey, don't forget, there’s always that trusty cleaning spray you can whip up to tackle any kitchen mess. just a mix of water , vinegar , and dish soap will do, or as i like to call it, the spray wax & gum stains away fast! it pulls its weight around the house too.
So there you have it! whether you’re sautéing, baking, or just trying to keep your kitchen clean, knowing these professional cooking methods can make all the difference.
Get creative with your food, and you'll turn every meal into something special.
Stay tuned for our last section, where we’ll tackle even more eco-friendly cleaning solutions to keep your space spotless!

Additional Recipe Information for Spray Wax & Gum Stains Away Fast!
Oh, let me tell you, gum stains can really ruin your day, right? you’re just living your best life, then boom! there's a wad of gum stuck on your favorite shirt or your kids’ carpet.
Let’s dive into how to tackle those forgettable sticky moments with my homemade spray wax & gum stains away fast! .
Pro Tips & Secrets
Okay, listen up. first things first, let’s talk about some pro tips for making this gum-fighting concoction. getting the right measurement of ingredients is key.
You’re mixing 1 cup of water with ½ cup of white vinegar and 1 tablespoon of dish soap —don’t skip on that soap unless you wanna be disappointed!
Time-saving techniques? well, keep all your ingredients in one spot. just grab ‘em, mix, and shake! and, if you add 2 teaspoons of baking soda for extra cleaning power, it can really make a difference.
Just watch out for the fizzing , okay? it’s like when you shake a soda—explosive if you don't control it!
Now, let’s spice things up with flavor enhancement tips. try a few drops of essential oils like tea tree or lemon.
Not only do they smell amazing, but they come with awesome essential oil benefits , too!
Perfect Presentation
Alright, let’s dish on presentation. you think it stops with just making it? nope! when you pour your spray solution into a clean spray bottle, try using a funnel for no spills, 'cause who wants to clean up that mess, right? for the look? get a dark glass bottle if you can.
It’ll help preserve the freshness of your eco-friendly cleaning solution.
As for garnishes, stick with simple visuals . a cute label saying "gum stain helper!" goes a long way. and color combinations? your ingredients look nice together—green from the vinegar, clear water, and whatever vibe you get from the essential oils.
Keep it fresh and inviting!
Storage & Make-Ahead
Let’s chat storage. this spray will last if you keep it in a cool, dark place . think pantry, not the windowsill.
It should stay fresh for about two weeks —perfect for those kitchen messes that might pop up.
If you’re like me, wanting to have everything ready to go for sticky situations, make a batch ahead. Just remember to shake it before each use to make sure everything's well mixed.
Creative Variations
If you’re feeling adventurous, let’s talk creative variations . want a zesty twist? sub in apple cider vinegar for a different fragrance .
Or add in some lemon juice for more stain-fighting power. you could also combine this with other stain removal techniques you’ve stumbled across.
One of my friends swears by using baking soda cleaning power combined with this spray for tougher stains.
Complete Nutrition Guide
And just to be clear, you're not eating this—this is a cleaning solution! so there aren't calories or any of that in this recipe.
Just lots of goodness in your household ingredients for cleaning .
This spray does a better job than many store-bought stain treatment options that are filled with harsh chemicals. you know, those non-toxic cleaners can cost a pretty penny! homemade cleaning products like this one not only save cash but are also eco-friendly cleaning solutions .
Wrapping it All Up
So there you have it, folks! with just a handful of those wholesome household products , you’ve got a killer solution that’s quick to whip up.
No more losing your mind over gum stains! turn those sticky moments into a reason to smile with your own diy cleaning products.
Give this spray wax & gum stains away fast! a whirl next time you're greeting an inevitable mess. it'll become your secret weapon against stains, and soon enough, you'll be the stain treatment guide everyone seeks.
Remember, cleaning doesn’t have to be a chore—it can be a fun experiment! happy spraying, gang!
Frequently Asked Questions
What ingredients do I need to make Spray Wax & Gum Stains Away Fast?
To make Spray Wax & Gum Stains Away Fast, you'll need 1 cup of water, ½ cup of white vinegar, 1 tablespoon of non-toxic dish soap, and optionally, 2 teaspoons of baking soda and 5-10 drops of essential oil for fragrance. These ingredients work together to create an effective stain remover for various surfaces.
How do I use Spray Wax & Gum Stains Away Fast on different surfaces?
When using Spray Wax & Gum Stains Away Fast, spray directly onto the gum stain and let it sit for 5-10 minutes for better penetration. Scrape off the gum gently with a plastic scraper or cloth, and then wipe the area clean with a damp cloth to remove any residue.
Can I store Spray Wax & Gum Stains Away Fast, and if so, how?
Yes, you can store Spray Wax & Gum Stains Away Fast in a cool, dark place, preferably in a dark glass or BPA-free plastic spray bottle. Shake well before each use to ensure the ingredients are properly mixed, as they may separate over time.
Are there any variations I can try with this recipe?
Absolutely! You can enhance your Spray Wax & Gum Stains Away Fast by adding 1 tablespoon of lemon juice for added stain-fighting properties or replacing white vinegar with apple cider vinegar for a different scent. Remember, you can also adjust the dish soap based on your eco-friendly preferences.
What should I do if the gum stain doesn't come out after one application?
If the gum stain persists, you can allow the spray to sit longer before scraping, which helps break down the residue more effectively. For tougher stains, repeat the application process a couple of times, ensuring to rinse the area afterward to avoid any buildup from the ingredients.
Is Spray Wax & Gum Stains Away Fast safe to use around children and pets?
Yes, Spray Wax & Gum Stains Away Fast is made from natural ingredients, making it a safer alternative to harsh chemicals. However, always ensure your children and pets are not in the immediate area while you’re cleaning, and allow the treated surfaces to dry thoroughly before allowing them to come into contact.
Spray Wax & Gum Stains Away Fast! Card

⚖️ Ingredients:
- 1 cup water (240 mL)
- ½ cup white vinegar (120 mL)
- 1 tablespoon dish soap (15 mL) – non-toxic or eco-friendly preferred
- 2 teaspoons baking soda (10 g) – optional for extra cleaning power
- 5-10 drops of essential oil (optional) – such as tea tree or lemon for a fresh scent
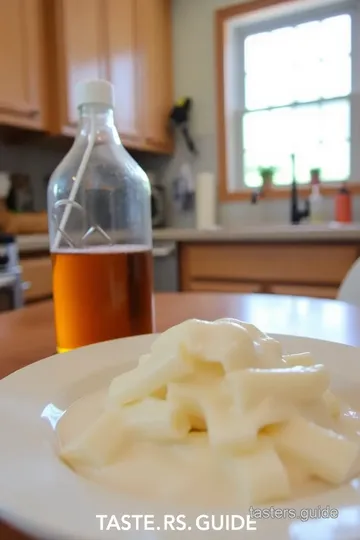
- 1 clean spray bottle (12-ounce capacity, preferably dark glass or BPA-free plastic)
🥄 Instructions:
- Step 1: Gather all ingredients and equipment.
- Step 2: In a mixing bowl, combine: 1 cup water, ½ cup white vinegar, 1 tablespoon dish soap, and (Optional) 2 teaspoons baking soda – stir carefully to avoid fizzing.
- Step 3: Add essential oil drops if desired and mix well.
- Step 4: Using a funnel, pour the mixture into the spray bottle.
- Step 5: Secure the spray nozzle and gently shake to combine.
- Step 6: Test on a small, inconspicuous area of the stained surface to ensure no damage occurs.
- Step 7: Spray directly onto the gum stain and let it sit for 5-10 minutes.
- Step 8: Scrape off the gum gently with a plastic scraper or cloth.
- Step 9: Wipe the surface clean with a damp cloth.
- Step 10: Store the spray in a cool, dark place.
Previous Recipe: Easy & Juicy Grilled Chicken Delight in 25 Minutes: My Go-To Herb Marinade
Next Recipe: Festive Turkey Cookies: A Sweet Delight for Your Holiday Gathering