Herbed Cream Cheese Crackers: Ready in 10 Minutes!
Discover the easiest way to make Spread Soft Cheese Herb Crackers in 10 Min! Perfect for gatherings or quick snacks, they’re simply irresistible. Try it now!

- Your Essential Ingredients Guide for Herbed Cream Cheese Crackers
- Mastering the Art of Professional Cooking: Essential Tips and Techniques
- Pro Tips & Secrets for the Perfect Spread Soft Cheese Herb Crackers in 10 Min
- Perfect Presentation
- Storage & Make-Ahead Magic
- Creative Variations to Try
- Complete Nutrition Guide
- Conclusion: Get Cooking!
- Frequently Asked Questions
- Recipe Card
Ever been in a situation where your hungry friends drop by unannounced? oh my gosh, i’ve been there! picture me standing in a kitchen with nothing but a jar of peanut butter and stale crackers.
Talk about an epic fail! that’s why i’ve got a go-to snack that’s a total lifesaver: spread soft cheese herb crackers in 10 min .
Seriously, this recipe has saved me in so many snack emergencies, all while keeping the vibe classy and delicious.
Imagine creamy, fresh flavors dancing on soft cheese spread, layered over crunchy crackers. can you say yum ? this isn’t just about snacking; it’s about bringing people together.
Whether for an unexpected gathering or a simple lunch, these crackers are a crowd-pleasing hit. let’s dive into the details, shall we?
Recipe Overview
Now, a little history lesson for you! the concept of using herbs with cheese isn’t new—far from it. in mediterranean cuisine, fresh herbs combined with creamy cheese have been making hearts (and taste buds) happy for centuries.
Fast forward to today, and it’s not hard to see why these flavors are still so popular. with everything being go-go-go in our lives, who wouldn't love a quick cheese spread on homemade herb crackers?
You’re looking at a 10-minute appetizer that is also super easy. seriously, if you have 10 minutes, you’re golden. and the best part? you don’t need to break the bank either.
Most ingredients hanging out in your pantry will work wonders here, and you’ll get about 4 to 6 servings per batch.
Perfect for gatherings or a cozy night with netflix.
Key Benefits
Let’s get down to the nitty-gritty: why are these herbed cream cheese crackers a must-try? first and foremost, they are a healthy grazing board option.
Let’s talk nutrition—cream cheese provides a decent protein boost while the fresh herbs pack in vitamins. you’ve got yourself a delicious and nutritious snack that’s great in so many ways.
These little guys are fantastic simple entertaining recipes . they’re easy to assemble, and they look gorgeous on an appetizer platter.
Plus, you can customize them! swap out the herbs, play with spices, or even mix in some zesty sun-dried tomatoes.
Oh, and since they’re no-bake snacks, you can let your creativity roam wild!
Perfect for special occasions too—think birthday parties, potlucks, or game day gatherings. trust me, these aren’t just ordinary cheese recipes .
They bring a touch of excitement to the table while being a breeze to whip up.
And because you can modify them (hello, gluten-free cracker alternatives!), everyone can enjoy this delightful treat regardless of dietary restrictions!
So, what are you waiting for? It's time to gather your ingredients and get ready to impress. It all starts with some simple items that you might already have in your kitchen—get excited, because we’re about to make some serious snack magic happen!
Stay tuned as i share what you'll need to create these divine homemade herb crackers and the luscious herb cheese spread .
Your friends and family will be raving about these treats long after they’ve devoured them! let's hit that ingredient list next!
Your Essential Ingredients Guide for Herbed Cream Cheese Crackers
Alright, folks! let’s get into the nitty-gritty of making some bomb herbed cream cheese crackers in no time flat—like 10 minutes fast.
Seriously, we’re talking about snappy, delicious snacks that can elevate your quick meal prep game to a whole new level.
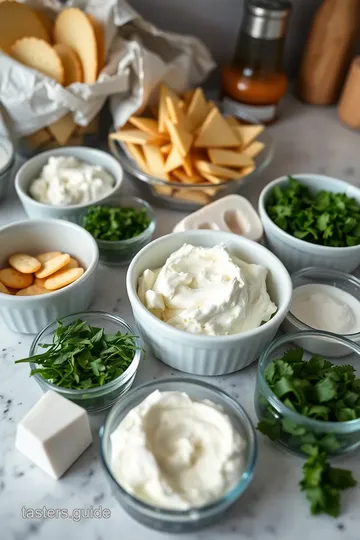
Premium Core Components
To get started, let’s break things down into essentials. You’ll want to pay close attention to what you’re using.
Measurements:
- Flour: 1 cup (125 g) - gives structure.
- Olive oil: 1/4 cup (60 ml) - keeps things moist and flavorful.
- Water: 1/4 cup (60 ml) - the magic liquid to bind everything together.
Quality Indicators: For your flour, make sure it’s fresh. A quick smell test is always good. Olive oil should have that rich, fruity aroma, signaling it's top-notch.
Storage Guidelines: Keep flour in an airtight container away from moisture. Olive oil does best stored in a cool, dark place.
Signature Seasoning Blend
Now, let’s jazz it up!
Essential Spice Combinations: When making your easy snack ideas , you’ll need salt and pepper. Simple, but crucial.
Herb Selections: Try using fresh chives, parsley, or dill for that pop of flavor. I adore dill; it’s got that fresh vibe that screams Mediterranean snack options !
Flavor Enhancers: Don’t sleep on lemon juice. Just a tablespoon makes a world of difference in brightening up that creamy goodness.
Smart Substitutions
We’ve all been there. You decide to whip up a batch of these delightful crackers and realize you’re out of something. Fear not!
Common Alternatives: If you’re missing cream cheese, goat cheese can save the day! It’s tangy and delicious.
Dietary Modifications: Want a gluten-free cracker? Easy peasy—grab a gluten-free flour blend, and you’re good to go!
Seasonal Options: In the spring, use fresh herbs like basil or even mint for a vibrant twist.
Kitchen Equipment Essentials
Now, let’s talk tools!
Must-Have Tools:
- Mixing bowl: grab any trusty bowl you have.
- Rolling pin: if you don’t have one—don’t sweat it! A wine bottle works just as well.
- Baking sheet and spatula: essential for that quick assembly.
Preparation Tips: Always preheat your oven to 400° F ( 200° C) if you want your crackers to be extra crunchy .
Storage Solutions: Store leftover spread in an airtight container in the fridge for about 5 days. It’s a lifesaver for those surprise snack attacks during the week!
The Perfect Quick Cheese Spread
Imagine guests dropping by unexpectedly—your first thought: “What’s a good crowd-pleasing appetizer?” You’ve got it! This herbed cream cheese spread will save the day. It’s effortless but incredibly delicious.
Now, gather your ingredients, mix that cream cheese with herbs, and spread it on your baked or no-bake snacks . the best part? you’ll be serving up a rustic cracker with an herb-infused cheese spread that’ll have everyone asking for the recipe variations .
Wrapping It Up
So, my friend, you’re all set to start assembling your herbed cream cheese crackers in 10 min ! uncomplicated, delightful, and honestly, fun to make.
Whether it’s a chill afternoon snack or a fab appetizer platter suggestion for a casual gathering, these crackers totally deliver.
With your newfound knowledge of this savory cracker recipe , you can elevate that snack board. it’s all about creativity—play with herbs, swap in new cheese… the sky's the limit! get ready to impress your friends and fam, and dive into those flavors.
Next up, let’s dive into the step-by-step instructions to make this fantastic treat. You won’t want to miss it!
Mastering the Art of Professional Cooking: Essential Tips and Techniques
When you think of cooking like a pro, it might seem overwhelming. but trust me, it’s all about having a good game plan.
I mean, who doesn't want to whip up a feast without feeling like they’ve been in a culinary marathon? let’s break down some basic steps that'll have you knocking out dishes in no time, like those herbed cream cheese crackers ready in 10 min .
Seriously, what's better than that for an easy snack idea?
Essential Preparation Steps
First things first, let’s talk mise en place . this fancy french term just means having everything in its place before you start.
Chop those herbs, measure out your cheese, and have all your ingredients waiting for you. trust me, it’ll save you from the oh crap, i forgot to season that! moments.
Now, onto time management . when you’re cooking, think like a quarterback. use a timer! for example, your crackers might only need 5- 6 minutes in the oven at 400° f ( 200° c) .
So, set that timer to avoid burnt snacks—no one wants a surprise charcoal cracker!
Organization strategies are also crucial. Lay out your workspace. Keep utensils and ingredients close. This makes the overall process smoother and lets you flex those cooking muscles like a pro.
And don’t forget about safety . Keep your area clean, and remember, sharp knives are your friends! Always cut away from yourself to avoid any kitchen drama.
Step-by-Step Process
Now, imagine this: you’ve got all your ingredients lined up. Here’s the step-by-step to absolute deliciousness.
-
Get those Crackers Ready: Mix your flour, salt, and pepper. Trust me, enjoy mixing that together. Add olive oil and water and form a dough. You’ll want it smooth, not too sticky.
-
Roll It Out: Divide the dough, roll it thin—about 1/8 inch thick . Keep an eye on it, precise timing is key!
-
Baking time: preheat that oven to 400° f ( 200° c) and send your crackers in for 5- 6 minutes .
Keep an eye, and pull them out when they’re golden brown.
-
Spread Time: For the herbed cream cheese, mix all those herbs with your softened cheese and don’t hold back on flavor! It should be smooth, spreadable, and oh-so-luscious.
-
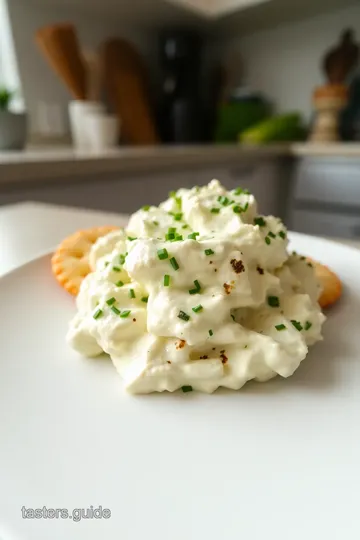
Assemble the Best Snack: Generously spread that magical herb cheese over your perfectly baked crackers. Add a garnish if you feel fancy.
Voilà! You’re left with impressive, crowd-pleasing appetizers that took you no time at all.
Expert Techniques
Here’s where the pros shine. Quality checkpoints are essential. When you’re baking those crackers, look for that golden color. That’s your signal they’re done!
If something goes haywire—like your spread is too thick, just add a splash of lemon juice or milk to loosen it up. Cooking is all about adjusting and experimenting, right?
Success Strategies
Now, let’s talk about common mistakes to avoid . Don’t rush through the prep! Taking a minute to measure and chop correctly makes a world of difference in the final product.
For quality assurance , just taste as you go. If things don’t taste right, adjust before assembly. Once it’s all put together, there’s no backtracking!
As for make-ahead options , that herbed cream cheese can chill in the fridge for up to 5 days . Perfect for last-minute parties or light lunch recipes.
Closing Thoughts
With these tricks under your belt, you've got the power to create weekday magic—or wow at parties with just a few quick bites.
Have fun with it and don’t stress too much! cooking is about enjoying the process and tasting the results.
Next up, we’ll dive into some Additional Information , including variations and substitutions that keep things fresh and exciting. Let’s keep that creativity flowing and your taste buds happy!

Pro Tips & Secrets for the Perfect Spread Soft Cheese Herb Crackers in 10 Min
Oh my gosh, i can’t tell you how many times i’ve taken these herbed cream cheese crackers to parties, and they’re always a hit! want to know the secret? it’s all about the loving little extras.
Here’s what i’ve learned on my culinary journey that’ll have you whipping up this easy snack idea in no time.
Chef's personal insights:
don’t skimp on the fresh herbs ! they make a massive difference in flavor. trust me on this one.
You can use whatever you have on hand—chives, parsley, or dill works wonders. mix 'em up for an explosion of taste.
Time-saving techniques:
if you’re in a hurry, you could skip the baking process for the crackers. just roll out the dough into thin shapes and pan-fry them.
They’ll still be delicious! great if you’re in a pinch for time or want to whip these up as 10-minute appetizers for surprise guests.
Flavor Enhancement Tips:
For an extra kick, add crushed garlic or a splash of lemon juice to your cheese spread. It gives a zingy freshness that cuts through the richness.
Presentation advice:
let’s be real. we eat with our eyes first! arrange your crackers on a rustic wooden board and add a splash of color with cherry tomatoes or bell pepper slices.
A sprinkle of pink salt on top is like adding a cherry on top of a sundae!
Perfect Presentation
Okay, so we got the flavor down, now onto making it look damn good ! when it comes to plating techniques , try to arrange the crackers in a circular fashion, with the spread in the middle like a fountain of flavor.
Garnish ideas:
slice some additional herbs and sprinkle them over the top. you could even drizzle a little olive oil for that fancy restaurant vibe at home.
Just grab a small spoon, drizzle, and feel like a kitchen pro!
Color combinations and visual appeal tips:
remember, vibrant colors make everything pop! pair your crackers with colorful dips. think beet hummus or vibrant olive tapenade.
Your snack board will not only taste fantastic but look like a piece of art.
Storage & Make-Ahead Magic
Here’s where it gets practical. If you want to make these ahead (because who doesn’t love a little meal prep?), follow these storage guidelines .
Preservation Methods:
Keep the crackers in an airtight container at room temp for up to three days. But let’s be honest, they usually don’t last that long once you serve them.
Reheating instructions:
if your crackers lose a bit of crunch, just pop them back in a preheated oven at 350° f for 3– 5 minutes .
They’ll crisp up fresh as a daisy!
Freshness Duration:
The cheese spread is good in the fridge for about five days . Just store it in an airtight container. Smell test before using—your nose knows!
Creative Variations to Try
Now, let’s switch things up a bit! There’s nothing wrong with being a little experimental in the kitchen. Here are some creative options :
Flavor Adaptations:
How about a spicy herb cheese spread ? Just throw in some red pepper flakes.
Dietary Modifications:
For those gluten-free friends, swap out all-purpose flour for a gluten-free blend. You gotta keep everyone happy!
Seasonal Twists:
In fall, add crushed pumpkin seeds on top for a crunch that’ll scream autumn!
Regional Variations:
Feeling Mediterranean? Toss in some sun-dried tomatoes and basil in the spread. Works like a charm!
Complete Nutrition Guide
What’s a recipe without a bit of nutritional insight? Here’s the lowdown on the health benefits of your snack:
- Calories: 200
- Protein: 4g
- Fat: 12g
- Carbs: 20g
You really can’t go wrong with these nutritious snack options . make a big batch, and not only do you have a quick meal prep option, but they’re perfect for grazing boards at parties.
Conclusion: Get Cooking!
So there you have it, the ultimate guide for making spread soft cheese herb crackers in 10 min . the flavors, the presentation, the creativeness—this recipe has it all! trust me, once you dive into these herbed cream cheese goodies, there’s no going back.
Now, roll up those sleeves and have fun in the kitchen. you got this! happy snacking!
Frequently Asked Questions
How can I make Spread Soft Cheese Herb Crackers in 10 Min if I'm short on time?
If you're short on time, consider skipping the optional baking step for the crackers. Instead, you can enjoy them in their raw form, which will still provide a delicious crunch when topped with the herbed cream cheese spread. This allows you to prepare an impressive snack in under 10 minutes!
What are some good variations for the herbs in the cream cheese spread?
You can easily customize the Spread Soft Cheese Herb Crackers by experimenting with different herbs. Try using fresh basil, cilantro, or mint instead of the typical chives or parsley. For a Mediterranean twist, sun-dried tomatoes and basil can be great additions.
Can I store leftover cream cheese spread, and if so, how?
Yes, you can store any leftover cream cheese spread in an airtight container in the refrigerator for up to 5 days. If the spread thickens too much, simply add a splash of milk or lemon juice to adjust the consistency before serving.
Are there any nutritional considerations I should be aware of when making these crackers?
Each serving of the Spread Soft Cheese Herb Crackers contains an estimated 200 calories and 12 grams of fat. If you're looking for a lighter option, consider using reduced-fat cream cheese or substituting some of the oil in the cracker recipe with apple sauce to cut down on fat.
Can I make these crackers gluten-free?
Absolutely! To make gluten-free Spread Soft Cheese Herb Crackers, substitute all-purpose flour with a gluten-free flour blend. Just ensure that your flour choice can handle the same measurements as the original recipe for the best results.
What should I serve with Spread Soft Cheese Herb Crackers?
These crackers pair wonderfully with a variety of sides. Consider serving them with a refreshing cucumber salad, sliced vegetables, or olives for a colorful platter. They're also great with a light white wine or sparkling water to enhance the flavors!
Herbed Cream Cheese Crackers: Ready in 10 Minutes! Card

⚖️ Ingredients:
- 1 cup all-purpose flour (125 g)
- 1/2 teaspoon salt (2 g)
- 1/4 teaspoon black pepper (1 g)
- 1/4 cup olive oil (60 ml)
- 1/4 cup water (60 ml)
- 8 oz cream cheese, softened (226 g)
- 1/4 cup fresh herbs, finely chopped (15 g)
- 1 tablespoon lemon juice (15 ml)
- Salt and pepper to taste
🥄 Instructions:
- Step 1: In a mixing bowl, combine flour, salt, and pepper.
- Step 2: Add olive oil and water, and mix until a dough forms.
- Step 3: Divide the dough into two equal pieces and roll each piece into a thin sheet (about 1/8 inch thick) on a floured surface.
- Step 4: Cut into desired cracker shapes and place them on a baking sheet lined with parchment paper.
- Step 5: Preheat the oven to 400°F (200°C).
- Step 6: Bake for 5-6 minutes, or until the edges are golden brown. (Optional step if you prefer crispy crackers.)
- Step 7: In a clean mixing bowl, combine softened cream cheese, chopped herbs, lemon juice, salt, and pepper.
- Step 8: Mix until well combined and smooth.
- Step 9: Spread a generous layer of the herb cream cheese on each cracker.
- Step 10: Garnish with extra herbs or a sprinkle of black pepper if desired.
- Step 11: Serve immediately or enjoy at room temperature.
Previous Recipe: Easy & Moist Bake Swedish Walnut Color Cake in 50 Minutes: Perfect for Any Occasion
Next Recipe: My Zesty Grilled Chicken Refreshing Salad in 25 Min: A Family Favorite!